overview
This is a setting example for connecting to the FP series via RS-232C.
Model used
item |
Model etc. |
PLC |
FP-10SH |
Communication Unit |
CPU Built-in port |
Configuration environment
item |
environment |
OS |
Windows7 Professional 64Bit |
Configuration details
item |
setting |
Setting items |
Configuration Example |
PLC side settings |
Set with tools |
Transmission speed |
19200bps |
Bit Size |
7bits |
||
Parity Check |
Even |
||
Stop bits |
1bits |
||
PC settings |
Unit Settings |
COMPort |
Communication port number to connect to |
Transmission speed |
19200bps |
||
Byte Size |
7bits |
||
Stop bits |
1bits |
||
parity |
Even |
||
Folder and communication test settings |
Destination |
01 |
* Most of the settings on the computer will be adjusted to match the settings on the unit.
PLC side settings
Set up the "FP-10SH". Settings are made using the switch on the side.
1.Set the side switch as follows:
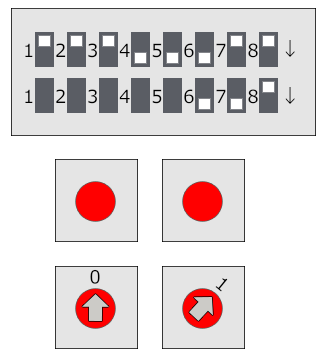
switch |
explanation |
Setting contents |
Unit No. (.COM tens digit) |
0 |
0 |
Unit No. (.COM ones digit) |
1 |
1 |
SW1 BIT1 |
Modem Control *The setting on the right is "Do not control" |
OFF |
SW1 BIT2 |
Start Code ※The setting on the right is "STX (02ch) Disabled" |
OFF |
SW1 BIT3 |
Termination Code ※The setting on the right is "CR (0Dh) code" |
OFF |
SW1 BIT4 |
ON |
|
SW1 BIT5 |
Stop bit length ※The setting on the right is "1bit" |
ON |
SW1 BIT6 |
Parity Check ※The setting on the right is "Even" |
ON |
SW1 BIT7 |
OFF |
|
SW1 BIT8 |
Data Length ※The setting on the right is "7bit" |
OFF |
SW2 BIT6 |
Transmission speed *The setting on the right is "19200bps" |
ON |
SW2 BIT7 |
ON |
|
SW2 BIT8 |
OFF |
|
Unit No. (TOOL) and BIT1 to 5 of SW2 are used for setting up tool connections, etc., so no settings are required for connecting to our Server application. |
|
"STX Invalid" and "Terminal Code CR" are fixed. |
PC settings
Use the Server application to connect to the PLC for which you have set up communications.
1.Right-click "Application" - "Driver" in the tree and select Add Driver.
2.Select the following units from the displayed driver list and add them:

3.Open the properties of the added unit (U01) and click Communication Settings.
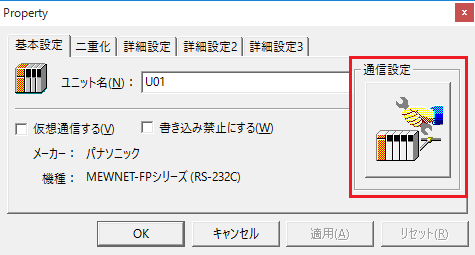
4.Set "Communication Settings" as follows:
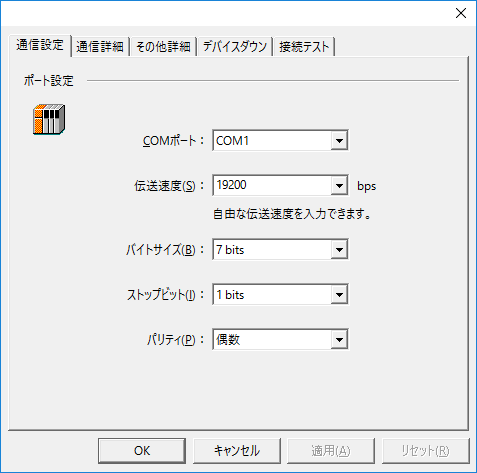
setting |
Setting contents |
COMPort |
Communication port number to connect to |
Transmission speed |
19200 |
Byte Size |
7bits |
Stop bits |
1bits |
parity |
Even number |
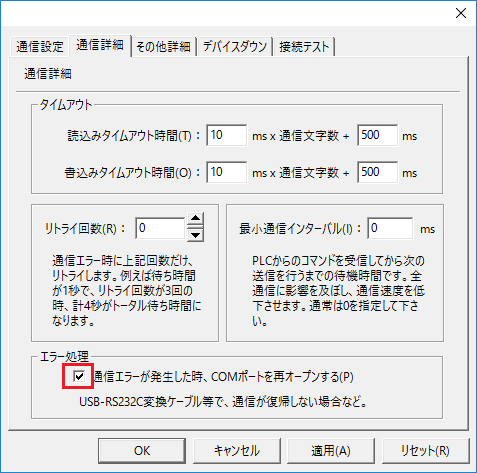
5.USB-RS-If you are using a 232C conversion cable, the COM port may be locked in the event of a communication error, so check the reopen setting.
6.Perform a connection test to check the connection
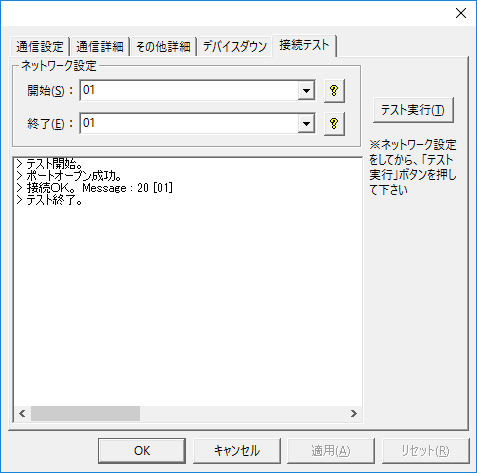
If a message such as "Connection OK" is displayed, the connection is confirmed to be OK.