Alternate Switch
|
The alternate switch is a component that switches the tag between ON and OFF.
|
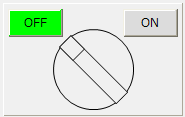
Specify the tags to be displayed in the input tag (_TagIn) and input tag 2 (_TagIn2). If only one point is input, you can specify the tag path in _TagIn only. If two points are input, you can specify the tag path in _TagIn and _TagIn2.
Specify the output tag in output tag (_TagOut) and output tag 2 (_TagOut2). If you are only outputting one item, you can specify the tag path in _TagOut only. If you are outputting two items, you can specify the tag path in _TagOut and _TagOut2.
In addition to the input tag, by specifying a tag for fault identification in the fault identification tag (_TagFault), it is also possible to display a fault based on signals such as equipment abnormalities received from downstream.
Custom Properties
Tag configuration |
Input Tags |
_TagIn |
Specify the tag path of the input tag. |
Input Tag 2 |
_TagIn2 |
Specifies the tag path of input tag 2. Used only for two-point input. |
|
Output Tags |
_TagOut |
Specifies the tag path of the output tag. |
|
Output Tag 2 |
_TagOut2 |
Specifies the tag path of output tag 2. Used only for two-point output. |
|
Fault Identification Tag |
_TagFault |
Specifies the tag path of the fault identification tag. |
|
Value/Switch Setting |
ON value |
_RaiseValue |
Set the value that is considered to be ON. True is set by default (same as "1"). You can also set a value other than True according to the meaning of ON/OFF of the target signal. The value of this property will also be used for the ON value written to the tag by switch operation. |
OFF value |
_LowerValue |
Set the value to be considered as OFF. False is set by default (equals "0"). You can also set a value other than False according to the meaning of ON/OFF of the target signal. The value of this property will also be used for the OFF value written to the tag by switch operation. |
|
Detection Latency |
_DiscrepancyTimeout |
In the case of two-point input, if the input values of _TagIn and _TagIn2 remain in an inconsistent state for the period of time (milliseconds) specified here, the value will be displayed in the abnormal color (_AbnormalColor) (an inconsistent state would be, for example, if both _TagIn and _TagIn2 are True). |
|
Display settings |
caption |
_Caption |
Specify a caption. |
ON Label |
_Label2 |
Specify the ON label. |
|
OFF Label |
_Label |
Specify the OFF label. |
|
ON angle |
_LampOnAngle |
Specifies the angle of the twist switch in the ON state (twist switch type only). |
|
OFF angle |
_LampOffAngle |
Specifies the angle of the twist switch in the OFF state (twist switch type only). |
|
Display color settings |
Lamp paint color |
_LampFillColor |
Specifies the initial display color of the lamp. |
ON color |
_LampOnColor |
Specifies the ON display color of the lamp. |
|
OFF color |
_LampOffColor |
Specifies the OFF display color of the lamp. |
|
Abnormal color |
_LampAbnormalColor |
Specifies the display color when an abnormal value is detected. This will be the display color when an abnormal value is detected in the input value (inconsistent input value). |
|
NULL color |
_LampNullColor |
Specifies the NULL display color. The NULL color is the lamp display color while the input tag value cannot be obtained (for example, immediately after the screen is displayed) or when a fault occurs. |
|
Caption Color |
_CaptionColor |
Specifies the color of the caption. |
|
Label Color |
_LabelColor |
Specifies the text color of the label (ON/OFF). For parts with labels placed on lamps, setting @AutoColor will display the text color that is optimal for the fill color. For button types, button 1 text color (_Btn1TextColor) and button 2 text color (_Btn2TextColor) are also provided. |
|
Background Panel |
_BackPanelColor |
Specifies the color of the background panel. |
|
Selector 1 |
_SelColor |
Specifies the color of the selector. |
|
Selector 2 |
_SelColor2 |
Specifies the color of the selector. |
|
Input assistance settings |
Confirmation screen display |
_IsConfirm |
If enabled, a confirmation dialog will be displayed when performing an operation. |
Confirmation message |
_ConfirmMsg |
Specify the confirmation message to be displayed on the confirmation screen. |
|
Error Message |
_ErrorMsg |
Specifies the error message to be sent when a write error occurs. |
|
Operation history output |
_Log |
If enabled, the operation history will be output when a value is written. If you want to output the operation history in a standard project that uses the standard framework, enable the operation history setting from the system administration settings screen. For details, see "Operation History Settings". If you want to output the operation history in an original project that does not use the standard framework, define Alarm server to record the operation history and set the root DefaultFireAlarm property appropriately. |
|
Operation Message |
_LogMsg |
Specify the message to be output to the operation history. |
Output Value
The specifications for each output value are as follows:
When operating the selector |
One output |
•When the switch is pressed, the inverted value of the input tag is written. When the input tag is ON, _LowerValue is written to _TagOut, and when the input tag is OFF, _RaiseValue is written to _TagOut. |
2-point output |
•When the switch is pressed, the inverted value of the input tag is written. When the input tag is ON, _LowerValue is written to _TagOut and _RaiseValue is written to _TagOut2. When the input tag is OFF, _RaiseValue is written to _TagOut and _LowerValue is written to _TagOut2. |
|
When the ON/OFF button is operated |
One output |
•When Button 2 (ON button) is pressed, _RalseValue is written to _TagOut. •When Button 1 (OFF button) is pressed, _LowerValue is written to _TagOut. |
2-point output |
•When Button 2 (ON button) is pressed, _RaiseValue is written to _TagOut and _LowerValue is written to _TagOut2. •When Button 1 (OFF button) is pressed, _LowerValue is written to _TagOut and _RaiseValue is written to _TagOut2. |
Usage Example
1) 1 point input/1 point output
The ON/OFF state is identified by only one tag. When the value of the input tag (_TagIn) is the ON value (_RaiseValue), the lamp displays the state as ON, and when the value of the input tag (_TagIn) is the OFF value (_LowerValue), the lamp displays the state as OFF.
_TagIn: Specify the tag path of the input tag
_TagIn2: Unused
_TagOut: Specify the tag path of the output tag.
_TagOut2: Unused
_TagFault...optional
|
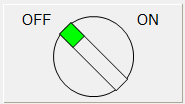
When you click the selector (the circle in the center), the inverted ON value/OFF value of the input tag will be written to the output tag. |
|
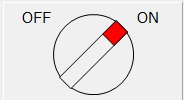
An ON value was written to the output tag. As the selector angle changes to the ON direction, the lamp display turns ON color. |
|
For button types, you can operate the selector by clicking the ON button or the OFF button.
|
|
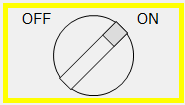
When the quality flag of the input tag is BAD or the fault identification tag is True, a fault is displayed. When a fault is displayed, a yellow frame will be displayed and flashing, and switch operation will be disabled.
|
|
If the same tag is used for both input and output, specify the same tag path for the input tag and output tag. |

|
By setting the "FocusHover" property of the form to which the component is attached to True, a focus frame will be displayed when you move the mouse cursor over the component you want to operate. |
2) 2-point input/2-point output
The ON/OFF state is identified by two tags. When the value of the input tag is the ON value (_RaiseValue) and the value of input tag 2 is the OFF value (_LowerValue), the lamp displays "ON." When the value of the input tag is the OFF value (_LowerValue) and the value of input tag 2 is the ON value (_RaiseValue), the lamp displays "OFF."
_TagIn: Specify the tag path of the input tag
_TagIn2: Specify the tag path of input tag 2
_TagOut: Specify the tag path of the output tag.
_TagOut2: Specify the tag path of output tag 2
_TagFault...optional
|
When you click the selector (the circle in the center), the inverted ON value/OFF value of the input tag will be written to the output tag and output tag 2.
|
|
An ON value was written to output tag and an OFF value was written to output tag 2. As the selector angle changes to the ON direction, the lamp display turns ON color. |
|
If you click it again, the OFF value is written to the output tag and the ON value is written to output tag 2, and the lamp display turns OFF.
|
|
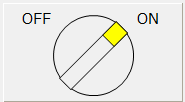
If the value of the Input Tag and Input Tag 2 remain inconsistent for the detection wait time (for example, when both Input Tag and Input Tag 2 are False), the lamp display will turn to the abnormality color (the fill will flash yellow by default). |
For button types, in addition to clicking the selector, you can also use the ON and OFF buttons to perform the same operations.
Other than that, the operation in the event of a fault is the same as for single input.
|
In the case of one-point input, if the value of the input tag is different from either the ON value or the OFF value, the lamp display will change to the abnormal display color. In this case, the detection wait time is not applied and the display color will change immediately. |
3) Confirmation screen display
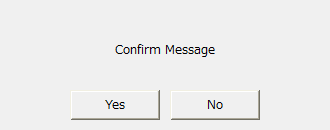
If you enable the confirmation screen display (_IsConfirm), a confirmation dialog (Yes/No) will be displayed when you perform a write operation.
|
If Yes is selected in the dialog, the value will be written to the tag.
|