Select Switch
|
The select switch is a component that writes the selected value (numeric value) by pressing a button to a tag.
|
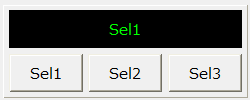
Specify the tag to be input as the input tag (_TagIn) and the tag to be output as the output tag (_TagOut). The value of the input tag will be the initial display, and thereafter the display will be dynamically updated whenever the value changes.
It is possible to specify the combination of the input tag value and the status display string that corresponds to the input value in the property. The input value does not necessarily have to be a sequential number, and can be set to any value.
In addition to the input tag, by specifying a tag for fault identification in the fault identification tag (_TagFault), it is also possible to display a fault based on signals such as equipment abnormalities received from downstream.
Custom Properties
Tag configuration |
Input Tags |
_TagIn |
Specify the tag path of the input tag. |
Output Tags |
_TagOut |
Specifies the tag path of the output tag. |
|
Fault Identification Tag |
_TagFault |
Specifies the tag path of the fault identification tag. |
|
Display settings |
caption |
_Caption |
Specify a caption. |
Confirm button |
_LabelSet |
Specifies the label for the confirm button. |
|
ON color |
_LampOnColor |
Specifies the ON display color of the lamp. Used for parts that display the currently selected value as a button lamp. |
|
NULL color |
_LampNullColor |
Specifies the NULL display color of the lamp. The NULL color is the lamp display color when no value has been obtained from the input tag (for example, immediately after the screen is displayed) or when a fault occurs. |
|
Paint color |
_StatusFillColor |
Specifies the fill color for the status display (only for parts with a status display frame). |
|
Lamp text color |
_StatusTextColor |
Specifies the text color of the status display (only for parts with a status display frame). |
|
Button selection color |
_BtnSelColor |
When the screen is displayed in a flat theme, specify the color of the button when it is selected. For parts with a Confirm button, it shows the selected state before confirmation (in the case of a 3D theme, it is shown by the bumps of the button, not the color of this property). |
|
Caption Color |
_CaptionColor |
Specifies the color of the caption. |
|
Button 1 text color |
_Btn1TextColor |
Specify the label color for Button 1. By specifying @AutoColor, the text color will be displayed in the most appropriate color for the fill color (only for parts where the button is a lamp display). |
|
Button 2 text color |
_Btn2TextColor |
Specify the label color for Button 2. By specifying @AutoColor, the text color will be displayed in the most appropriate color for the fill color (only for parts where the button is a lamp display). |
|
Button 3 text color |
_Btn3TextColor |
Specify the label color for Button 3. By specifying @AutoColor, the text color will be displayed in the most appropriate color for the fill color (only for parts where the button is a lamp display). |
|
Button 4 text color |
_Btn4TextColor |
Specify the label color for Button 4. By specifying @AutoColor, the text color will be displayed in the most appropriate color for the fill color (only for parts where the button is a lamp display). |
|
Button 5 text color |
_Btn5TextColor |
Specify the label color for button 5. By specifying @AutoColor, the text color will be displayed in the most appropriate color for the fill color (only for buttons that display as lamps). |
|
Background Panel |
_BackPanelColor |
Specifies the color of the background panel. |
|
Selector 1 |
_SelColor |
Specifies the color of the selector (selector type only). |
|
Selector 2 |
_SelColor2 |
Specifies the color of the selector (selector type only). |
|
Value Settings |
Tag Value 1 |
_SelectValue |
Specify the input tag value 1. It does not necessarily have to be a numeric sequence number, you can also specify a string. |
Tag Value 2 |
_SelectValue2 |
Specifies input tag value 2 (same as above). |
|
Tag Value 3 |
_SelectValue3 |
Specify input tag value 3 (same as above). |
|
Tag Value 4 |
_SelectValue4 |
Specify input tag value 4 (same as above). |
|
Tag Value 5 |
_SelectValue5 |
Specify input tag value 5 (same as above). |
|
Display character 1 |
_Label |
Specifies the display string corresponding to tag value 1. |
|
Display character 2 |
_Label2 |
Specifies the display string corresponding to tag value 2. |
|
Display character 3 |
_Label3 |
Specifies the display string corresponding to tag value 3. |
|
Display character 4 |
_Label4 |
Specifies the display string corresponding to tag value 4. |
|
Display character 5 |
_Label5 |
Specifies the display string corresponding to tag value 5. |
|
Input assistance settings |
Confirmation screen display |
_IsConfirm |
If enabled, a confirmation dialog will be displayed when performing an operation. |
Confirmation message |
_ConfirmMsg |
Specify the confirmation message to be displayed on the confirmation screen. |
|
Error Message |
_ErrorMsg |
Specifies the error message to be sent when a write error occurs. |
|
Operation history output |
_Log |
If enabled, the operation history will be output when a value is written. If you want to output the operation history in a standard project that uses the standard framework, enable the operation history setting from the system administration settings screen. For details, see "Operation History Settings". If you want to output the operation history in an original project that does not use the standard framework, define Alarm server to record the operation history and set the root DefaultFireAlarm property appropriately. |
|
Operation Message |
_LogMsg |
Specify the message to be output to the operation history. |
Usage Example
1) Status display frame/No confirmation button
This is an example of a part with a status display frame but no Confirm button. Because there is no Confirm button, the selected value is written to a tag by selecting it with the button.
_TagIn: Specify the tag path of the input tag
_TagOut: Specify the tag path of the output tag.
_TagFault...optional
|
The current selection is displayed in the status pane. Clicking a selection button writes the value corresponding to the button to an output tag. Here, try clicking the "Sel2" button. |
|
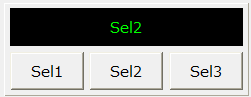
The value of Sel2 is written to the output tag and the status display frame changes to Sel2.
|
|
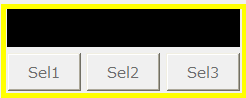
When the quality flag of the input tag is BAD or the fault identification tag is True, a fault is displayed. When a fault is displayed, a yellow frame will be displayed and blinking, and switch operation will be disabled.
|
|
If the same tag is used for both input and output, specify the same tag path for the input tag and output tag. |

|
By setting the "FocusHover" property of the form to which the component is attached to True, a focus frame will be displayed when you move the mouse cursor over the component to be operated. |
2) Status display frame/Confirm button
This is an example of a part with a status display frame and a Confirm button. After selecting with the Select button, the selected value is written to a tag by pressing the Confirm button.
_TagIn: Specify the tag path of the input tag
_TagOut: Specify the tag path of the output tag.
_TagFault...optional
|
The current selection is displayed in the status pane. Clicking a selection button writes the value corresponding to the button to an output tag. Here, try clicking the "Sel2" button. |
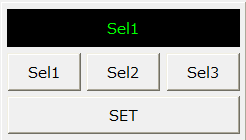
|
The "Sel2" button is now selected. At this stage, we are not yet writing to the output tag. Click the Confirm button. |
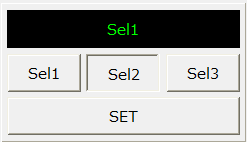
|
The value of Sel2 is written to the output tag and the status display frame changes to Sel2.
|
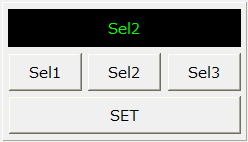
The behavior in case of a fault is the same as in example 1.
3) No status display frame/No confirmation button
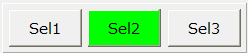
This is an example of a part that has no status display frame and no Confirm button. Because there is no Confirm button, the selected value is written to a tag by selecting it with the button.
_TagIn: Specify the tag path of the input tag
_TagOut: Specify the tag path of the output tag.
_TagFault...optional
|
The currently selected value is indicated by a lamp on the button. Clicking a selection button writes the value corresponding to the button to an output tag. Here, try clicking the "Sel2" button. |
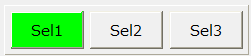
|
The value of Sel2 is written to the output tag, and the lamp display changes to the Sel2 button.
|
The behavior in case of a fault is the same as in example 1.
4) No status display frame/Confirm button
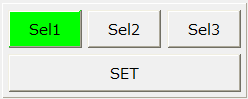
This is an example of a part with a Confirm button without a status display frame. After selecting with the Select button, the selected value is written to a tag by pressing the Confirm button.
_TagIn: Specify the tag path of the input tag
_TagOut: Specify the tag path of the output tag.
_TagFault...optional
|
The currently selected value is indicated by a lamp on the button. Clicking a selection button writes the value corresponding to the button to an output tag. Here, try clicking the "Sel2" button. |
|
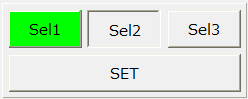
The "Sel2" button is now selected. At this stage, we are not yet writing to the output tag. Click the Confirm button. |
|
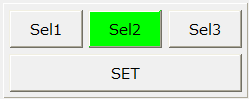
The value of Sel2 is written to the output tag, and the lamp display changes to the Sel2 button. |
The behavior in case of a fault is the same as in example 1.
5) Confirmation screen display
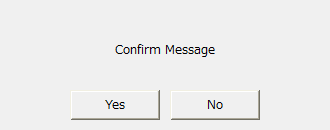
If you enable the confirmation screen display (_IsConfirm), a confirmation dialog (Yes/No) will be displayed when you perform a write operation.
|
If Yes is selected in the dialog, the value will be written to the tag.
|