overview
When displaying log data on a trend graph, you may want to display the results of calculations between different tags on the graph.
For example, you may want to display the average of multiple measurement tags on a graph.
There are several ways to achieve this need:
method |
Contents |
Specify an arithmetic expression for the pen settings
|
When specifying the data source in the pen settings, you can specify an arithmetic expression. The arithmetic expression allows you to specify multiple data sources, and the calculation results can be displayed on the graph.
This method can be done using only pen settings, so the advantage is that you can freely edit the calculation formula during operation.
However, this method only performs dynamic calculations when the graph is displayed, so the calculated values are not included in the actual log data. This is not suitable for cases where the data needs to contain calculated values, such as when you want to use log data directly.
|
Include the results of operations between tags in the log
|
This method involves performing calculations between tags just before logging using a summary action, and then saving the calculation results in the log data.
Each action has a function called "Script execution" that allows you to perform calculations between tags just before logging. Therefore, by preparing a tag to store the results of the script calculations and including that tag in the field master, you can save the results of the calculations in the log data.
The disadvantage of this method is that the calculation formula cannot be changed during operation, because the FA-Server must be taken offline to change the calculation formula.
|
This section describes each of the above methods.
Download the sample
The creation examples shown on this page are provided with samples.
The sample can be downloaded from below.
Specifying an arithmetic expression in the pen settings
This section explains how to specify an arithmetic expression in the pen settings.
This method is pen settings only and does not require any customization to the application.
Click on Online (yellow arrow) at the top of the FA-Server screen.
After running FA-Server online, please start FA-Client.
Once FA-Client is started, display the trend graph screen.
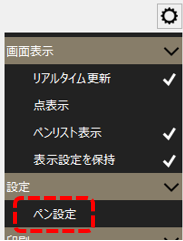
Display the menu on the trend graph screen and select "Pen Settings."
In the pen settings dialog, click the "Add" button in the pen list to add a new pen.
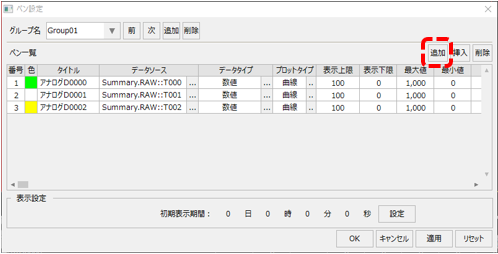
Once the pen has been added, click on the Select Data Source button.
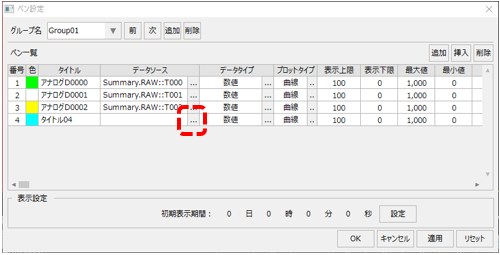
The data source selection dialog appears.
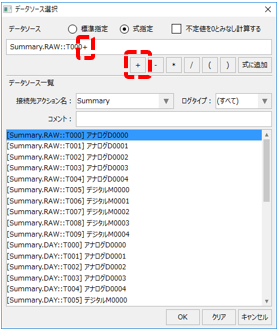
As an example, we will display the result of adding T000 and T001, which are already registered in the pen, on a graph.
|
First, select "Specify Expression" in the data source options.
If you select this option, you will be able to define an expression.
|

|
Next, click the T000 (Analog D0000) row in the data source list.
The data source will then display "Summary.RAW:T000".
|

|
Next, click the "+" button at the bottom of the data source.
The "+" operator was then added to the end of the data source "Summary.RAW::T000".
Summary.RAW::T000 +
You can also enter operators directly from the keyboard.
|
|
Next, click the row for T001 (Analog D0001) in the data source list, and then click the "Add to Expression" button at the bottom of the data source.
The T001 format will then be added to the data source, looking like this:
Summary.RAW::T000 + Summary.RAW::T001
You can freely write any formula in the data source. For example, if you want to calculate the average of two data sources, you can write it as follows.
(Summary.RAW::T000 + Summary.RAW::T001) / 2
|

Once you have completed the settings, click the OK button to close the data source selection dialog.
Make sure that the settings are displayed in the data source, then close the pen settings dialog box by clicking the OK button.
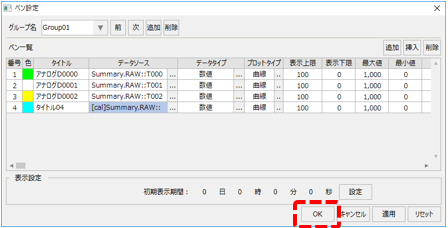
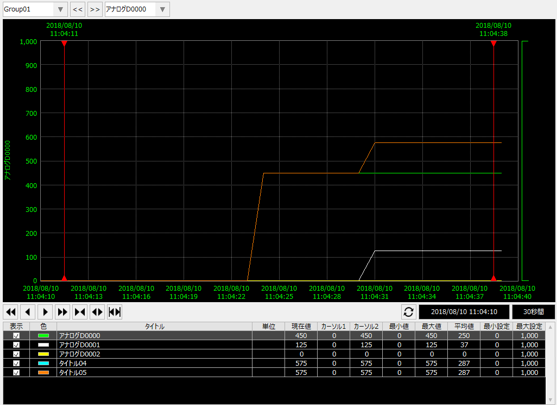
The pen we just added (Title04) is displayed on the trend graph.
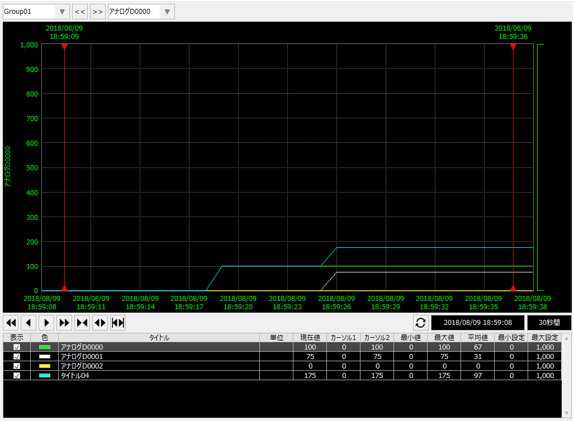
Try changing the values of the tags registered in T000 and T001 from FA-Server (in this example, U01.F01.D0000 and D0001).
It's OK if the value obtained by adding D0000 and D0001 is displayed for the pen you just registered (Title 04).
Include the results of tag-to-tag operations in the log
Next, we will explain how to include the calculation results in the log.
In the customization example introduced here, a pre-action script is used to temporarily store the results of calculations between tags in a working tag, and then the working tag is included in the log and recorded.
■ Add working tags
1.Opening the Server Configuration File
From FA-Server, open the target project's “server.txt” (server settings file).
2.Add a memory device tag
First, prepare a working tag to store the calculation results of the action script. If you want to use a tag as a temporary working area like this time, a "virtual device" or "memory device" that does not communicate with PLC is suitable.
This time we will use "Memory Device" as an example.
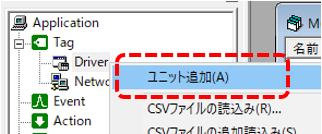
In the tree selection view, right-click on "Tag" > "Driver" to display the menu, and select "Add Unit" from the menu that appears.
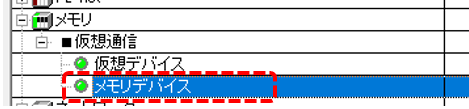
The driver list screen will then be displayed. In this example, we will add "Memory Device" as the working tag.
Select "Memory Device" from the driver list tree and click the OK button.
The "U02" unit will then be added under Tag/Driver.
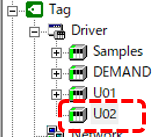
You can change the unit name "U02", but in this example we will keep it as it is.
Next, add a folder under the U02 unit. In this example, we will create a folder called "F01".
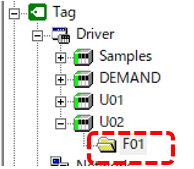
Please register one numeric tag, "T01", under the U02.F01 folder.
T01...Register as a numeric tag
■Editing tag field master
Edit the tag field master and add the working tag you just added to the definition.
This setting ensures that the working tag is included in the logging.
1.Editing a Tag Field Master
The tag field master is stored in:
(Project folder) \server\summary\fieldmaster_tag.csv
Open the tag field master in Excel.
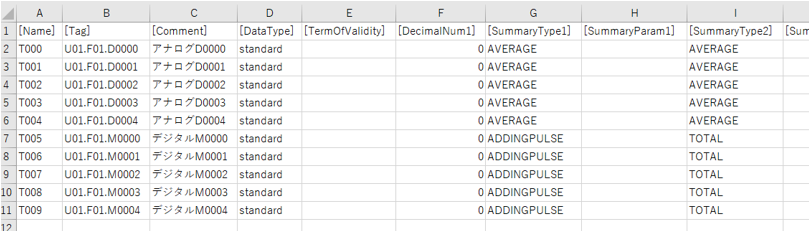
In the above example, fields T000 through T009 are defined.
Therefore, add the following line to the end of the line, T010.

field |
Configuration Example |
[Name] |
T010 |
[Tag] |
U02.F01.T01 *Specify the tag path for working. |
[Comment] |
Specify any comment. In this example, we will enter "Tag operation". |
[DataType] |
Standard |
[TermOfValidity] |
Blank |
[DecimalNum1] |
Specify the number of decimal places. Here, we will set it to "0" as an example. |
[SummaryType1] |
AVERAGE |
[SummaryParam1] |
Blank |
[SummaryType2] |
AVERAGE |
[SummaryParam2] |
Blank |
[ReportHeader1] |
Ibid. |
[ReportHeader2] |
Ibid. |
[ReportHeader3] |
Ibid. |
[ReportHeader4] |
Ibid. |
When you have finished editing, save the tag field master.
■ Setting a pre-action script
1.Configure a pre-action script
Display the properties of the summary action "Summary".
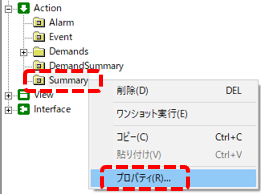
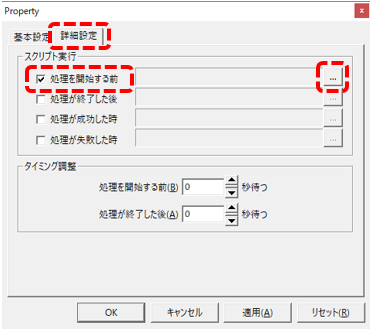
Open the "Advanced Settings" tab in the summary action properties.
|
Click the Advanced tab and check "Before processing begins" under Script execution.
The Select button to the right of the check box will then be enabled, so click it.
|
This will display the following script editor:
|
In the editing area, enter the following:
U02.F01.T01 = U01.F01.D0000 + U01.F01.D0001
The above adds U01.F01.D0000 and D0001 and assigns the result to U02.F01.T01.
*U02.F01.T01 is the working tag that was added earlier.
|

Once you have written the process, click the OK button to close the dialog.
■ Operation check
Run FA-Server online and run FA-Client to display the trend graph screen.
From the pen settings, add the T010 that you just added.
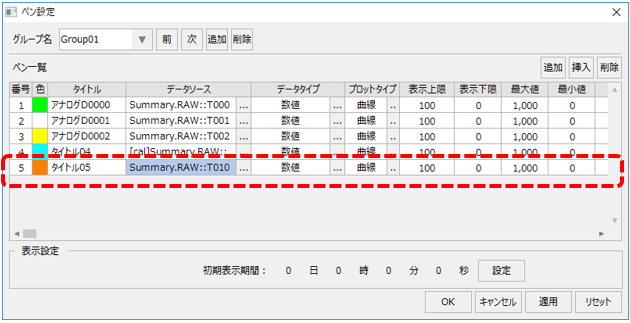
Then, the value obtained by adding D0000 and D0001 will be displayed on the graph for the pen added above (Title 05).