overview
Summary (ODBC) action allows you to save log data to a database via ODBC.
Here, we will make the following customizations to the standard summary function.
Customization details
•Prepare a database.
•Configure the ODBC driver.
•Add a Summary (ODBC) action and configure it.
As an example, we will introduce a database configuration example using SQLServer2017.
|
The latest information on supported database types, versions, etc. can also be found in the FAQ on our website, "What database products are supported?". |
Download the sample
The creation examples shown on this page are provided with samples.
The sample can be downloaded from below.
Procedure
■Preparing a database for summary data
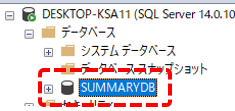
First, prepare a database to store summary data. You can name the database freely, but for this example we will assume that a database named "SUMMARYDB" has been created.
Below is an example displayed in Object Explorer for SQLServer Management Studio.
Summary (ODBC) actions do not necessarily require a dedicated database. There is no problem if the connected database contains tables other than the tables that store the logging and aggregated data of summary actions.
■Preparing a table for summary data
Summary (ODBC) actions are designed so that the various tables required for storing data are automatically generated the first time you run the action online. Therefore, you do not need to create the tables manually.
■ Summary (ODBC) Action Settings
Next, add a summary (ODBC) action to FA-Server and configure it to connect to the database. As an example, we will introduce the settings for connecting to the SQL Server 2017 database in a Windows 10 environment.
In addition, in the server configuration file of the client connection sample, a summary (CSV) action named "Summary" that is included by default in the standard framework is registered, and this action is configured to be called periodically from the regular event "Log" that is set in the event Summary folder.
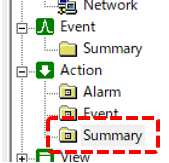
Therefore, in the procedure introduced here, we will delete the originally registered "Summary" action and add a new summary (ODBC) action named "Summary", while leaving other events and client-side settings unchanged.
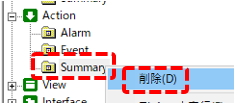
1.Delete the "Summary" action
In the left tree of FA-Server, right-click Summary of Action and select "Delete" from the menu.
A confirmation screen will appear, so select "Yes".
Below is the state after removing the action "Summary".
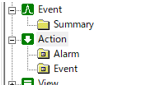
2.Add a Summary (ODBC) action
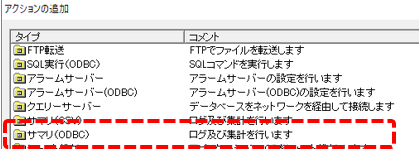
Right-click Action in the left tree of FA-Server and select Add > Action.
The Add Action screen will appear, so select "Summary (ODBC)" and click OK.
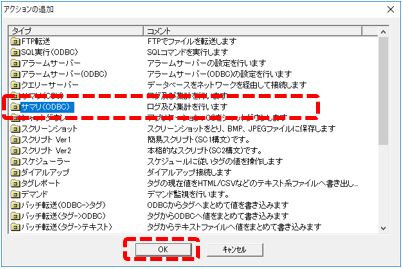
Action "A01" has been added.

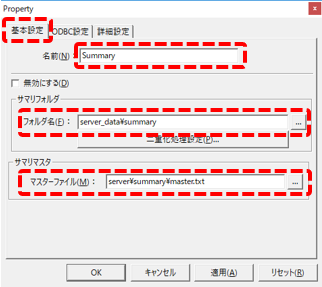
3.Summary (ODBC) Action Settings
Display the properties of A01 and configure various settings.
|
Shown on the left is the "Basic Settings" tab.
Change the name from "A01" to "Summary".
Set the following in the summary folder:
server_data\summary
Set the following in the Summary Master.
server\summary\master.txt
|
|
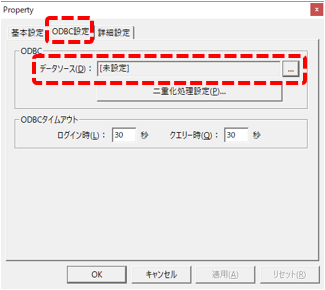
Shown on the left is the "ODBC Settings" tab.
For the data source, set the ODBC data source to connect to the database "SUMMARYDB" that you prepared in advance. The data source setting procedure can be done by common operations for each DBMS. For ODBC settings, please refer to the description in "ODBC Settings" in the common settings for actions.
|
4.Edit summary master
Next, edit the "Summary Master" and add the settings required for Summary ODBC.
Open the "master.txt" file for the target project using Notepad or similar and edit it.
(Project folder) \server\summary\master.txt
Editing common property settings (COMMON)
First, edit the common property settings (COMMON) section as follows:
Add the following line.
OdbcDatabaseType=SQLSERVER
(Edit example)
;Common property section ([COMMON]) [COMMON] DaysOfHoldingData=3660 OdbcDatabaseType=SQLSERVER
|
|
For OdbcDatabaseType, specify the appropriate type depending on the type of DBMS you are connecting to. In this example, we are using "SQLSERVER" to connect to SQL Server. For the types that can be specified for OdbcDatabaseType, please refer to the description in "Common Properties Section".
|
Editing the root log definition (RAW)
Next, edit the root log definition (RAW) section as follows:
Delete the following three lines:
CsvFileName=DB\RAW\SMR_RAW_.csv
CsvFileMaxFields=1000
CsvFileFlushCount=1
Add the following two lines.
OdbcTable=RAW
OdbcMaxFields=500
(Edit example)
;Root log section ([RAW], etc.) [RAW] TagFieldMaster=..\..\server\summary\fieldmaster_tag.csv TagFieldIndex=DB\index_tag.txt CalculationFieldMaster=..\..\server\summary\fieldmaster_calculation.csv CalculationFieldIndex=DB\index_calculation.txt TimeRangeType=TYPE2 OdbcTable=RAW OdbcMaxFields=500
|
Editing the aggregate log definition (DAY)
Next, edit the aggregate log definition (DAY) section as follows:
Delete the following two lines:
CsvFileName=DB\DAY\SMR_DAY_.csv
CsvFileUnit=DAY
Add the following line.
OdbcTable=DAY
(Edit example)
;Aggregated log section ([RAW::DAY], [DAY::MONTH], etc.) [RAW::DAY] SummaryUnit=1HOUR SummaryType=[SummaryType1] SummaryParam=[SummaryParam1] CalculationType=[Expression] TimeRangeType=TYPE2 DecimalNum=[DecimalNum1] ODBCTable=DAY SummaryASync=T ReportLayoutMaster=..\..\server\summary\layoutmaster.xls ReportLayoutMasterSheet=DAY ReportOutputSheetName=Daily report_ ReportTitleHeader=Daily report_ ReportExcelCellFormatType=formatednum2 ReportTitleDateFormat=@[%H hour]
|
Editing the aggregate log definition (MONTH)
Next, edit the aggregate log definition (MONTH) section as follows:
Delete the following two lines:
CsvFileName=DB\MONTH\SMR_MONTH_.csv
CsvFileUnit=MONTH
Add the following line.
OdbcTable=MONTH
(Edit example)
[DAY::MONTH] SummaryUnit=1DAY SummaryType=[SummaryType2] SummaryParam=[SummaryParam2] CalculationType=[SummaryType1] DecimalNum=[DecimalNum1] ODBCTable=MONTH ReportLayoutMaster=..\..\server\summary\layoutmaster.xls ReportLayoutMasterSheet=MONTH ReportOutputSheetName=Monthly report_ ReportTitleHeader=Monthly report_ ReportExcelCellFormatType=formatednum2 ReportTitleDateFormat=@[%m month %d day (%a)]
|
Editing the aggregate log definition (YEAR)
Next, edit the aggregate log definition (YEAR) section as follows:
Delete the following two lines:
CsvFileName=DB\YEAR\SMR_YEAR_.csv
CsvFileUnit=YEAR
Add the following line.
OdbcTable=YEAR
(Edit example)
[MONTH::YEAR] SummaryUnit=1MONTH SummaryType=[SummaryType2] SummaryParam=[SummaryParam2] CalculationType=[SummaryType1] DecimalNum=[DecimalNum1] ODBCTable=YEAR ReportLayoutMaster=..\..\server\summary\layoutmaster.xls ReportLayoutMasterSheet=YEAR ReportOutputSheetName=Annual Report_ ReportTitleHeader=Annual Report_ ReportExcelCellFormatType=formatednum2 ReportTitleDateFormat=@[%#mmonth]
|
This completes the setup process. Save master.txt by overwriting it.
Operation check
Now let's check how it works.
Click on Online (yellow arrow) at the top of the FA-Server screen.
Next, click the browser run icon (green arrow) at the top of the Panel Editor screen to call up FA-Client.
FA-Client has started.
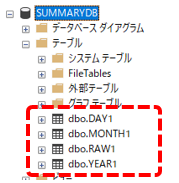
If you view the SUMMARYDB table in Management Studio of SQLServer, you can see that each table for the summary action has been automatically generated, as shown below.
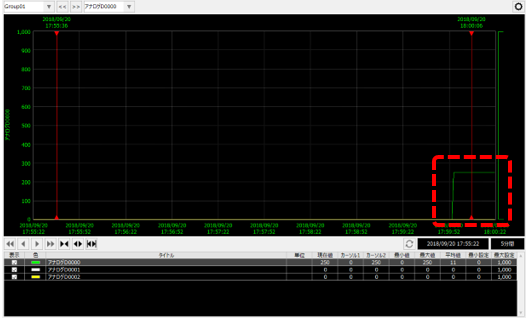
From FA-Server, change the value of “U01.F01.D0000” among the tags that are the target of summary action logging to any number (in this example, enter “250”).
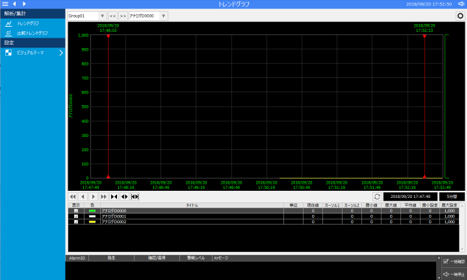
The numbers were then reflected on the trend graph.
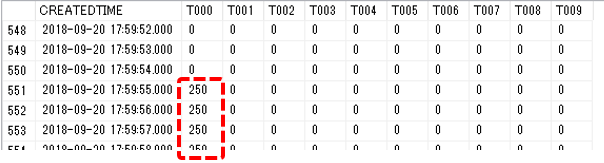
Furthermore, if you look at the data in the "RAW1" table on the SQL Server side, you will be able to confirm that the following data has been saved after the record where the value was edited.
supplementary explanation
■About automatic table division
Tables automatically generated in the database by the Summary (ODBC) action are automatically divided by the number of fields in the "OdbcMaxFields" parameter defined in the Summary Master. For example, if the number of fields defined in the Tag Field Master is 900 and OdbcMaxFields is defined as 250, 4 tables will be generated.
In addition, the name of the generated table will be the name defined in the Summary Master as "OdbcTable" with the number of divisions of the generated table added. For example, if you define "RAW" in the OdbcTable of the root log definition, the names of the automatically generated tables will be "RAW1", "RAW2", etc.
|
The upper limit of the number of fields that can be defined in OdbcMaxFields varies depending on the type and version of the database to which you are connecting. Also, if you define too many columns, logging and aggregation performance may decrease. If you are unsure of how many columns to define, try starting with about 500 columns. |