Basic Settings
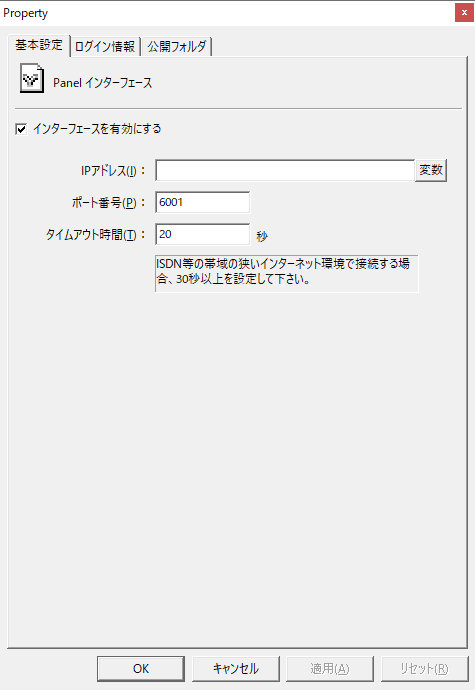
In the "Basic Settings" of Panel-Interface, you can set the following items.
(Panel-Interface/Basic Settings tab)
|
Setting items
|
explanation
|
Enable the interface
|
Enables or disables Panel-Interface.
|
IP address
|
This is the IP address of Panel Server. If omitted, the default IP address will be applied. If there are multiple network adapters on the PC running Panel Server and Panel Browser connects to one of the IP addresses, set it as follows.
[IP address 1] ; [IP address 2]
* Separate with a semicolon (;) and set the second and subsequent IP addresses.
For example, when connecting to a single Panel Server from multiple network segments, you can set it as follows.


|
You can set up to five IP addresses.
|
|
The "Variables" button to the right of the IP address is used to specify environment variables for the IP address. For details, see "Environment Variables".
|
|
Port number
|
The default port is set to 6001. Change it if there is an application using the same port or if it is necessary to change it for security reasons.
|
Timeout period
|
This is the timeout period for a connection request from Panel Server to Panel Browser. If the communication bandwidth is narrow, set the number of seconds to a larger value.
|
|
Setting login information
In the "Login Information" of Panel-Interface, you can register login information such as user information and group definitions. Whenever Panel Browser connects to Panel Server, a login is performed. If this login fails, the connection is canceled and Panel Browser cannot obtain information from Panel Server.
In addition, in the case of a standard project using the standard framework, user and group settings are made from the system settings screen on the client side, so there is no need to edit user information from this screen.For details, please refer to "User Management (Login) for Standard Projects".
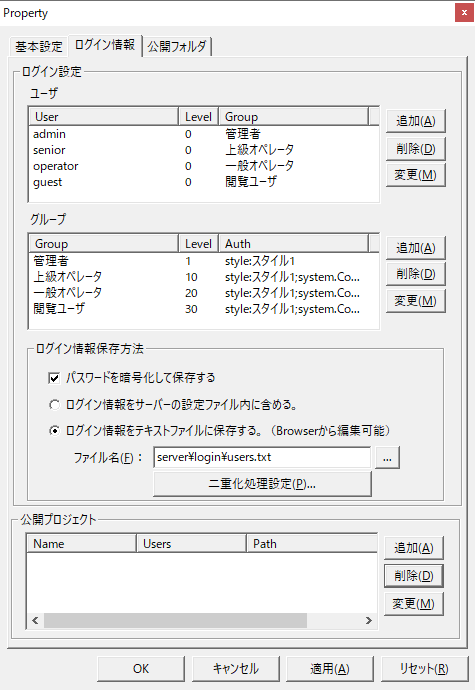
(Panel-Interface / Login Information tab / Login Settings)
|
Setting items
|
explanation
|
User
|
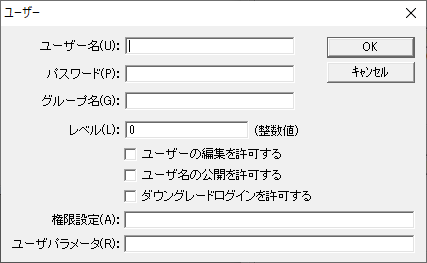
When you click the Add or Change button, the following dialog box will be displayed.
Setting items
|
explanation
|
Username
|
The user name.
|
password
|
This is your password.
|
Group Name
|
User levels and authority settings can be managed collectively in the following groups. If you do not use groups, there is no need to specify them.
|
level
|
Specifies the user's level as an integer value.
|
Allow users to edit
|
Check this box to allow the user to edit user information from the client. For users for whom this option is not enabled, calling route methods to edit user information, such as AddLoginUser and DelLoginUser, will fail.
|
Allow Username to be Disclosed
|
If checked, the user's name will be obtained by the GetPublicUserName route method from the script. This parameter is used in the user management function.
|
Allow Downgrade Login
|
If checked, the user will be eligible for downgrade login using the DowngradeLogin route method. This parameter is used in the user management function.
|
Permission Settings
|
When you log in with this parameter set, the string specified in the parameter will be set directly to the PSUserAuth root property.
|
In the standard user management function, this parameter is implemented to be saved in the following map format.
(Map format)
-Define the permission key and permission value, separating them with a half-width colon ":".
・When defining multiple settings, list them separated by semicolons ";".
Example) style:Style 1;key2:123;key3:abc
Although it is possible to reference the value of the PSUserAuth root property as a string from a script and use it as is, by defining the authority string in map format, you can generate map values for all authorities by converting it from map format to a map value using the MAPSTRTO route method and calling the SetAuthMap route method. This mechanism makes it easy to obtain authority values by simply calling the GetAuth route method from a script.
For more information on this, please see "Getting permission settings from a script".
|
|
User parameters
|
You can specify a user parameter. If you log in with this parameter set, the string specified in the parameter will be set to the PSUserParam root property as is.
|
|
group
|
User levels and authority settings can be managed collectively by group. Setting up a group is not mandatory. Levels and authority settings can be granted to individual users, or can be consolidated by registering a group. If no group is set, the level and authority setting values set for each individual user will be adopted. If a group is registered, the values registered on the group side will be adopted with priority.
When you click the Add or Change button, the following dialog box will be displayed.
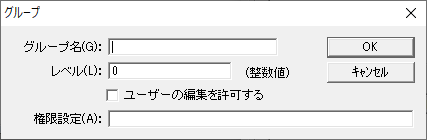
Setting items
|
explanation
|
Group Name
|
The group name.
|
level
|
Specifies the user's level as an integer value.
|
Allow users to edit
|
Check this box to allow users in the group to edit user information from the client. See "Users" above for details.
|
Permission Settings
|
A permission string can be specified, see "Users" above for details.
|
|
How to save login information
|
Set how your login information will be saved.
Setting items
|
explanation
|
Encrypt and store passwords
|
Checking this box will encrypt and save your password. Checking this box will encrypt and save your password. We recommend checking this box.
|
Include login information in the server configuration file
|
The login information is stored in the server configuration file.
|
Save your login information in a text file
|
Saves login information in an external text file. This must be selected if you want to use the user management function.
|
|
|
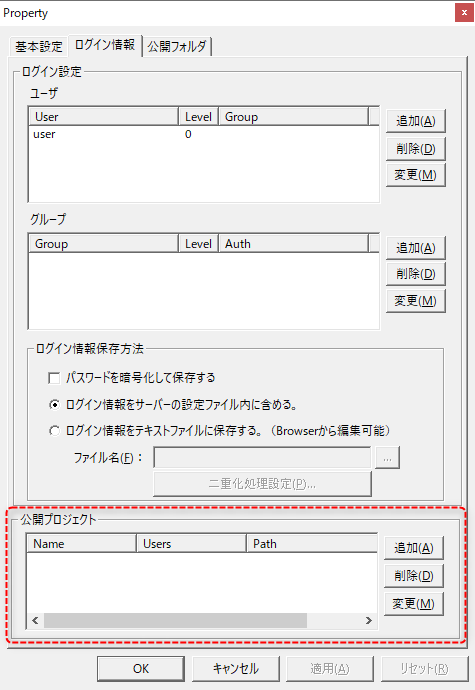
(Panel-Interface / Login Information tab / Public Projects)
|
Public projects are registered when using the direct login function.
For details, please refer to "Execution by direct login".
|
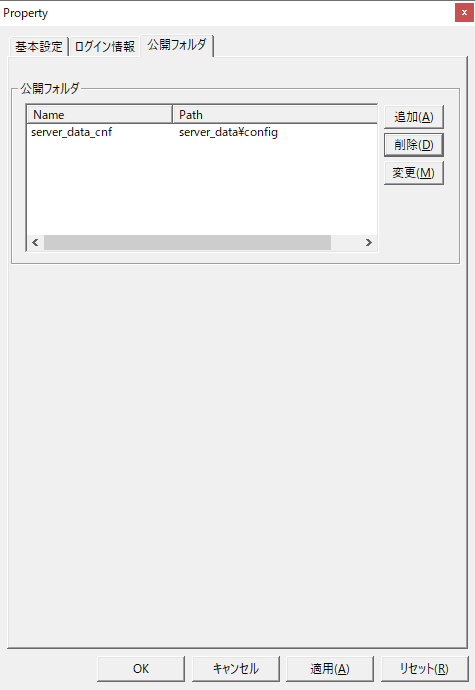
Public Folder Settings
In the "Public Folder" of Panel-Interface, you can set the following items.
(Panel-Interface/Public Folder tab)
|
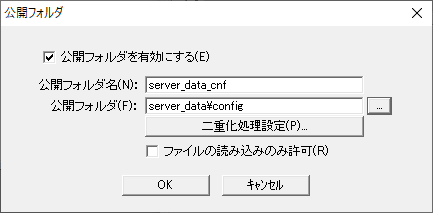
When you click the Add or Change button, the following dialog box will be displayed.
Setting items
|
explanation
|
Enable Public Folders
|
Toggles the public folder feature on and off. Enabling public folders allows you to use the SendFile / ReceiveFile route methods in your browser.
|
Public Folder Name
|
Specify the public folder name. The public folder name is specified in the first argument of the SendFile / ReceiveFile route method.
|
Public Folder
|
Specify the path of the public folder. In addition to the absolute path, you can also specify a relative path. If you specify a relative path, the folder will be referenced starting from the root folder defined in the application's system settings (for example, if you specify "server\config" as the path of the public folder, it will be referenced as (root folder)\server\config).
|
Duplex processing settings
|
Set this if you are using a duplicated server configuration. Server duplication is described in "Server duplication operation".
When you configure the duplicated processing, the following browser route method will duplicate the processing requests:
SendFile / ReceiveFile / ServerMakeFolder / ServerDeleteFile / ServerDeleteFolder / ServerRenameFile / ServerRenameFolder
For example, when you use SendFile, the file will be sent to both the main and sub. If writing to either file fails, the file will be automatically restored when the system recovers from the disconnected state. Also, for example, if the file sent with SendFile can only be written to one of the drives, either the main or sub, the file will be automatically copied to the drive that could not be written to when the other drive recovers.
|
Allow only reading of files
|
Check this box if you do not want the files in the public folder to be updated from the client.
|
|
Points to note when running Panel Server and Panel Browser on one PC
When running Panel Server and Panel Browser on the same PC, communication between Panel Server and Panel Browser may become impossible if the LAN cable is disconnected from the PC. This occurs when the media detection function of the Windows OS detects that the IP address set for the network adapter is different from the local IP address "127.0.0.1" automatically. Also, Panel Server and Panel Browser communicate using the IP address set in the network adapter at startup, so if the IP address changes during operation, they will not be able to keep up.
To avoid this issue, in the IP address settings of Panel-Interface, register both the IP address to be used for communication (for example, "192.168.1.1") and the local IP address "127.0.0.1", separated by a semicolon.
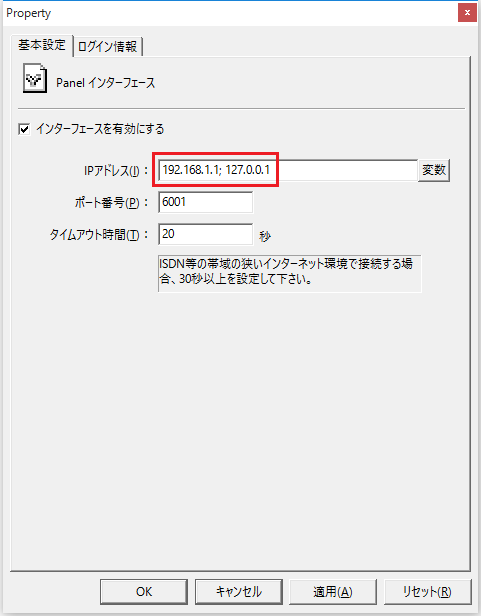
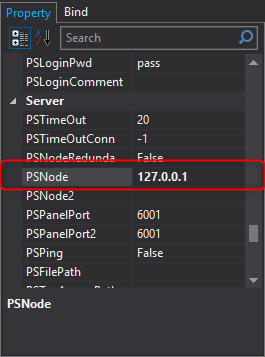
Also, set the PSNode root property of Panel Browser to "127.0.0.1" (if empty, a valid IP address will be used at startup).