Video recorder settings screen
Recorder Registration
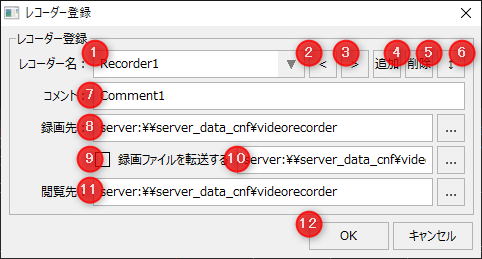
This is the settings screen for registering/editing recorders.
#
|
name
|
explanation
|
1
|
Recorder Name
|
Select a recorder that has already been registered. You can edit the recorder name by manually entering it.
|
2
|
before
|
Moves to the previous recorder of the currently selected recorder.
|
3
|
Next
|
Moves the recorder one position behind the currently selected one.
|
4
|
addition
|
Add a new recorder.
|
5
|
delete
|
Deletes the currently selected recorder.
|
6
|
Change display order
|
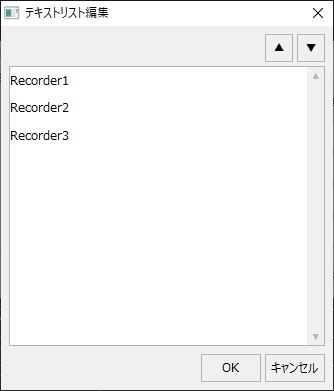
You can edit the display order of recorders. Clicking the button displays the following dialog.
|
The list shows the currently registered recorders.
To change the display order, select the target recorder from the list and click the up or down button.
|
|
7
|
comment
|
Set any comment for the recorder.
|
8
|
Recording destination
|
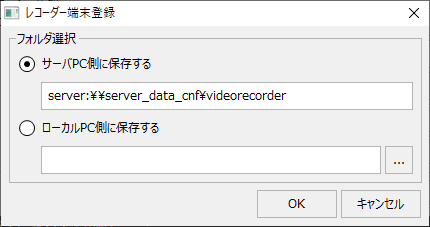
Set the recording destination. Click the Settings button to display the following dialog.
|
If you select "Save on the server PC", the recording file will be saved on the server. By default, it will be displayed in the following format.
server:\\server_data_cnf\videorecorder
In the above example, the "videorecorder" folder will be created under the folder defined in the public folder "server_data_cnf" and the recorded data will be saved there. In this format, the public folder name is specified after "\\". If you want to use another public folder, add a separate public folder to the server and specify the public folder name after "\\".
If you select "Save to local PC", you can save the recording file to any folder on the client PC set in the recorder. You can either enter the destination folder directly, or click the setting button to display the folder selection dialog and select the folder.
|

|
The settings for the recording destination of the recorded files must be carefully set according to the actual operation. For ideas on the recording settings of the recorder, please refer to "System configuration and operation of the video recorder" in the Surveillance System Construction Guide.
|
|
9
|
Transfer recording files.
|
You can copy the recording files recorded by the recorder to the location specified in the transfer destination below. This setting is mainly used when you want to transfer data recorded and saved on a local PC to a server or to a storage device built with NAS, etc.
|
10
|
Forwarding destination
|
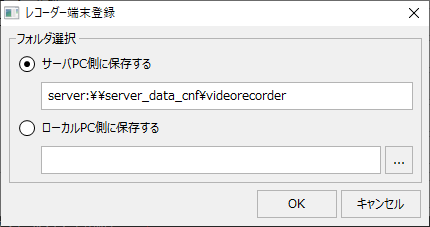
Set the recording destination. Click the Settings button to display the following dialog.
|
If you select "Save on the server PC side", the recording file will be transferred to the server. For the format when you select the server PC side, please refer to the description of "Recording destination" above.
If you select "Save to local PC", you can transfer the recording file to any folder on the client PC set in the recorder.
|
|
11
|
Browse to
|
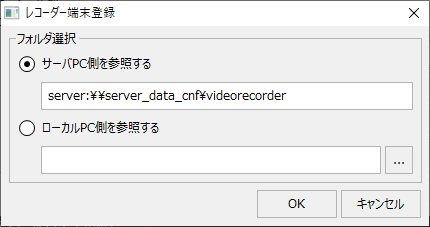
Specify the reference destination when playing back recorded data. Clicking the Settings button displays the following dialog.
|
If you select "Refer to the server PC side", the server will be the reference when playing the recorded file. For the format when you select the server PC side, please refer to the description of "Recording destination" above.
If you select "Browse local PC", the reference destination when playing back recorded files will be the specified folder on the client PC set in the recorder.
|
|
12
|
OK/Clear/Cancel
|
OK
|
Saves the current edits and closes the settings screen.
|
Clear
|
Removes the currently selected recorder from the camera.
|
cancel
|
Cancels and closes the current edits.
|
|
Recorder device registration
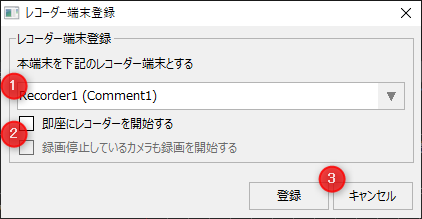
This is the setting screen for assigning your own client as a recorder terminal to a registered recorder.
#
|
name
|
explanation
|
1
|
Recorder Selection
|
From the currently registered recorders, select the recorder that will be used as the recorder terminal for your client.
|
2
|
Operational Settings
|
Specify the action to be taken for the recorder when it is registered as a recorder device.
Start the recorder immediately
|
When you register as a recorder device, the recorder will start immediately.
|
Cameras that are stopped will start recording again
|
When registering as a recorder device, a request will be made to start recording for cameras that are stopped. This option is enabled when you check the box above.
|
|
3
|
OK/Cancel
|
Registration
|
Register your client as a recorder device for the selected recorder.
|
cancel
|
Cancels and closes the current edits.
|
|
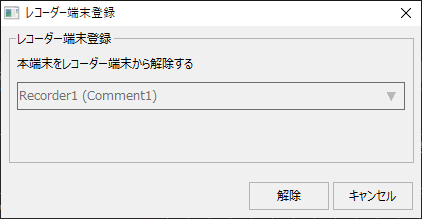
If your client is already registered as a recorder device, the screen will be displayed as follows:
|
Clicking the "Unregister" button will unregister your client from the recorder.
|