Passing parameters to Panel Browser (login INI)
You can define the parameters required for direct login in a INI file (hereafter referred to as "login INI") and then specify the file name from the shortcut that launches Panel Browser to specify and execute the direct login behavior.
The following explains how to start the program using the login INI.
|
The login INI file is not included in the distribution files output by the client setup, so this file must be manually placed on each client PC that runs Panel Browser. |

1.Create a login INI file.
The login INI is a text file. Please create it manually using a text editor such as Notepad. The file name can be anything. Here we will use "login.ini" as an example.
The parameters that can be specified in the login INI are as follows:
Parameters |
explanation |
PSNode |
IP address to connect to Panel Server (IP address to connect to the main server in case of duplication) |
PSNode2 |
IP address of the secondary server when Panel Server is duplicated |
PSPanelPort |
Port number for connection to Panel Server (port number for connection to the main server in case of duplication) |
PSPanelPort2 |
Port number for connecting to the secondary server when Panel Server is duplicated |
PSLoginUser |
Login User Name |
PSLoginPwd |
Login Password |
PSLoginProject |
Public Project Name |
PSLoginSavePwd |
T: Save login password, F: Do not save If this option is TRUE, the login password will be saved and available the next time it is displayed. (Default: T) |
PSAutoLogin |
T: Automatic login, F: Do not automatically login If this option is TRUE, automatic login will be performed. Note that in order for automatic login to be performed, PSLoginProject / PSNode / PSNode2 / PSPanelPort / PSPanelPort2 must be set appropriately. Regarding PSLoginUser / PSLoginPwd, if they are not set, the login screen will be displayed; however, by setting PSLoginSavePwd to T, the password entered on the screen at the first login will be stored internally, and the user will be logged in automatically from the next time onwards. |
StartupApplicationTitle |
You can specify the title string that will be displayed in the title bar of the login screen. |
StartupTitle |
You can specify the title string that will be displayed in the center of the login screen. |
StartupMenu |
Whether to display the menu icon in the upper right corner of the login screen. T: Display, F: Do not display (default: T) |
StartupUserList |
Specify this if you want to display candidate user names. To specify multiple names, separate them with commas. The user names specified with this parameter will be displayed in the user selection combo box on the login screen.
example) StartupUserList=admin,senior,operator,guest
|
StartupBrowserState |
You can specify the browser display state when the login screen is displayed. The following can be specified. MAXIMUM: Display maximum FULLSCREEN: Display full screen |
StartupVisualTheme |
You can specify the visual theme of the login screen. The following can be specified. WHITE/BLACK/GREEN/ORANGE/BROWN/GRAY (default: WHITE) |
PSLoginComment |
When directly logging in, you can specify any string as a comment for each login user. The string specified here can be referenced from the PSLoginComment root property of the client. |
Below is an example definition.
PSLoginProject=project PSNode=192.168.1.1 PSNode2= PSPanelPort=6001 PSPanelPort2= PSAutoLogin=T PSLoginSavePwd=T PSLoginUser=admin StartupApplicationTitle=Login StartupTitle=Login StartupMenu=F |
2.Create a shortcut
Create a Windows shortcut to run Panel Browser and specify the parameters of your login INI file after the pathname of the file to run.
To create a shortcut, right-click on an empty space on the desktop or in a folder in Explorer to display the menu and select "New - Shortcut".

In the Create Shortcut wizard, click the Browse button and select Panel Browser6.exe in the installation folder.
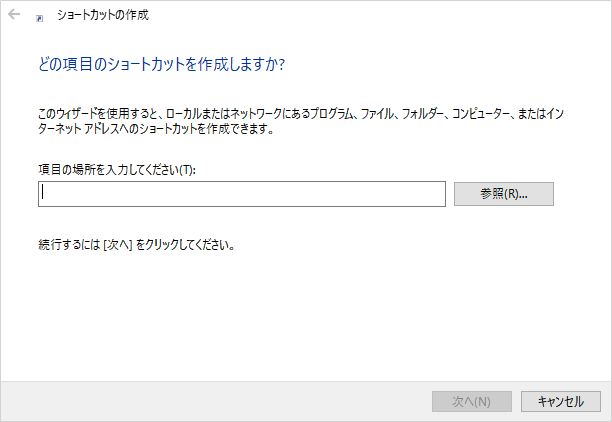
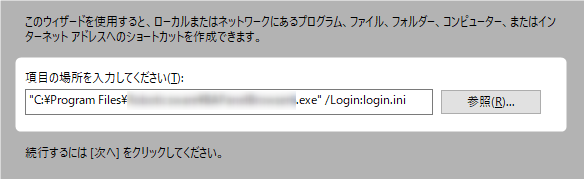
After the execution path of Panel Browser, specify the login INI file name in the /Login parameter. In this example, the file name is "login.ini".
Execution path of Panel Browser□/Login:login.ini *"□" represents a half-width space. |
Setting example)
|
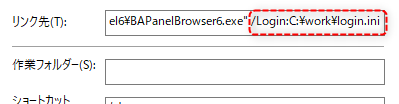
The path name of the login INI file can be specified in one of the following ways: •Specify using an absolute path.
•Set the working folder for the shortcut.
|

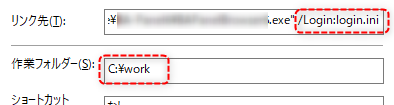
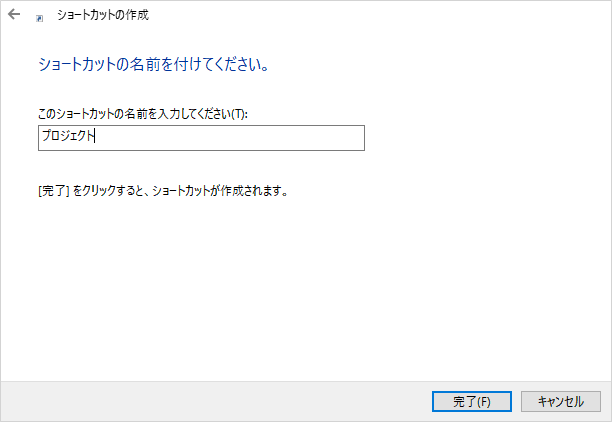
Enter a name for the shortcut and click "Finish" to create the shortcut.
3.When the shortcut is launched, a direct login is performed according to the parameters specified in the login INI file.