overview
To send alarm emails, you need to define the configuration information for Send mail in a text-format configuration file called the email master, and also define a field for Send mail in the alarm master.
Alarm emails are sent via a mail server. On the Alarm server action settings screen, you need to set the mail server name, port number, account, password, etc. to connect to the mail server of a provider, according to the authentication method of the mail server to be connected. Note that FA-Panel does not have a built-in mail server function. You need to prepare a separate mail server.
This section describes how to customize the standard alarm function to send alarm emails.
Download the sample
The creation examples shown on this page are provided with samples.
The sample can be downloaded from below.
To send alarm emails, a separate mail server is required in addition to FA-Panel. Please prepare an environment that can connect to a mail server that can send emails.
Procedure
■Editing the alarm master
1.Open Alarm Master
Open "master.csv" in the following folder of the target project.
(Project folder)\server\alarm\master.csv
Below is an example of an alarm master before the change.
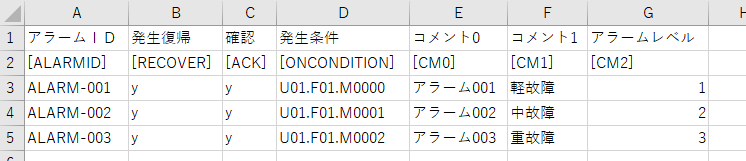
2.Editing an Alarm Master
To send an alarm email, you must define the alarm email field ([MAIL]) in the alarm master.
The MAIL field allows you to define when emails are sent for each alarm. The Send mail timing refers to each event of the alarm, such as when it occurs, when it is recovered, when it is acknowledged, etc.
The following are the keywords that can be specified in the MAIL field.
keyword |
Contents |
all
|
Send emails at all times. |
new
|
Send an email when it occurs. |
recover
|
Send an email when you return. |
ack
|
Send an email upon confirmation. |
change
|
Send an email when an alarm state changes. |
(blank)
|
If this field is blank, no email will be sent for the alarm. |
Furthermore, the above definitions can be combined by listing multiple definitions separated by spaces.
For example, if you want to send a message when an event occurs and when an event recovers, define it as "new recover".
As an example, edit the alarm master as follows:

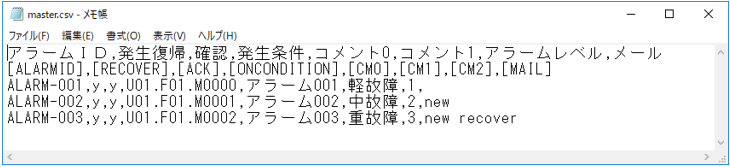
Above we add a [MAIL] field to the end of the column to define the Send mail timing for each individual alarm.
•ALARM-001 ... Send mail No (blank)
•ALARM-002 ・・・Send email only when an error occurs (new)
•ALARM-003: Sends an email when an alarm occurs or when recovery is complete (new recover)
When editing the alarm master in Excel, save it in CSV format.
Below is an example edited in Notepad.
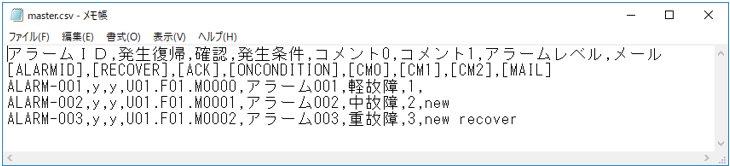
■ Editing the email master
1.Editing the Mail Master
Next, edit the email master.
The sample project provides "mail_master.txt" in the following folder.
(Project folder)\server\alarm_mail\mail_master.txt
The sample email master contains the following:
[MailCondition]
[MailSubject] Alarm email
[MailSender] xxx@xxx.co.jp
[MailSendToName] xxx@xxx.co.jp (end)
[MailSendToNameCC] (end)
[MailSendToNameBCC] (end)
[MailAttachedFile] (end)
[MailHeader] ****************************** alarm e-mail. ****************************** (end)
[MailFooter] bottom of e-mail. (end)
[MailMessage] [DATESTR:%Y/%m/%d %H:%M:%S] & " " & [CM1] [ALARMID] & " " & [CM0] & " " & [TYPEJP] "--" (end) |
Please change the following parts according to your environment and save it.
[MailSender]
xxx@xxx.co.jp←Please specify the sender email address
[MailSendToName]
xxx@xxx.co.jp←Please specify the destination email address
(end)
When checking the operation, please set the destination email address to a receivable address such as the email address of your own PC.
■Alarm serverAction email settings
1.Alarm serverOpen the action settings screen
Select Alarm under Action in the tree on the left of Panel Server and open its properties.
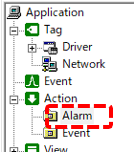
2.Alarm server Set up email for action
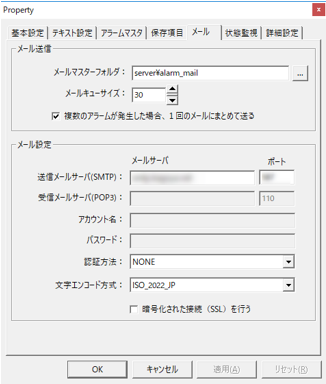
Configure the email settings from the settings dialog.
|
Click on the "Email" tab at the top of the screen.
|
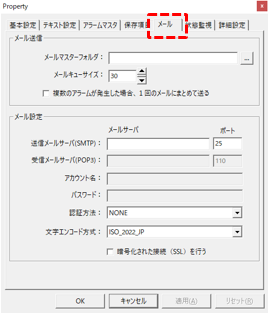
|
First, specify the folder for the email master. Here, specify the folder "server\alarm_mail" where the email master you just edited is stored.
Also, in this example, check the box for "When multiple alarms occur, send them all in a single email."
In the email settings section, enter the information required to connect to the email server. Please configure according to your environment.
|
■Adding Periodic event for Send mail
Next, set Periodic event to call the Alarm server action Send mail.
1.Add Periodic event
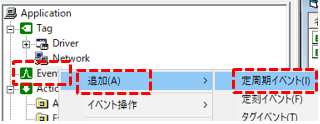
Right-click Event in the left tree of Panel Server and select Add / Periodic event.
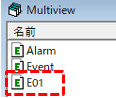
A new event called "E01" has been added.
2.Setting Periodic event
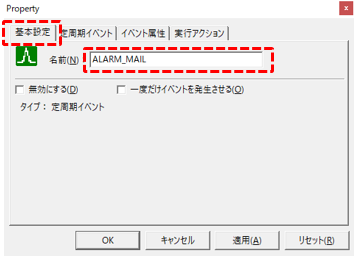
Display the properties of the added "E01" event and configure the following:
|
First, go to the Basic Settings tab and change the name to something more easily understandable.
As an example, we will use "ALARM_MAIL".
|
|
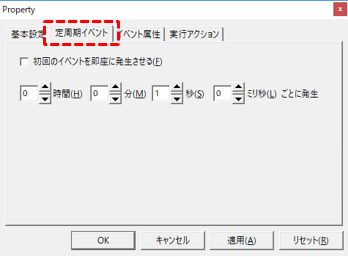
Next, check the period of Periodic event.
In this example, we will use the default 1 second period.
|
|
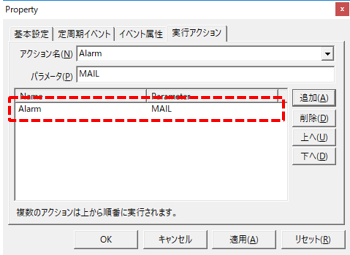
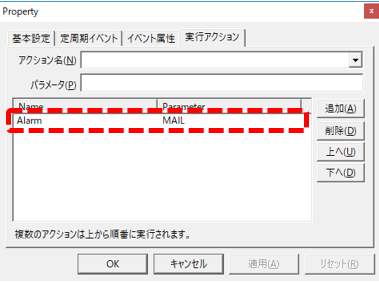
Next, configure the execution action.
Select "Alarm" as the action to execute, enter "MAIL" as the parameter, and click the Add button (please enter all characters in uppercase).
Once you have completed the settings, close the dialog with the OK button.
|
Operation check
Now let's check how it works.
Click Online (yellow arrow) at the top of the Panel Server screen.
Next, click the browser run icon (green arrow) at the top of the Panel Editor screen to call up Panel Browser.
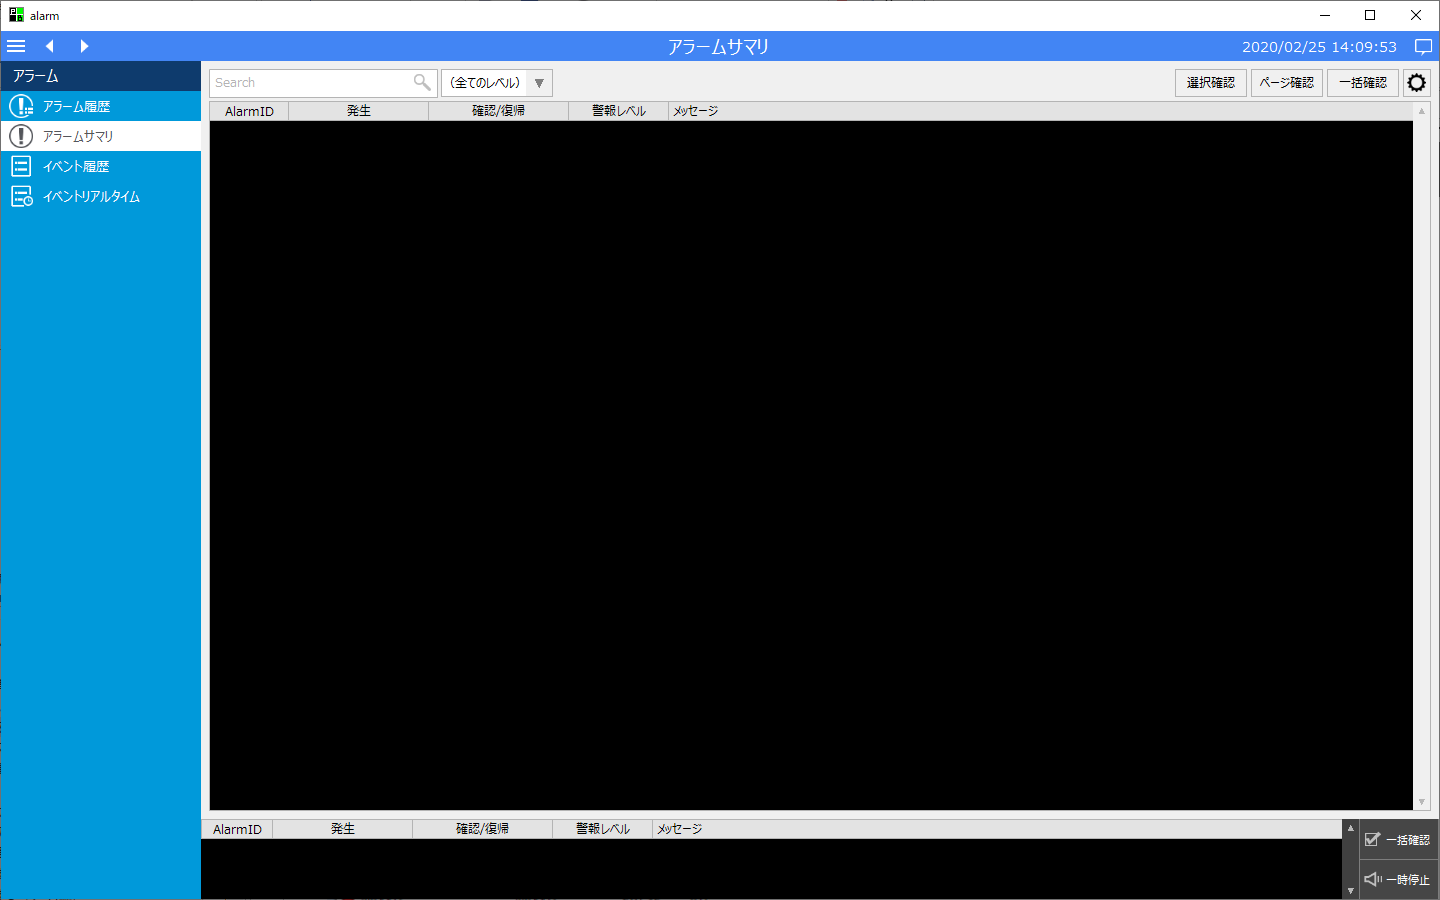
When Panel Browser starts, display the alarm summary screen so that you can check the alarm status.
Also, please prepare an environment where you can receive alarm emails.
The sample alarm master is configured as follows, with tags U01.F01.M0000, M0001, and M0002 registered as alarms. Also, in the MAIL field settings, M0000 is blank (no Send mail), M0001 is new (only when an alarm occurs), and M0002 is new recover (when an alarm occurs and when an alarm is restored).
Please write True from Panel Server to U01.F01.M0000.
A minor fault M0000 was displayed in the alarm summary, but because the MAIL field of the alarm master for M0000 is blank (not to be sent), no email will be sent.

Next, write True to U01.F01.M0001 from Panel Server.
The alarm summary displayed a medium fault of M0001.

When the above occurs, an alarm email will be sent with the following details:
Please check that the content of the email matches the content displayed in the alarm summary.
****************************** alarm e-mail. ****************************** 2018/05/22 10:53:20 Medium failure ALARM-002 Alarm 002 occurred -- bottom of e-mail. |
Next, write False to Panel ServerU01.F01.M0001.
The alarm summary showed a medium fault M0001, waiting for confirmation.

Since the MAIL field of the M0001 alarm master is set to "new", an email will be sent only when an alarm occurs. Please confirm that no email will be sent due to the above recovery operation.
Next, write True from Panel Server to U01.F01.M0002.
A serious fault, M0002, was displayed in the alarm summary.

The following information will be sent as an alarm email.
Please check that the content of the email matches the content displayed in the alarm summary.
****************************** alarm e-mail. ****************************** 2018/05/22 11:00:54 Serious failure ALARM-003 Alarm 003 occurred -- bottom of e-mail. |
Next, write False from Panel Server to U01.F01.M0002.
The serious fault M0002 in the alarm summary has been resolved and is now waiting for confirmation.

Since the MAIL field of the alarm master for M0002 is "new recover", an email will be sent when the alarm occurs and when the alarm is recovered. In this example, the following alarm email will be sent.
Please check that the content of the email matches the content displayed in the alarm summary.
****************************** alarm e-mail. ****************************** 2018/05/22 11:03:03 Serious failure ALARM-003 Alarm 003 recovery -- bottom of e-mail. |
Next, try writing True from Panel Server to U01.F01.M0001 and M0002 at the same time.
Then, alarms M0001 and M0002 were displayed in the alarm summary.

The following information will be sent as an alarm email.
****************************** alarm e-mail. ****************************** 2018/05/22 11:08:42 Medium failure ALARM-002 Alarm 002 occurred -- 2018/05/22 11:08:42 Serious failure ALARM-003 Alarm 003 occurred -- bottom of e-mail. |
The above is an example of multiple alarms being sent in a single email because the Alarm server action email setting "When multiple alarms occur, send them all in a single email" was checked. If you uncheck this setting, the alarms will be sent in separate emails.
supplementary explanation
■About Periodic event for Send mail
To send an alarm email, create a separate Periodic event event to call the Send mail process in addition to the normal event to call the Alarm server action at a fixed interval.
(Send mail for calling Periodic event)
|
When defining an execution action from Periodic event, specify "MAIL" as the parameter. The Alarm server action will send an email when it is called with the MAIL parameter.
Alarm email messages are temporarily stored in an email queue on the Alarm server side. When Alarm server is called from an event with the MAIL parameter, it will send an email based on the messages in the queue.
|
■ About the email master
A mail master is a text file that defines the destination information and format of mail. There are no particular restrictions on the file name of a mail master, so you can name it freely. Mail masters are stored in the folder for mail masters specified by the Alarm server action. Do not place any files other than mail masters in this folder.
Furthermore, mail masters can also be defined in multiple files. By preparing multiple mail masters and defining "MailCondition" for each mail master, you can switch the format of the mail to be sent and the destination for each sending condition. For example, you can define mail master 1 for emails with moderate or greater failures ( [CM2]>=2 ), mail master 2 for emails limited to major failures only ( [CM2]==3 ), and define the destination email addresses for each separately.
Below are the main settings and examples for defining the mail master.
Setting items |
Commentary |
||
[MailCondition]
|
Send mailWrite the conditions. Sending conditions are written using field names.
For example, if [CM3] is the field that represents the group number, and you want to send only alarms whose group number is greater than 10, define it as follows:
[MailCondition] [CM3] > 10
Also, if [CM2] is a field that indicates importance and [CM3] is a field that indicates group number, and you want to send only those whose group number is greater than 10 and whose importance is 2, define it as follows.
[MailCondition] [CM3] > 10 && [CM2]==2
Use this Send mail condition when you want to create multiple mail masters and send emails to different groups of recipients depending on the conditions for each. If you only have one mail master (i.e. only one destination), you do not need to set this Send mail condition, because you can specify the condition for whether or not to send for each alarm in the [MAIL] field of the alarm master. If nothing is written in [MailCondition], all alarm emails specified in the [MAIL] field of the alarm master will be sent.
|
||
[MailSubject]
|
Specify the title (subject) of the email.
example) [MailSubject] Alarm mail
|
||
[MailSender]
|
Send mailSpecify the person.
example) [MailSender] xxx@xxx.co.jp
|
||
[MailSendToName]
|
Specify the email address of the email recipient. If you want to specify multiple recipients, write them on multiple lines as shown below. The last line of this section must be "(end)" (※The same rule applies to CC and BCC).
example) [MailSendToName] xxx@xxx.co.jp yyy@xxx.co.jp (end)
|
||
[MailSendToNameCC]
|
Specify the recipient (CC). The notation is the same as [MailSendToName].
|
||
[MailSendToNameBCC]
|
Specifies the Send mail destination (BCC). The notation is the same as [MailSendToName]. |
||
[MailAttachedFile]
|
By specifying the file name, you can attach the specified file to the email and send it. If you want to attach multiple files, list the file names as follows. Be sure to end the list with "(end)".
example) [MailAttachedFile] c:\xxx1.txt c:\xxx2.txt (end)
|
||
[MailHeader]
|
Specify the header text of the email. The header text will be added to the beginning of the email text. It must end with "(end)".
example) [MailHeader] ****************************************** *********** Alarm Mail *********** ****************************************** (end)
|
||
[MailFooter]
|
Specify the footer text for the email. The footer text will be added to the end of the email text. The footer text must end with "(end)".
example) [MailFooter] ****************************************** ** Emergency Contact Number xxx-xxx-xxxx ** ****************************************** (end)
|
||
[MailMessage]
|
Describes the format of the alarm message to be included in the email. You can use alarm field names to define the format. The last line of this section must be "(end)".
example) [MailMessage] [DATESTR:%Y/%m/%d %H:%M:%S] & " " & [CM1] [ALARMID] & " " & [CM0] & " " & [TYPEJP] "--" (end)
In the above example, the first line contains the date and time of occurrence followed by the alarm level string (such as "major fault") separated by a space, the second line contains the alarm ID, comment, and alarm event, and the third line contains two hyphens "--" as separators. Characters can be joined with &.
Also, if you want to change the message depending on the conditions, you can write it using the "arithmetic expression syntax" as shown below (see "Script Manual" "Arithmetic Expression Syntax"). When using "arithmetic expression syntax", everything must be written on one line. If you need a line break within the text, you can specify a line break by including RET() as shown below.
example) [MailMessage] {[TYPE] == "new"}{"■" & [DATESTR:%Y/%m/%d %H:%M:%S] & " AlarmID:" & [AlarmID] & RET() & [CM0]},{[TYPE] == "recover"}{"■" & [DATESTR:%Y/%m/%d %H:%M:%S] & " AlarmID:" & [AlarmID] & RET() & [CM1]},{default}{"■" & [DATESTR:%Y/%m/%d %H:%M:%S] & " AlarmID:" & [AlarmID] & RET() & "Status has changed."} (end)
|
||
[MailRetry] |
You can specify the number of retries for Send mail. If you do not specify this parameter, retries will be repeated until the email is successfully sent.
Example: If Send mail fails, retry five times, and if it still doesn't work, discard the email. [MailRetry] 5
|

■ Reference) Example of email master settings
Setting example 1)
[MailCondition]
[MailSubject] Alarm1
[MailSender] xxx@xxx.co.jp
[MailSendToName] xxx@xxx.co.jp (end)
[MailSendToNameCC] (end)
[MailSendToNameBCC] (end)
[MailAttachedFile] (end)
[MailHeader] *************** ** Alarm Mail1 ** *************** (end)
[MailFooter] ************** TEL:xxx-xxx-xxx ************** (end)
[MailMessage] "■" & [DATESTR:%Y/%m/%d %H:%M:%S] [TYPEJP] & "," & [ALARMID] & "," & [CM0] & "," & [CM1] & [CM2] (end) |
Setting example 2)
[MailCondition]
[MailSubject] Alarm2
[MailSender] xxx@xxx.co.jp
[MailSendToName] xxx@xxx.co.jp (end)
[MailSendToNameCC] (end)
[MailSendToNameBCC] (end)
[MailHeader] *************** ** Alarm Mail2 ** *************** (end)
[MailFooter] ************** TEL:xxx-xxx-xxx ************** (end)
[MailMessage] {[TYPE] == "new"}{"■" & [DATESTR:%Y/%m/%d %H:%M:%S] & " AlarmID:" & [AlarmID] & RET() & [CM0]},{[TYPE] == "recover"}{"■" & [DATESTR:%Y/%m/%d %H:%M:%S] & " AlarmID:" & [AlarmID] & RET() & "The status has been restored."},{default}{"■" & [DATESTR:%Y/%m/%d %H:%M:%S] & " AlarmID:" & [AlarmID] & RET() & "Status has changed."} (end) |