overview
Here we will introduce a customization example for the standard alarm function, where tag values are displayed as comments.
Customization details
•Add [CM3:TAG] to the alarm master.
•Add [CM3:TAG] to the alarm storage items.
•The tag value is included in the alarm summary and alarm history messages.
In this example, we will explain the following two types of customization:
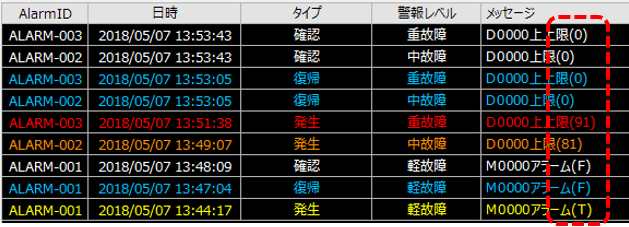
(Alarm history display example 1: Displaying tag values for all alarms)
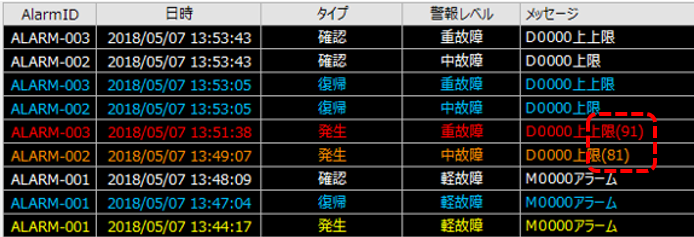
(Alarm history display example 2: tag values are displayed only when an upper or lower limit alarm occurs)
Download the sample
The creation examples shown on this page are provided with samples.
The sample can be downloaded from below.
Work procedure 1
■Editing the alarm master
First, add a comment to the alarm master.
1.Open Alarm Master
Open "master.csv" in the following folder of the target project.
(Project folder)\server\alarm\master.csv
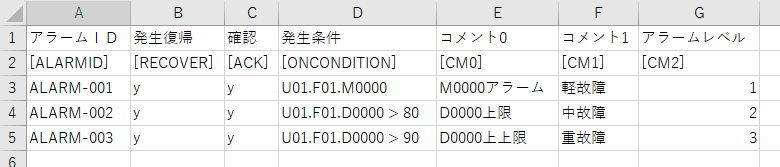
Below is an example of a standard alarm master layout with analog high limit and high high limit monitoring configured (note: the following is an example opened in Excel).
2.Editing an Alarm Master
Add [CM3:TAG] to the end of the column above. For example, edit as follows.

When editing the alarm master in Excel, save it in CSV format.
Below is an example edited in Notepad.
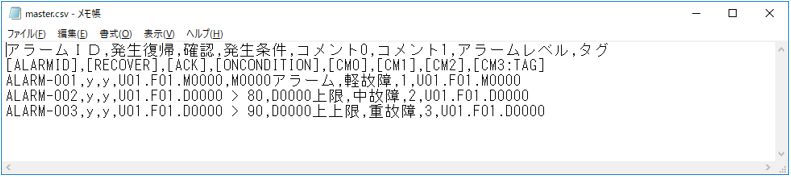
The CM3:TAG added above is a field called Tag Comment, which allows you to include the value of the tag path defined in this column in the alarm log.
In the above settings, please be careful not to duplicate comment numbers (numbers such as CM0, CM1, etc.). For example, in the above example, numbers from 0 to 3 are defined as CM0, CM1, CM2, CM3:TAG. The tag comment added this time (CM3:TAG) has ":TAG" at the end, but as with other normal comments, please make sure that numbers are not duplicated.
■ Adding saved items
Next, add the CM3:TAG that you just added to the “Saved items” of the Alarm server action.
1.Alarm serverOpen the action settings screen
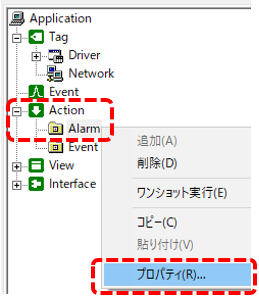
Select Alarm under Action from the tree on the left of Panel Server and right-click to open its properties.
Set the save items from the settings dialog.
|
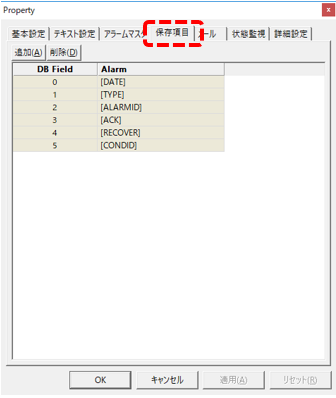
Click the "Saved Items" tab at the top of the screen.
|
|
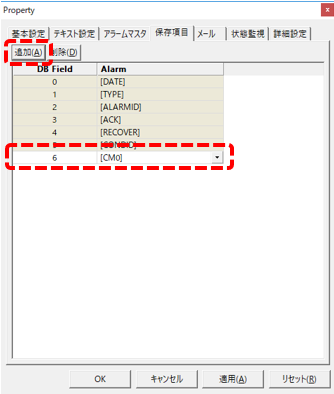
Click the Add button on this screen.
This will add a new line.
|
|
Double-click the newly added section on the left to edit it, change it to [CM3:TAG], and click the OK button. |

With this setting, the tag value of the tag path defined in the CM3:TAG column of the alarm master will be included and saved in the alarm log data.
■ Editing the layout of alarm summary/alarm history
Next, edit the layout of the alarm summary screen and alarm history screen.
1.Editing the alarm grid on the alarm summary screen
Open the alarm summary screen (_AlarmSummary._Main) from Panel Editor and double-click the remote alarm grid located in the center of the alarm summary screen.
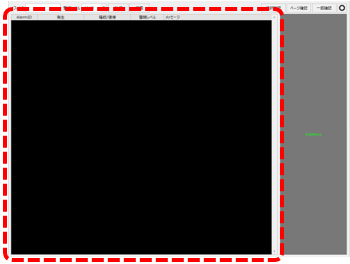
A settings dialog will then appear, so click the edit button for "Layout" (AlarmLayout property).
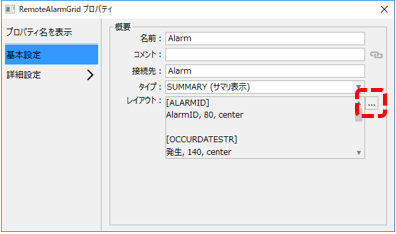
Edit the alarm layout from the editor.
|
Here, edit as follows and save with the OK button.
Before editing) [CM0] Message, 2000, left
After editing) [CM0] & " (" & [CM3] & ")" Message, 2000, left
|
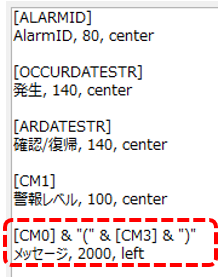
2.Remote alarm grid on the alarm history screen
Next, open the alarm history screen (_AlarmHistory._Main) and double-click the remote alarm grid located in the center of the alarm history screen to open the settings dialog.
From the settings dialog, click the Edit button for "Layout" (AlarmLayout property).
When the editor appears, you can edit the alarm layout.
|
Edit it as follows, just like the alarm summary, and save it with the OK button.
Before editing) [CM0] Message, 2000, left
After editing) [CM0] & " (" & [CM3] & ")" Message, 2000, left
|
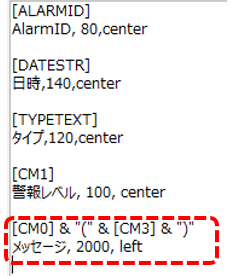
Operation check 1
Now let's check how it works.
Click Online (yellow arrow) at the top of the Panel Server screen.
Next, click the browser run icon (green arrow) at the top of the Panel Editor screen to call up Panel Browser.
Once Panel Browser is running, display the alarm summary screen.
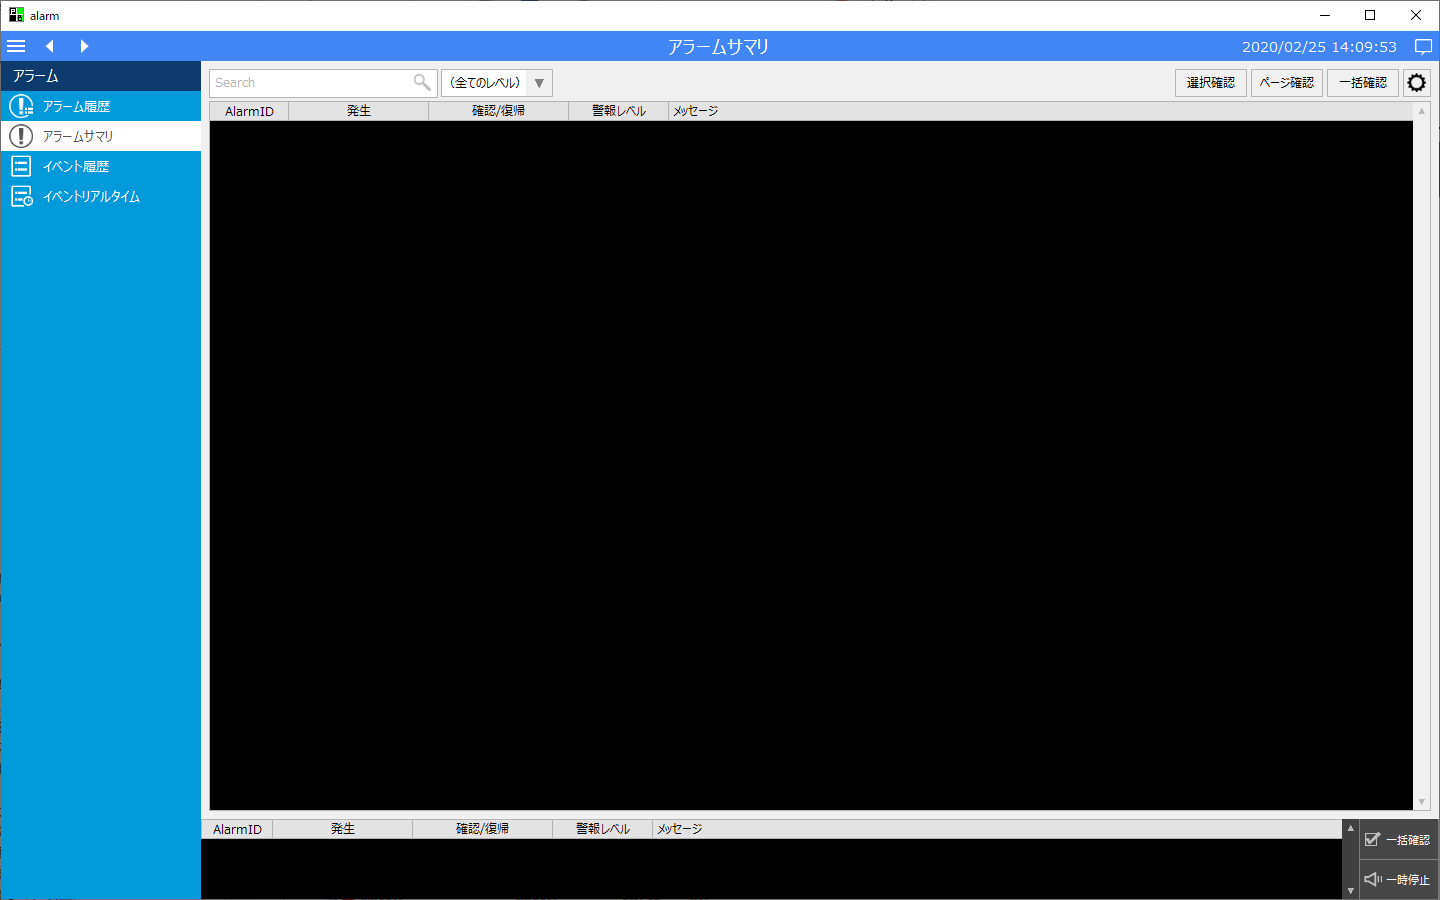
Try writing TRUE to U01.F01.M0000, one of the tags registered in the alarm, from Panel Server.
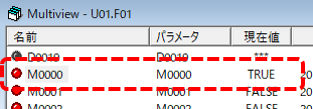
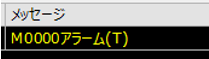
Now, the tag value will be displayed in parentheses at the end of the generated alert message. In this example, it is displayed as "(T)".
Next, try writing 81 from Panel Server to U01.F01.D0000, one of the tags registered in the alarm.
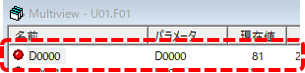
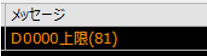
The value 81 was then displayed in parentheses at the end of the message informing us that an upper limit warning had occurred.
Next, try writing 91 to D0000 from Panel Server.

Then, the value 91 in parentheses was displayed at the end of the high-high alarm message. Once you have confirmed the display, return the values of each tag to their original values and check them all at once from the alarm summary screen.
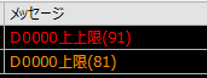
Next, let's display the alarm history screen.
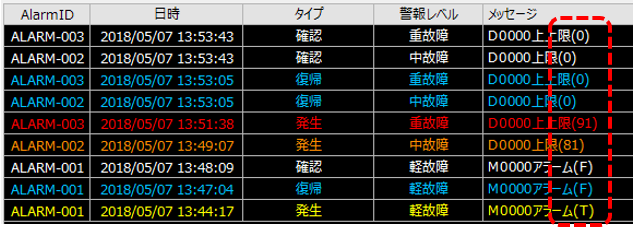
As you can see above, currently all messages have a tag value displayed at the end in parentheses.
There is no problem with the functionality as it is, but it will be more user-friendly if you improve the following two points.
Improvements:
•Only analog values should include tag values in messages (as there is little meaning in looking at bit alarm values).
•In addition, the tag value is displayed only for messages that occur at the time of occurrence.
The steps below will continue to make the improvements listed above.
Work procedure 2
■Editing the alarm master
First, add a comment to the alarm master.
1.Open Alarm Master
Open the alarm master "master.csv" that you just edited.
(Project folder)\server\alarm\master.csv
After the steps above, the alarm master should be in the state shown below (below is an example opened in Excel).
2.Editing an Alarm Master
For the above, add a new category [CM4] to the end of the column.
Here, edit it as follows:

Below is an example edited in Notepad.
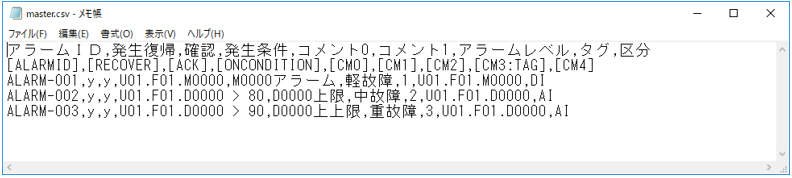
In the above setting example, a new column called "CM4" is added to the end of the alarm master column, and a classification of "AI" or "DI" is added to this column. In the alarm layout settings, modify the message to include the value only for AI alarms for CM4.
■ Editing the layout of alarm summary/alarm history
Next, edit the layout of the alarm summary screen and alarm history screen.
1.Editing the alarm grid on the alarm summary screen
Open the alarm summary screen (_AlarmSummary._Main) and double-click the remote alarm grid located in the center of the alarm summary screen to open the settings dialog.
From the settings dialog, click the Edit button for "Layout" (AlarmLayout property).
When the editor appears, edit the alarm layout as follows:
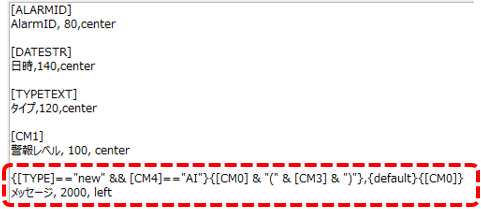
Before editing)
[CM0] & " (" & [CM3] & ")" Message, 2000, left |
After editing)
{[TYPE]=="new" && [CM4]=="AI"}{[CM0] & "(" & [CM3] & ")"},{default}{[CM0]} Message, 2000, left |
By making the above definition, you can branch the message display content depending on the result of the condition expression.
2.Editing the alarm grid on the alarm history screen
Next, open the alarm history screen (_AlarmHistory._Main) and double-click the remote alarm grid located in the center of the alarm history screen to open the settings dialog.
From the settings dialog, click the Edit button for "Layout" (AlarmLayout property).
When the editor appears, edit the alarm layout.
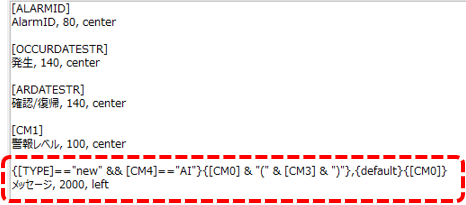
*The above editing contents are the same as those for the alarm summary.
Operation check 2
Now let's check how it works.
Click Online (yellow arrow) at the top of the Panel Server screen.
Next, click the browser run icon (green arrow) at the top of the Panel Editor screen to call up Panel Browser.
Once Panel Browser is running, display the alarm history screen.
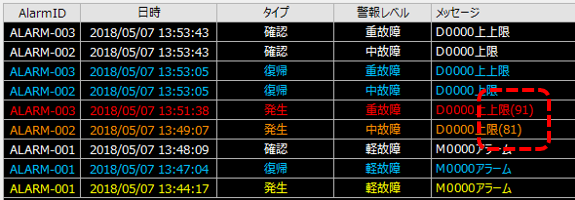
As shown above, please confirm that among the messages displayed in the alarm history, only analog alarms (alarms defined as "AI" in CM4) and messages at the time of occurrence have values in parentheses displayed.
supplementary explanation
■Alarm layout formula syntax
When defining an alarm layout, you can write a condition expression. By branching the display content depending on the evaluation result of the expression, you can achieve more flexible display.
The condition expression and result definition are expressed by combining half-width "{" and "}". In addition, you can define any number of condition expression and result pairs by listing them separated by a half-width comma ",".
{Condition 1}{Result 1}, {Condition 2}{Result 2}, {Condition 3}{Result 3}, ... {default}{Results other than all conditions}
For example, in this example, the following is written:
{[TYPE]=="new" && [CM4]=="AI"}{[CM0] & "(" & [CM3] & ")"},{default}{[CM0]}
The above means that only when TYPE is "new" (when the event occurred) and CM4 is "AI", the value (CM3) is included in CM0 and displayed; otherwise, only CM0 is displayed.
|
Details regarding the expression syntax are described in "Expression syntax". |

■About alarm save items
Alarm serverYou can define "Saved items" from the action setting screen.Saved items are data items that are recorded in the alarm log data.
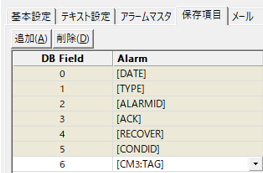
By default, the [DATE], [TYPE], [ALARMID], [ACK], [RECOVER], and [CONDID] fields are defined as saved items.
In this customization, the tag value is added to the saved item by specifying the [CM3:TAG] field.
If you want to include the tag value in the message and display it, you must add it to the saved items. Because tag values are constantly changing, for example, by recording the value at the time an alarm occurred as a saved item, you will be able to display the tag value at the time of the alarm occurrence in the alarm history.
In addition, the messages ([CM0]) are not set to be included in the saved items for each alarm function in the screen library. In this case, the original data of the messages displayed in the alarm summary and history will be the messages defined in the alarm master. Therefore, for example, if you change the alarm master message after starting operation of the system, the new messages will be displayed when you display the alarm history of past data.
If you want to display the messages before the changes for past alarm history (so that they are not affected by editing the alarm master), you can do so by including [CM0] in the save items.