About Layout Master
The "Client Configuration Guide" provides a "Client Connection Sample" as an example of connection from FA-Client. This sample has a summary action named "Summary" registered in advance.
One of the configuration files for summary actions is a configuration file called "Layout Master." Layout Master is a Excel file that defines the layout used when printing a report (Daily/Monthly/Yearly Report).
The layout master for the above "Summary" action is stored below.
(Project Folder)\server\summary\layoutmaster.xls
The layout master is an Excel file itself and can be freely edited in Excel.
Editing a Layout Master
Layout files are Excel files themselves and are edited using Excel.
Here we will briefly explain how to edit a Layout Master.
|
For details about the sheet configuration of the Layout Master and the keywords that can be specified, see "Layout Master" in the Action Reference. |
Please open the following file with Excel.
(Project Folder)\server\summary\layoutmaster.xls
Below is the layout master opened.
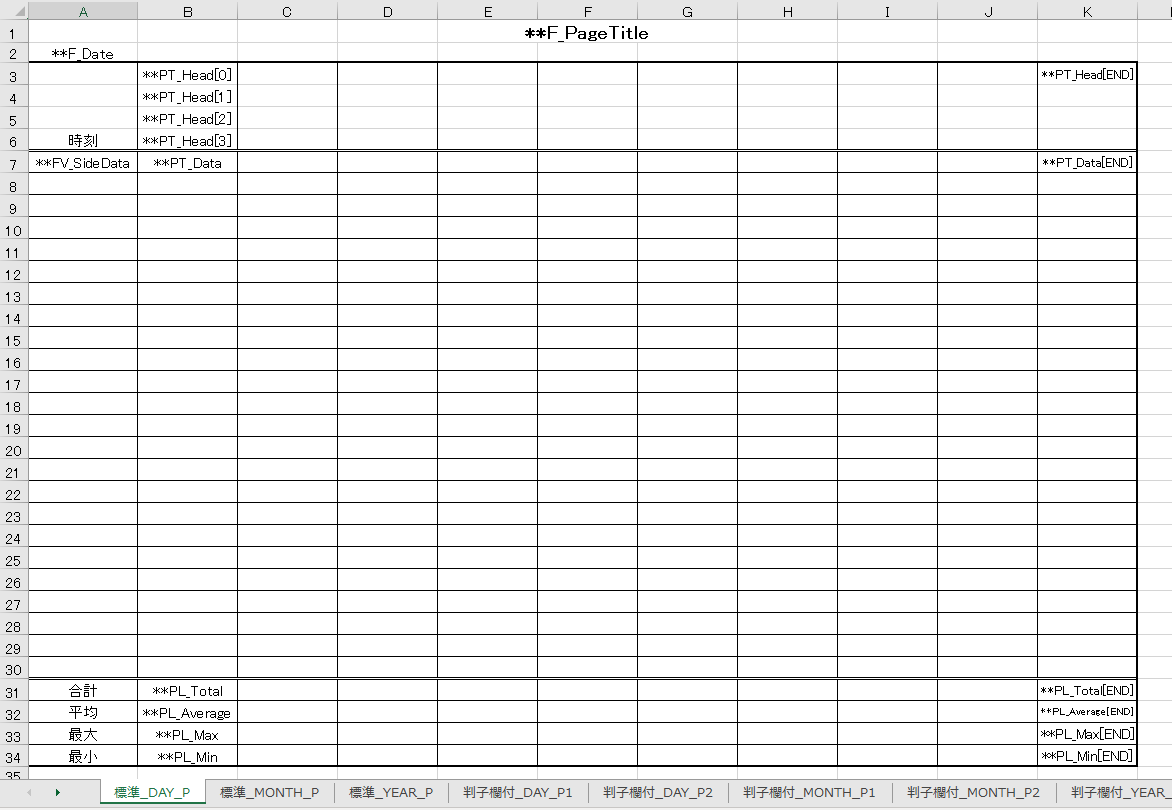
In the actual printed form, the cell attributes (border, font size, type, color, justification (right, center, left), etc.) defined in the layout master are used exactly as defined in the Excel file. In other words, the form layout designed in Excel can be printed as is.
■ Layout Master Keywords
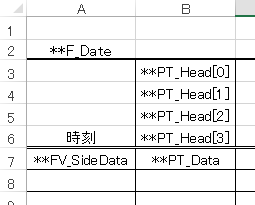
If you look at the Layout Master sheet, you will see that there are cells containing keywords beginning with "**" (two half-width asterisks).
 |
When printing is performed, the desired data is embedded in these keywords and printed.
For example, "**F_Date" means the report date, and "**PT_Data" means the detailed line of the aggregated data.
|
For example, you only need to define "**FV_SideData" once in the top left corner of the detail area, and the necessary number of lines of data will be automatically filled in when printing. For example, the details of a daily report are one line per hour, for a total of 24 lines for one day, so when designing the layout of a daily report, make sure to reserve 24 lines of detail lines in advance. Similarly, a maximum of 31 lines are required for a monthly report, and 12 lines for an annual report. Also, if you specify "**PT_Head" or "**PT_Data", the columns will be automatically filled up to the cell position of "**PT_Head[END]" and "**PT_Data[END]", and the number of lines will be automatically filled in the same way as the number of lines required for the target data.
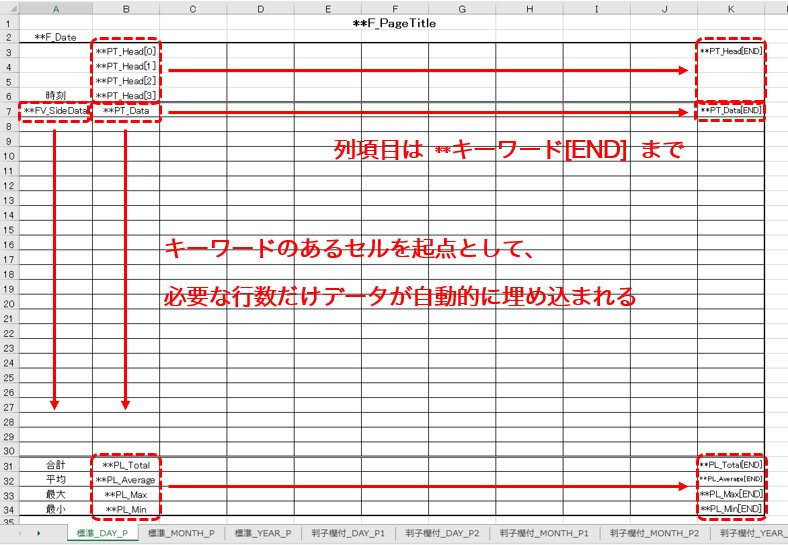
|
For information on the keywords that can be specified for layout masters, see "Layout Master" in the Action Reference. |
■ Layout Master Sheet Configuration
With Layout Master, you can define multiple sheets in one Excel workbook.
For example, if you look at a sample layout master sheet, it has the following structure:

The layout for Daily/Monthly/Yearly Report has a different number of detail rows, so each is defined on a separate sheet. There are also rules for naming sheets. The above sheet names are "Standard _DAY_P", "Standard _MONTH_P", and "Standard _YEAR_P", but the "DAY", "MONTH", and "YEAR" parts on the left are based on the definition of "ReportLayoutMasterSheet" in the summary log section of the summary master, and are used to determine which sheet is the layout for which summary section when the report is printed. For example, in the [RAW::DAY] section for daily report aggregation, the ReportLayoutMasterSheet setting is "DAY", for monthly report it is "MONTH", and for annual report it is "YEAR". The target sheet is automatically selected depending on whether these strings match the sheet name string.
Here, the prefixes such as "Standard" or "With Hanko Column" added to the beginning, such as "With Hanko Column_DAY_P1", are used as identifiers for the layout type. The page settings screen for the daily report screen allows you to select the layout type in a combo box, and the type selected there (Standard, With Hanko Column, etc.) is matched with the prefix string of the sheet name to identify the desired format.
Also, add "_P" to the end of the sheet name in the layout master file. If you specify a number after "_P", you can specify which page to print. For example, if you prepare sheets "DAY_P1 with stamp column" and "DAY_P2 with stamp column", P1 will be used to print the first page on the page, and P2 will be used for the second and subsequent pages on the page. This system allows you to devise layouts, such as providing a stamp column only on the first page.
|
For details about the sheet configuration of Layout Masters, see "Layout Master" in the Action Reference. |