Overview of setup steps
To set up duplication for FA-Server, follow the steps below.
Windows |
•Configuring Network Shares |
|
FA-Server |
•Configuring a redundant interface |
|
FA-Server |
•Action duplication settings |
|
FA-Client |
•Client duplication settings |
|
FA-Server |
•Server duplex startup mode setting |
In this example, we will assume that the primary and secondary PCs each have two LAN cards installed, and that the network configuration allows two communication paths to be used.
•Network Configuration Example

The duplication function of FA-Server uses the network sharing function provided as a standard feature of the Windows OS. Please set up the network sharing settings of the Windows OS so that the folders of both the primary and standby PCs are shared over the network.
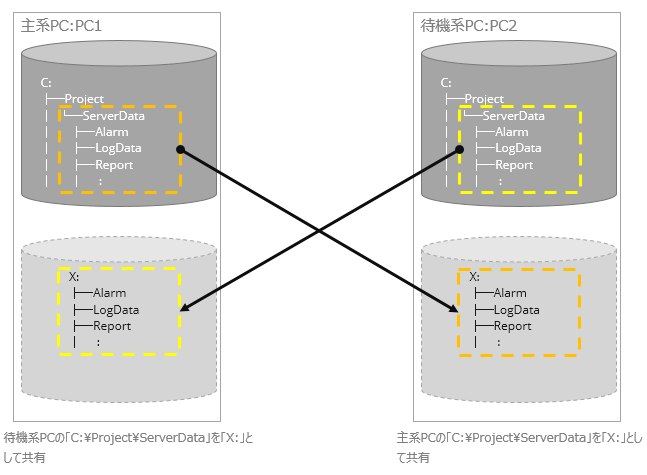
As an example, let's assume the following folder structure:
C:\Project Project folder.
\ServerData Under this folder, divide into subfolders
\Alarm Stores server data (alarms, logging, reports, etc.).
\LogData
\Report
: :::
As shown in the above configuration, by consolidating the server-related data you want to duplicate under a folder such as "ServerData," the ServerData folder will be the only folder that is subject to network sharing settings. Also, in the network sharing settings, you can set the main PC and standby PC to share the same folder on each other's PCs with the same drive letter (such as "X:").
The figure below is an example in which each other's "C:\Project\ServerData" is shared as "X:".
|
If there are multiple communication paths for LAN, specify the IP address directly in the network path name for the network share. If you specify the computer name, an unintended communication path may be selected. (example) \\PC2\ServerData → \\192.168.1.2\ServerData |
|
When an application is run in administrator mode, it may not be possible to access network drives correctly. This is a phenomenon that depends on the UAC (User Account Control) mechanism that has been installed in OSs since WindowsVista, and occurs because the connection state of network drives is not shared between administrator privileges and user privileges (before elevation). Specifically, even if it appears that you can connect to the network drive without any problems from Explorer, the network drive may be recognized as disconnected from an application run with administrator privileges.
This issue can be avoided by changing the settings on the OS side (it cannot be controlled from the application side). If this problem occurs when referencing a network drive in redundant operation or with File operation actions, please take the following measures.
*Please be careful when performing the following as it changes the registry settings. If you accidentally change anything other than the following, the OS may not function properly. [Solution]
By configuring the registry value "EnableLinkedConnections", the network share mapping settings will be shared between the two tokens. This setting allows access to network shares even when the application is run with administrator privileges.
1.Enter "regedit" in "Run" or "Search" and run regedit.exe 2.Once the Registry Editor is open, go to the following key: 3.Create the following new value and set its value data:
4.Exit Registry Editor and restart your computer.
|
|
When starting Windows, if the PC you are sharing with is not running, the network shared drive may not be reconnected automatically. In such cases, start Windows Explorer and click once on the target network drive (folder) from the folder tree to reconnect the network drive. When starting up the system, please check to make sure the network drive is connected correctly.
Even if the network drive for duplication is connected correctly at the start of operation, the network drive may be unintentionally disconnected during operation for some reason. If such a problem occurs, it can be avoided by periodically calling a simple external application for connecting to the network drive from a server action to automatically reconnect. A sample of this issue is posted on the following FAQ page on our website (click to display in a separate browser).
"In a duplicated configuration, the network drive may be disconnected. Is there a solution?"
|
|
When logging to a network shared folder in a large volume at high speeds in the CSV logging process, delays in writing to the network drive, etc., can occur depending on the hardware configuration, resulting in missing log data. This problem can be caused by a variety of factors, including low hardware specifications (insufficient memory, slow disk rotation speed), overhead due to the RAID configuration, and slow network communication speeds. Please consider the following as countermeasures (for reference):
•Is it possible to slow down the logging cycle? •Is it possible to reduce the number of files (by increasing the number of columns per file, etc.)? •Disable the OS disk cache settings.
|
|
When sharing over a network, sharing the entire directory of a drive such as "C:" is not recommended for security reasons. Network sharing should be limited to only folders that contain server data that requires duplication. |
Step 2 (Configuring redundant interfaces)
Configure the redundant interface for FA-Server.
1.Open Interface/Redundancy from the FA-Server tree, right-click to display the menu, and select Properties to display the redundant interface setting screen.

2.Configuring a redundant interface
In the settings for redundant communication line 1, specify the IP address of the LAN card to be used exclusively for the redundant communication line. Specify the IP addresses for both the main machine and the sub machine. The port number is displayed as 6002 by default. If you need to change it, change the setting from this screen.

If redundant communication line 2 can be used, check the box to enable redundant communication line 2 and specify the IP addresses and port numbers of the main and sub machines.
When you have finished setting up, click the OK button to close the dialog.
Step 3 (Duplication of actions, etc.)
The duplication settings for an action differ depending on the type of action. Also, if you use the disk save function of the memory device tag as a function other than an action, you can also set duplication for the memory device save destination settings.
The duplication settings for each target function are as follows:
Duplication setting (action) |
||||
|---|---|---|---|---|
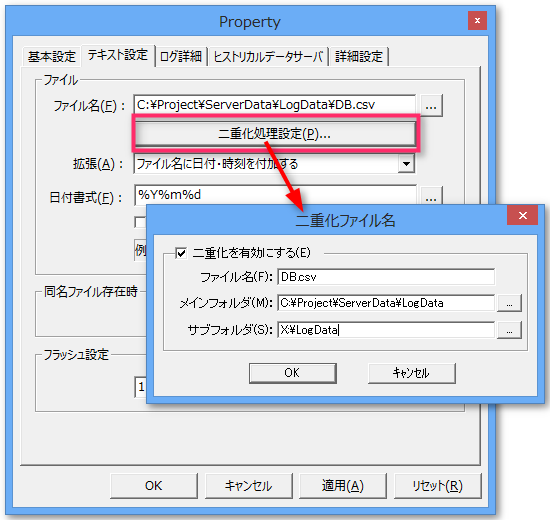
Logger(CSV) |
|
1.Open the Text Settings tab. 2.Clicking the Duplicate Settings button displays the Duplicate File Name dialog box. 3.If you check Enable Duplication, the input area will be enabled. 4.For the subfolder, specify the same folder name under the shared drive.
|
||
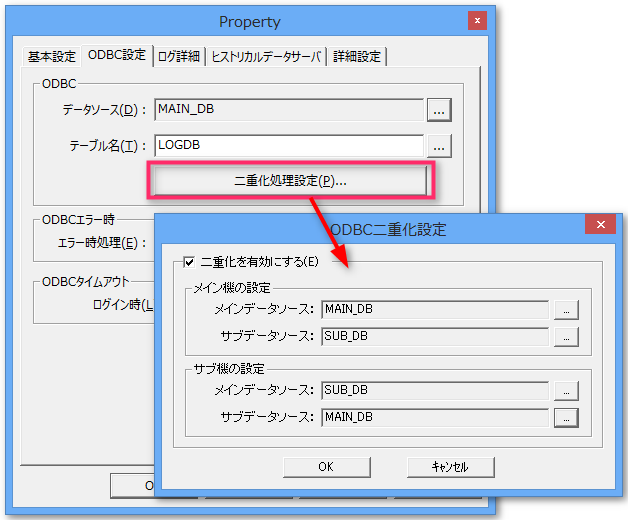
Logger (ODBC) |
|
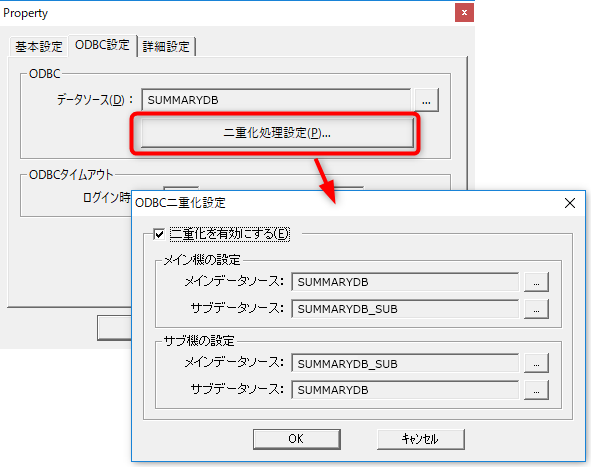
1.Open the ODBC settings tab. 2.Clicking the Duplication Settings button displays the ODBC Duplication Settings dialog.
3.Checking Enable Duplication will enable the input area. 4.In "Main machine settings," specify the DSN of the main DB as the main data source and the DSN of the sub DB as the sub data source. 5.In "Sub-machine settings," specify the DSN of the sub-DB as the main data source and the DSN of the main DB as the sub-data source.
|
||
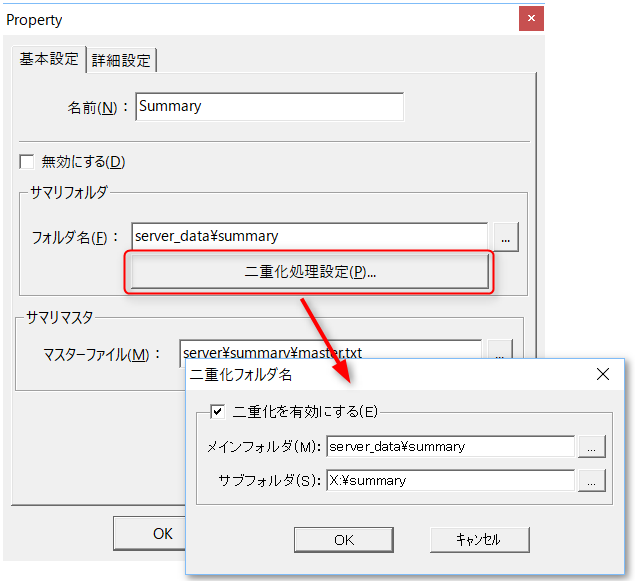
Summary |
|
1.Open the Basic Settings tab. 2.Clicking the Duplicate Settings button displays the Duplicate File Name dialog box. 3.If you check Enable Duplication, the input area will be enabled. 4.For the subfolder, specify the same folder name under the shared drive. |
||
Summary (ODBC) |
|
1.Open the ODBC settings tab. 2.Clicking the Duplication Settings button displays the ODBC Duplication Settings dialog. 3.Checking Enable Duplication will enable the input area. 4.In "Main machine settings," specify the DSN of the main DB as the main data source and the DSN of the sub DB as the sub data source. 5.In "Sub-machine settings," specify the DSN of the sub-DB as the main data source and the DSN of the main DB as the sub-data source.
|
||
File server |
|
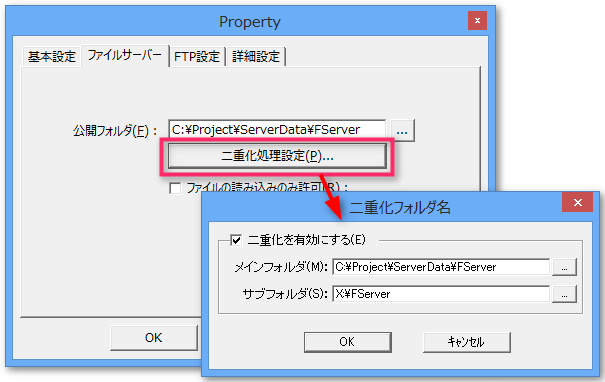
1.Open the Settings tab. 2.Click the duplicate public folder setting button. 3.Check Enable Duplication and specify the folder name of the shared drive in Subfolder.
|
||
Duplication settings (other than actions) |
||||
|---|---|---|---|---|
Memory Devices |
|
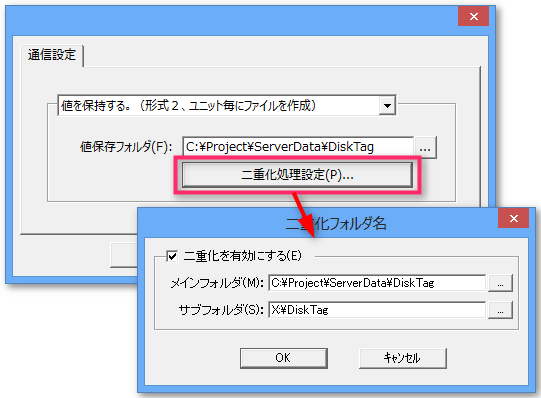
1.Open the unit properties of the memory device and open the Communication Settings dialog. 2.Click the Duplication Processing Settings button in the Value Retention Folder. 3.Checking Enable Duplication will enable the input area. 4.Specifies the subfolder name for the disk location of the tag value. |
||
Public Folder |
|
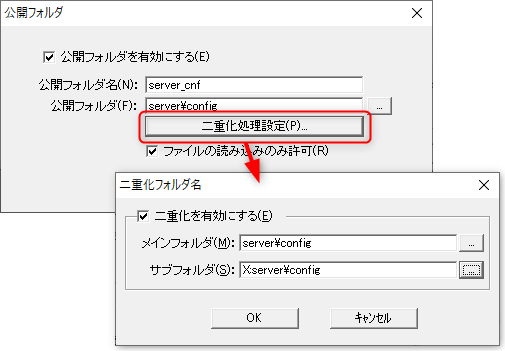
1.Open the properties of Panel-Interface and select the Public Folder tab.
2.Select the public folder that needs to be duplicated and click the Change button.
3.From the Public Folder dialog, click the Duplication Settings button.
4.Check Enable Duplication and specify the subfolder name.
|
||
Step 4 (Client duplication setup)
The client-side duplication settings are made to the following properties in the FA-Client setting definition file.
Property Name |
Contents |
PSNode |
IP address of the main PC |
PSNode2 |
IP address of the standby PC |
PSNodeRedundancy |
T: Perform duplication, F: Do not perform duplication |
To configure client duplication, follow the steps below:
1.From the Start menu, run “FA-Client (xxbit) Settings”.
*The xxbit part will be either 32-bit or 64-bit, depending on the installer run during installation.
2.Notepad will start and the FA-Client settings file will be open. Set the following properties and save the settings file.
・PSNode - the IP address set in Panel-Interface of the destination node (primary PC)
・PSNode2: The IP address set in Panel-Interface of the destination node (standby PC)
・PSNodeRedundancy ・・・ Redundancy enabled/disabled
Setting example)
PSNode=192.168.1.1 ... PSNodeRedundancy=T ... PSNode2=192.168.1.2 ... |
❖If it is "//PCNodeRedundancy=T", delete the leading "//" ("//" is treated as a comment).
❖The IP addresses to be set for PCNode and PSNode2 should be the IP addresses to connect to the actual main PC and standby PC. The IP addresses to be set here are the ones set in "Interface" and "Panel" of FA-Server.
This completes the duplex setting for the client. When you run FA-Client, it will start in duplex mode.
|
The IP address and port number set in the PSNode root property, PSNode2 root property, PSPanelPort root property, and PSPanelPort2 root property must match the settings specified in "Interface" and "Panel" of FA-Server. Note that these are not the IP address and port number set in "Interface" and "Redundancy". |
|
FA-Client startup settings, such as creating shortcuts and registering in startup, are the same as normal execution methods even in a duplicated environment. |
Step 5 (Setting the server's redundant startup mode)
Set the dual startup mode for FA-Server. Dual startup settings must be configured on both the main and sub FA-Server machines.
1.From the FA-Server menu, select Operations > Options.
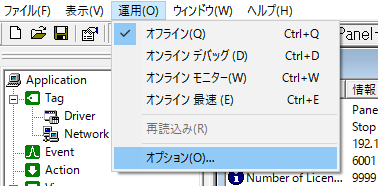
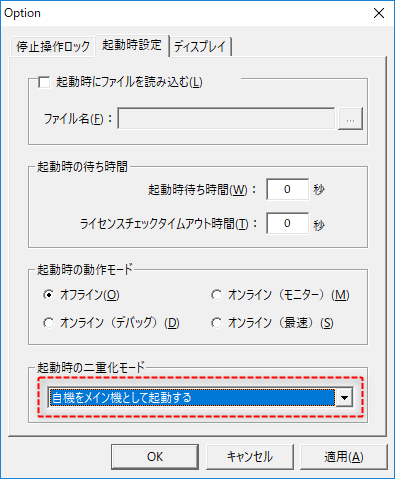
2.Open the Boot Settings tab and set the "Boot Duplex Mode".
For the main device, select "Start your device as the main device." For the sub device, select "Start your device as the sub device."
3.When you change the duplex settings, the following dialog box will be displayed. Click the OK button to save the settings.
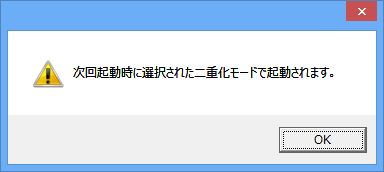
4.The change to the dual boot mode setting will be reflected the next time FA-Server is started. To reflect the change, close FA-Server and then start it again.
|
By using the FA-Server environment variable, it is possible to standardize the server configuration files for the main and sub servers. In other words, there is no need to have separate server configuration files for the main and sub servers. Specifically, define the IP address in the environment variable and set the environment variable to the IP address of Panel-Interface. For more information about environment variables, see "Environment variables". |