Specifying Cell Properties Using Styles
A combination of cell property settings is predefined as a "style."For each column (or each row)You can register it in advance. This is the recommended setting method.
By registering a style, when a new row or column is added to the grid, the various settings registered as the style will be applied.Cell PropertiesIt will be taken as the default value.
If the number of rows displayed in the grid changes dynamically, orThis is a good method if you want to change the display format.
(An example of specifying different display formats for each column)
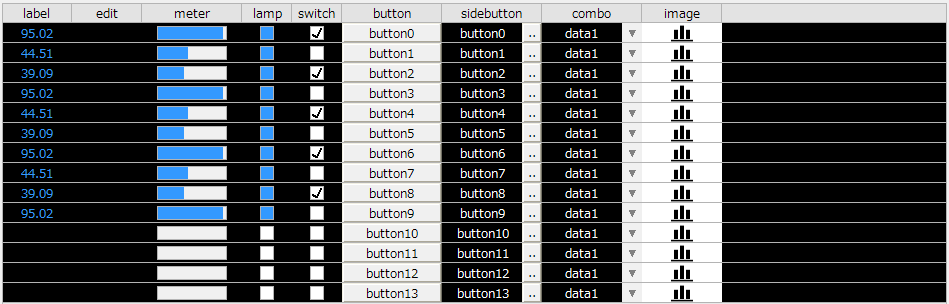
To define styles for each column (or row), use the following methods:
... Define styles. Give each style a unique name. |
|
... Assigns the style defined with AddStyle to each column. |
By assigning the style registered with the AddStyle method as the style of each column (or each row) with the SetDefaultStyle method, when a new row (or column) is added using the AddRow / AddCol / InsertRow / InsertCol method or the Rows / Cols property, the various setting values assigned as the style will beCell PropertiesThis behavior will be adopted as the default value.
Below is an example of a script using styles.
	// Prepare columns to apply style to
	this.Cols = 10;
	this.Rows = 0;

	// Add style using AddStyle
	this.AddStyle(
		c("styleLabel" , "CellType:label"),
		c("styleEdit" , "CellType:edit"),
		c("styleMeter" , "CellType:meter"),
		c("styleLamp" , "CellType:lamp"),
		c("styleSwitch" , "CellType:switch"),
		c("styleButton" , "CellType:button", "TextColor:@TextColor"),
		c("styleSideButton", "CellType:sidebutton"),
		c("styleCombo" , "CellType:combo", "ComboType:DROPDOWNLIST", "TextList:data1"+::RET()+"data2"+::RET()+"data3"),
		c("styleImage" , "CellType:image", "File:" + "image.png"),
		c("styleFill1" , "FillColor:#000000", "TextColor:@SelectColor"),
		c("styleFill2" , "FillColor:#000000", "TextColor:#FFFFFF")
	);

	// Set style for each column
	this.SetDefaultStyle("col",
		c(
			"styleLabel, styleFill1",
			"styleEdit, styleFill2",
			"styleMeter, styleFill1",
			"styleLamp, styleFill1",
			"styleSwitch, styleFill1",
			"styleButton",
			"styleSideButton, styleFill2",
			"styleCombo, styleFill2",
			"styleImage",
			"styleLabel, styleFill1"
		)
	);

	// Add a row
	this.AddRow(10);

	// Set column width
	this.SetColWidth(0, c(70, 70, 100, 50, 50, 100, 100, 100, 80, 500));
	// Set the header title
	this.SetRowData(-1, c("label", "edit", "meter", "lamp", "switch", "button", "sidebutton", "combo", "image"), F);
■Explanation
1) |
Specify the number of columns (or rows) to style
Prepare in advance the number of columns (or rows) for which you want to set styles. For example, when you set a style for a column, you specify the number of columns in the Cols property, and in this case, the Rows property is set to 0 because the style is applied to the added rows. this.Cols = 10; this.Rows = 0;
|
||||||||
2) |
Define a style
	this.AddStyle(
		c("styleLabel"     , "CellType:label"),
		c("styleEdit"      , "CellType:edit"),
		c("styleMeter"     , "CellType:meter"),
		c("styleLamp"      , "CellType:lamp"),
		c("styleSwitch"    , "CellType:switch"),
		c("styleButton"    , "CellType:button", "TextColor:@TextColor"),
		c("styleSideButton", "CellType:sidebutton"),
		c("styleCombo"     , "CellType:combo", "ComboType:DROPDOWNLIST", "TextList:data1"+::RET()+"data2"+::RET()+"data3"),
		c("styleImage"     , "CellType:image", "File:" + "image.png"),
		c("styleFill1"     , "FillColor:#000000", "TextColor:@SelectColor"),
		c("styleFill2"     , "FillColor:#000000", "TextColor:#FFFFFF")
	);
The AddStyle method allows you to specify multiple style definition arrays as parameters. The style definition array is specified in the following format:
|
||||||||
3) |
Set style for each column (or row)
This section explains how to set styles for each column. Use the SetDefaultStyle method to set predefined styles for each row.
	this.SetDefaultStyle("col",
 		c(
			"styleLabel, styleFill1",
			"styleEdit, styleFill2",
			"styleMeter, styleFill1",
			"styleLamp, styleFill1",
			"styleSwitch, styleFill1",
			"styleButton",
			"styleSideButton, styleFill2",
			"styleCombo, styleFill2",
			"styleImage",
			"styleLabel, styleFill1"
		)
        );
In the SetDefaultStyle method, pass either "col" (column-by-column) or "row" (row-by-row) as the first parameter. If you want to specify a style on a column-by-column basis, specify "col".
The second parameter specifies the styles for each column in an array.
You can also assign multiple styles to each column at the same time by listing the style names separated by commas and enclosing them in double quotation marks.
|
||||||||
4) |
Add a row (column) this.AddRow(10);
|
||||||||
5) |
Specify the column width this.SetColWidth(0, c(70, 70, 100, 50, 50, 100, 100, 100, 80, 500));
|
||||||||
6) |
Set data for the header and each cell
this.SetRowData(-1, c("label", "edit", "meter", "lamp", "switch", "button", "sidebutton", "combo", "image"), F);
|


|
In the above example, we've shown how to set styles for each column, but you can also set styles for each row (or the whole row). |