System configuration and setting example for distributing recorder terminal PCs
This section explains the system configuration and setting examples for distributing the recording process of video recorders by using multiple recorder terminal PCs.
The example configuration introduced here is a system configuration that assumes connecting multiple cameras simultaneously and performing high-quality recording. Note that high-quality recording assumes recording at a SVGA resolution and a frame rate of about 20 fps.
Key points of this configuration
•When recording at a high frame rate, the server PC and recorder terminal PC should be configured as separate PCs.
•A NAS drive is used as the destination for transferring and viewing recorded data.
•Six cameras can be connected simultaneously for recording. The number of cameras connected to one recorder PC is limited to "3", and the cameras are distributed across two PCs.
Expected specifications
item |
Setting values etc. |
supplement |
Video Compression Method |
MJPEG |
Connection is also possible with "H.264". |
Camera Image Resolution |
SVGA (800*600) |
Set on the camera. |
Camera quality |
usually |
Set on the camera. |
Camera Frame Rate |
24fps |
Set on the camera. If your camera only allows you to select from a set of preset values, select the frame rate that meets your requirements (up to 30 fps). |
Recording Frame Rate |
20fps |
Set from the recording settings when registering the camera. |
Number of cameras connected simultaneously |
6 units |
Three cameras will be registered to each of the two recorders, for a total of six cameras distributed across two recorder terminal PCs. If you wish to record high quality footage with more than the number listed above, you can do so by adding more recorder terminal PCs. |
|
This configuration is an example. By setting the camera and recording frame rate to a low value, you can increase the number of cameras that can be supported by one recorder terminal PC. If you want to connect multiple cameras and record by lowering the camera fps, please refer to the description in "When connecting multiple cameras simultaneously (low fps recording)". |

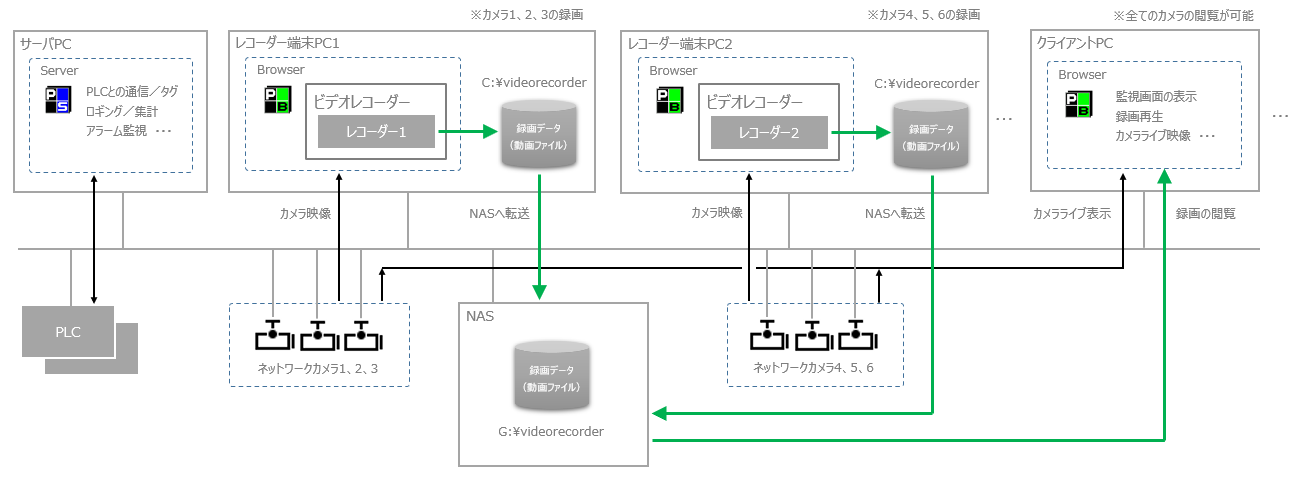
System configuration image
Components |
explanation |
|||||||||||||||||||||
Server PC (Panel Server) |
The server PC will be configured to run only Panel Server.
|
|||||||||||||||||||||
Recorder registration/Camera registration |
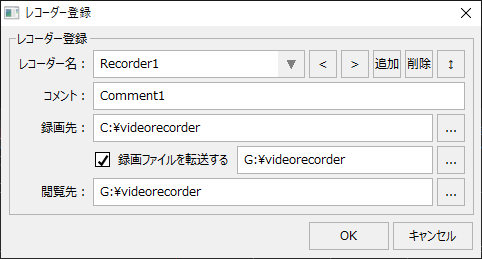
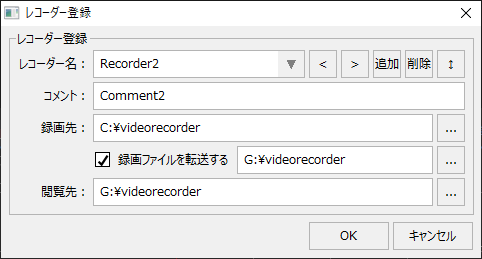
When registering recorders, register two recorders, "Recorder1" and "Recorder2". Also, when registering cameras, assign "Camera1", "Camera2", and "Camera3" to Recorder1, and "Camera4", "Camera5", and "Camera6" to Recorder2.
Please note that the number of days for automatic deletion for each camera (the number of days for which data is saved) should be determined based on the period for which you actually want to save the data and the amount of disk space available. For an estimate of the size of recorded data, please refer to "Recorded Data File Size and Disk Space".
|
|||||||||||||||||||||
Recorder terminal PC1 (Panel Browser) |
This PC will be registered as a recorder terminal for "Recorder1". On this PC, run only the video recorder in Panel Browser and do not display other functions (graphic screen, alarm monitoring, trend graphs, etc.).
|
|||||||||||||||||||||
Recorder terminal PC2 (Panel Browser) |
As above, register this PC as a recorder device for "Recorder2".
|
|||||||||||||||||||||
Client PC (Panel Browser) |
The client PC that displays the graphic screen, etc., is prepared separately from the recorder terminal PC. Graphic screen and other function screen display (trend, etc.) and viewing/playback of recorded data are performed on the client PC. Note that multiple client PCs can be configured.
|
|||||||||||||||||||||
Storage for recorded data (e.g. NAS) |
Use NAS as the destination for transferring recorded data. Make sure to connect to the network share using the same drive letter from all recorder terminal PCs and client PCs (connect as "G:" in this configuration example).
Selection points: ❖Please select a model with a fast disk rotation speed (7,200 rpm or higher) and a fast network connection speed (minimum 100BASE or higher). ❖The amount of data required for NAS varies depending on the number of cameras, storage period, recording fps setting, data resolution on the camera side, etc. In addition, "Recording data file size and disk capacity" lists the reference value of the size of the generated recording data. ❖If you would like to make the recording data redundant with this configuration, please set it up yourself using NAS functions (such as RAID).
|
|||||||||||||||||||||
Network Camera |
Below is an example of camera body settings. For details on tuning the camera body, please refer to "About camera body settings and tuning".
|
|||||||||||||||||||||
Network Devices
|
The network equipment for connecting to the network camera should be configured so that bottlenecks do not occur. For example, even if you select high-spec models for the LAN port of the recorder terminal PC or NAS device, if the relay device such as HUB is slow, it will become a bottleneck. Also, if the communication load with the network camera is high, consider preparing multiple LAN ports and HUBs for the PC and configuring the route of the normal network and the network connected to the camera separately.
|

Points to note about this configuration
Important points to note |
explanation |
Simultaneous playback of recorded data |
Playing back data recorded at a high fps places a high load on the CPU. When playing back multiple files recorded at 20 fps at the same time, the maximum number of files that can be played back at the same time is two. For an estimate of the number of files that can be played back at the same time, please refer to "Number of files that can be played back at the same time". |
When displaying multiple live images simultaneously |
The video recorder screen has a function that allows you to simultaneously display live images from multiple selected cameras. However, if you simultaneously display live images from high-fps cameras side-by-side, the processing load may become very high due to the streaming data sent from each camera, so please be careful.
As a guideline for displaying video from multiple cameras simultaneously on a typical PC, in the case of high fps cameras (approximately 20 to 30 fps, resolution 800*600, medium image quality level), the maximum number of cameras that can be displayed simultaneously is three, and at most five.
|
Users must make the recording data redundant themselves.
|
If you wish to make the recording data transferred to NAS redundant, you must create the system yourself (for example, use NAS to create a RAID configuration, or create a backup system to a separate drive). For details on using the video recorder function in a server duplex configuration, please refer to the description in "When operating a server in a duplex configuration". |