When connecting multiple cameras at the same time (recording at lower quality with reduced frame rate)
This section describes the system configuration and setting examples for connecting multiple cameras and recording at a lower frame rate.
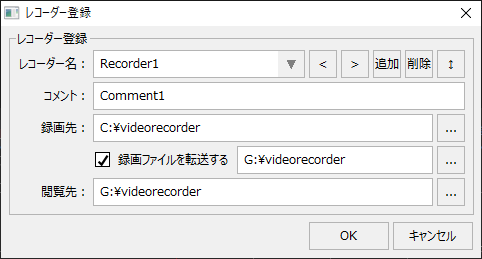
By lowering the frame rate and reducing the recording quality, it becomes possible to connect and record more cameras at the same time. Note that low-quality recording is assumed to be recorded at a resolution of SVGA and a frame rate of about 2 fps.
Key points of this configuration
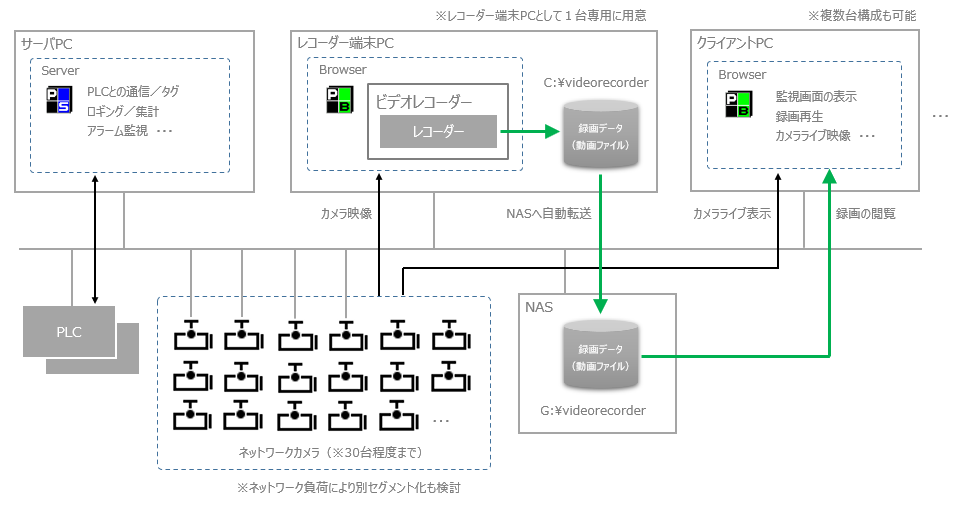
•The server PC and recorder terminal PC are configured as separate PCs.
•A NAS drive is used as the destination for transferring and viewing recorded data.
•With this configuration, up to 30 cameras can be connected simultaneously.
Expected specifications
item |
Setting values etc. |
supplement |
Video Compression Method |
MJPEG |
Connection is also possible with "H.264". |
Camera Image Resolution |
SVGA (800*600) |
Set on the camera. |
Camera quality |
usually |
Set on the camera. |
Camera Frame Rate |
1fps |
Set on the camera. Set to 5fps or less. |
Recording Frame Rate |
2fps |
Set from the recording settings when registering the camera. |
Number of cameras connected simultaneously |
Up to 30 units |
If you wish to record on more than the number listed above, this can be achieved by distributing the recorder terminal PCs. |
System configuration image
Components |
explanation |
||||||||||||||||
Server PC (Panel Server) |
The server PC will be configured to run only Panel Server.
|
||||||||||||||||
Recorder terminal PC (Panel Browser) |
Prepare a dedicated PC for the recorder terminal. On this PC, run only the video recorder in Panel Browser and do not display other functions (graphic screen, alarm monitoring, trend graph, etc.).
|
||||||||||||||||
Client PC (Panel Browser) |
The client PC that displays the graphic screen, etc., is prepared separately from the recorder terminal PC. Graphic screen and other function screen display (trend, etc.) and viewing/playback of recorded data are performed on the client PC. Note that multiple client PCs can be configured.
|
||||||||||||||||
Storage for recorded data (e.g. NAS) |
Use NAS as the destination for transferring recording data.
Selection points: ❖Please select a model with a fast disk rotation speed (7,200 rpm or higher) and a fast network connection speed (minimum 100BASE or higher). ❖The amount of data required for NAS varies depending on the number of cameras, storage period, recording fps setting, data resolution on the camera side, etc. In addition, "Recording data file size and disk capacity" lists the reference value of the size of the generated recording data. ❖If you would like to make the recording data redundant with this configuration, please set it up yourself using NAS functions (such as RAID).
|
||||||||||||||||
Network Camera |
Below is an example of camera body settings. For details on tuning the camera body, please refer to "About camera body settings and tuning".
|
||||||||||||||||
Network Devices
|
The network equipment for connecting to the network camera should be configured so that bottlenecks do not occur. For example, even if you select high-spec models for the LAN port of the recorder terminal PC or NAS device, if the relay device such as HUB is slow, it will become a bottleneck. Also, if the communication load with the network camera is high, consider preparing multiple LAN ports and HUBs for the PC and configuring the route of the normal network and the network connected to the camera separately.
|


Points to note about this configuration
Important points to note |
explanation |
||
How many cameras can be connected at the same time? |
When recording at a low fps like in this configuration, the number of cameras that can be connected simultaneously is limited to about 30. If more than that number of cameras are connected and recorded simultaneously, the processing load will be high, and problems such as skipping frames in the recorded data may occur.
|
||
Simultaneous playback of recorded data |
When playing back multiple recordings recorded at a frame rate of 2 fps at the same time, the number of simultaneous playbacks is limited to about 20. For an estimate of the number of recordings that can be played back simultaneously, please refer to "Number of recordings that can be played back simultaneously". |
||
Users must make the recording data redundant themselves.
|
If you wish to make the recording data transferred to NAS redundant, you must create the system yourself (for example, use NAS to create a RAID configuration, or create a backup system to a separate drive). For details on using the video recorder function in a server duplex configuration, please refer to the description in "When operating a server in a duplex configuration". |