How to use the logger action
Below are the basic steps to use a logger action:
1)Tag configuration
Define which area of PLC to communicate with. Also, create tags for handshake with the PLC and tags for calculations as necessary.
2)Action Settings
Configure the logger action. Define the basic settings for the database (save as a CSV file or save to a database via ODBC) and the field layout. The field layout can be created by registering the logger field in the logger action.
3)Event Settings
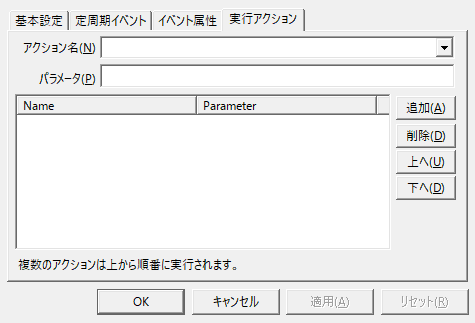
Set the event that will trigger the logger action to be executed.
4)online
Logging will start when you switch online. You can also control when to start and stop logging, and set the log cycle.
5)off-line
Going offline will end logging.
Configuring Logger Actions
The logger action configuration items are explained below.
Action specifications
|
Parameters
|
You can specify parameters for the action to be executed from the event that calls this action.
Parameter Characters
|
Operation
|
Do not specify anything
|
Perform logging.
|
SETFILENAME
|
Used to set the file name.
*No parameters are specified for normal logging. For information on how to use this parameter, see "CSV Dynamically change the log file name".
* When this parameter is specified, logging will not be performed.
|
MAINTENANCE
|
Perform maintenance on the logger.
*Log files can be automatically deleted at any time. For details, please refer to "DB Maintenance (Automatic Deletion)".
* When this parameter is specified, logging will not be performed.
|
RESTORE
|
If the logger action is duplicated, the duplication inconsistency can be repaired at any time. In particular, if an event-type log is used, the repair work will not be performed until an event occurs, so repairs can be performed quickly by calling an event with the RESTORE parameter separately at regular intervals. For general-type logs, the repair work is automatically performed when a normal event is called, so there is no need to call an event with the RESTORE parameter.
|
|
dialog
|
■ Text settings (for Logger (CSV))
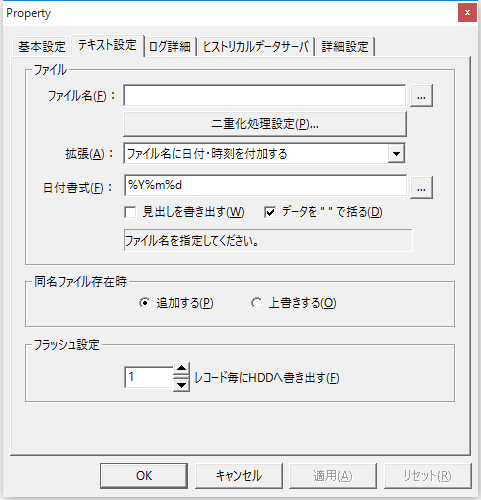
▪File name
Specifies the file name to save the log to.
If you specify [ansi] at the beginning of the file name, it will be saved in ANSI format. If you omit it, it will be saved in utf8 (with BOM).
Example) [ansi]c:\work\log.csv
▪Expansion
This is the extended setting for the log file name.
item
|
Operation
|
none
|
Save the file with the name you specified in the file name.
|
Add date and time to file name
|
The date specified in the "Date format" will be added to the end of the file name. If you specify %Y%m%d, a file will be created every day (e.g. DB20050101.csv).
You can also specify %Y%m to create a file every month, or %Y%m%d%H to create a file every hour.
|
Append the tag value to the file name
|
The tag value is added to the file name. For details, see "Dynamically change the log file name."
|
▪Write out the headline
The file header is always written to the first line of the file. The string used for the header is the field name set for each field.
▪Enclose the data in "".
Enclose the data in double quotes.
▪When a file with the same name exists
Append: Appends to the file with the same name. This is the normal setting.
Overwrite: Delete the old file, create a new file and save it as new.
▪Flash Settings
This setting is a function for writing multiple records to the hard disk at once, and is also an effective function for those who want to reduce the burden on the hard disk as much as possible during long-term operation.
If you want to write out each record, specify "1" for the flush setting. This setting ensures that the most recent data is saved even if the PC's power is suddenly turned off for some reason. In addition, if the log file is referenced from outside, the latest log is reflected immediately. However, since each record is written to the hard disk, the burden on the hard disk increases. If you want to reduce the burden on the hard disk, set the flush setting to a higher value.
|
|
■ Log details
▪Perform database maintenance
For details, please refer to "DB Maintenance (Automatic Deletion)".
▪Caching log data
Maximum number of cached log data. By using the cache, logs with accurate timestamps can be obtained.
The log data collected during data collection is first stored in a cache in memory before being saved to the database. It is then saved to the database as needed. This mechanism enables stable logging that is not affected by the load on the database.
If you do not want to use the cache for some reason, set it to 0. If the number of items stored in the cache exceeds the set value, the cache will wait until the cached data is saved in the DB (until the number of data items in the cache falls below the set value).
▪When a communication error occurs
How to process logs when a communication error occurs. For details, see "Settings when a communication error occurs".
▪If Scheduled event, save the scheduled time in a time field
If you want to log data in Scheduled event and want the logging to occur at the same time as the Scheduled event schedule (even if the timing is off), check this box.
▪Processing when the PC clock is reset (when a request is made to save data that is older than the last saved time)
This is the process to be performed when the time is set back by adjusting the time on the PC, etc. For details, please refer to "Processing when the time on the PC is set back".
|
|
■Historical data server
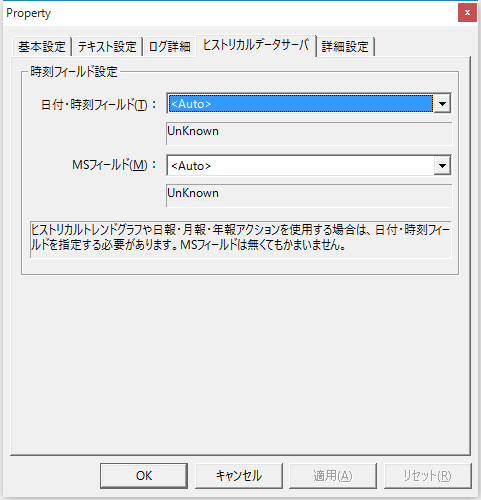
Logger actions have the Historical data server function. Items set on the "Historical data server" tab are automatically determined, so there is usually no need to specify them. This setting should only be specified if the data item contains two or more "date/time fields" and you want to specify which field to use as the time series. Also, specify the MS field only if the database contains a millisecond field. If you include the MS field, the historical trend graph will display the graph in milliseconds.
|
|
■ Advanced settings
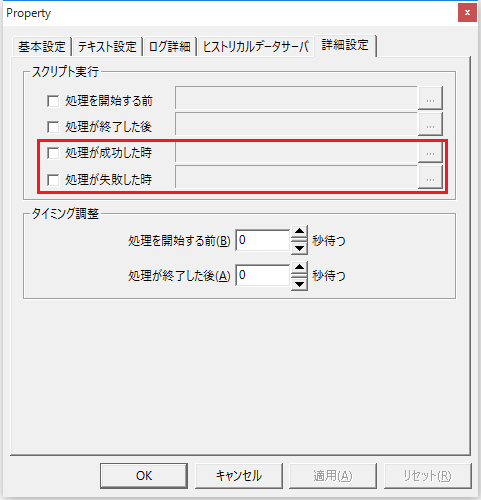
The logger action's "When the process is successful" and "When the process fails" indicate whether the log data was correctly written to the database or not. This behavior will be as follows depending on the cache settings of the log data.
•When the cache is set to 0
If logging to the database fails, the "When processing fails" script will be executed.
•When the cache is set to 1 or more
Because log data is stored in the cache, the operation in this case will always be successful (the "When the operation is successful" script will be executed).
|
|
■ODBC settings (for logger (ODBC))
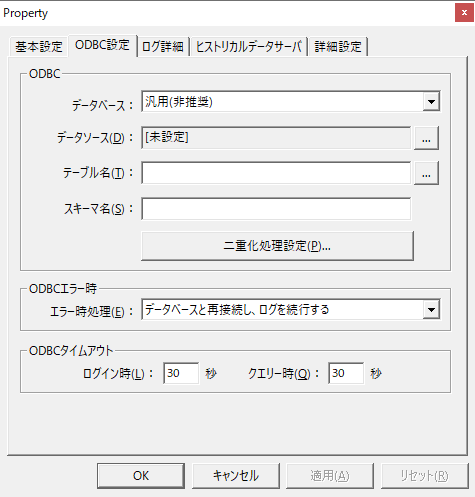
▪Data Source Table Name
When selecting the database, select "Generic"/"SQLServer"/"Oracle"/"MySQL"/"PosgreSQL". If you specify a non-generic database product, the processing will be optimized for each database, and each process will be faster.
For the data source, specify the ODBC data source name to connect to the database. For information on how to set up the data source, see "ODBC Settings" in Common Settings.
For table name, specify the name of the table that will store the alarm data.
If you want to specify the database schema name to connect, please specify the schema name. Note that if you are using MySQL, do not specify the schema name on this setting screen.
▪When a ODBC error occurs
If you want to continue logging, you should normally select "Reconnect to the database and continue logging."
▪ODBCTimeout
Specifies the timeout wait time for
ODBC.
|

|
In the "Advanced Settings" tab, you can specify the timing for executing a script (SC1) before an action is executed, or the timing for adjusting the execution of the action (setting the execution wait time). For details on the advanced settings of each action, see "Settings on the Advanced Settings tab of an action".
|
■ Field settings
When configuring a logger action, you need to add "fields" to define column information for the log data.
To add a field, right-click the action and select Add from the menu that appears.
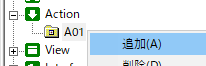
Alternatively, you can simply add the tag you want to log by dragging and dropping it onto an action (such as A01) in the tree selection view.
The added fields will be displayed in the multiview.
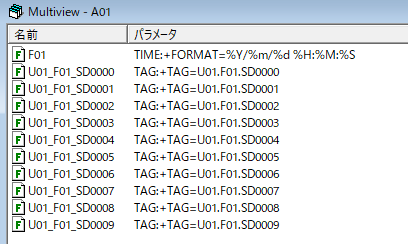
The settings in the field property setting dialog are explained below.
Logger field specifications
|
Tag Field
|
Select a tag field when you want to store a tag value.
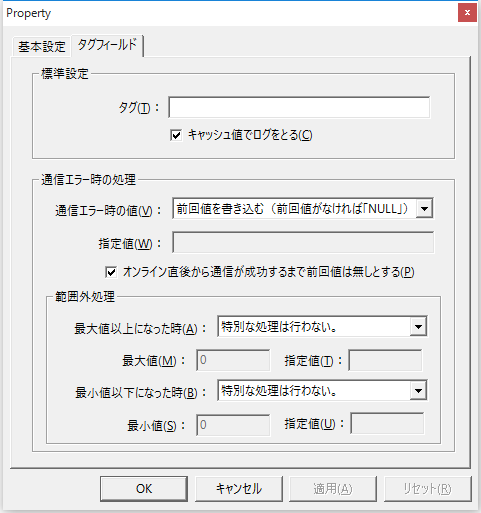
▪tag
The tag name you want to log (e.g. U01.F01.T01).
▪Log cached values
The value of the
tag is updated periodically by reading the actual device value from the PLC at a separately specified "update interval." This update interval is separate from the logger action settings.
Checking this item will enable logging using cached values. When logging cached values, the tag value at the time of action execution is used for logging, not the actual device value. Therefore, the processing time for data collection is very fast. Also, since communication with PLC does not occur each time an action is executed, stable logging can be performed even when multiple logger actions are executed in parallel. However, the timestamp of the log data will be past data within the range of the tag update cycle.
If you uncheck this item, logging will be by device value. When logging by device value, data is collected by communication with PLC each time a logger action is executed. Therefore, data with the most reliable timestamp can be obtained. This is the best choice if you are simply performing a single logger action.
However, if multiple logger actions use device values in parallel, communication requests may collide depending on the processing timing, and subsequent communication requests may have to wait. For example, if you are logging at a fixed interval, the fixed interval may be disrupted due to communication waits. Unless there is a special reason,Logging with cached values is recommendedI will.
▪Processing when a communication error occurs
For details, see "Settings when a communication error occurs".
|
Time Field
|
If you want to save time information, select the Time field.
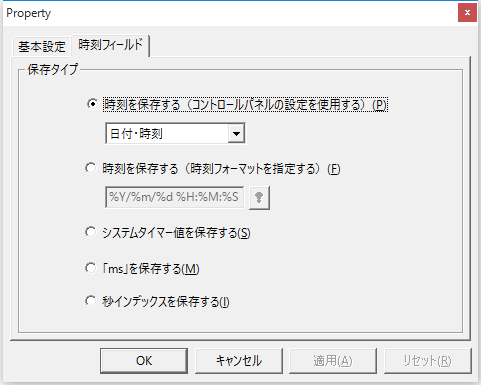
▪Use Control Panel Settings
Creates a time according to the standard settings of
OS. Seconds will be omitted when the time is 0 seconds. If you do not want to omit the seconds even when the time is 0 seconds, select "Specify format" and enter "%Y%m%d %H%M%S".
▪Specifying the format
Specifies the time format.
▪Use the system timer
The system timer value (0 to 4294967295) increases in 1ms increments. If the value exceeds 4294967295, the timer will wrap around to 0.
▪Using "ms"
Select this if you want to get the time in
ms units. Values are logged in the range 0 to 999.
By using a combination of a normal time field in seconds and a field in ms (total of two fields), you can display the time in ms on a trend graph.
▪Save the seconds index
This function adds an index to data recorded within the same second.
|
Constant Fields
|
Select a constant field when you want to store a specified value or an empty string.

▪Write NULL
Nothing to write.
▪Write the specified value
Writes the specified character.
|
Event Field
|
Select an event field when you want to save information about an event that occurred.
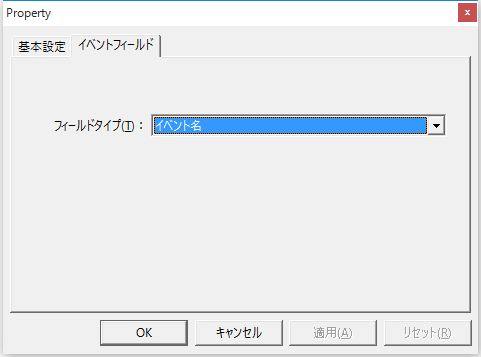
▪Field types
Event name
|
Event name. Example: E01
|
Tag Name
|
Tag name. Example: U01.F01.T01
|
Tag Comment
|
Tag comment. Set this in the tag properties "Basic Settings" tab.
|
message
|
The message, set on the Event Attributes tab of the event's properties.
|
value
|
For Tag event, the tag value when the event occurred.
|
Value (only numeric types are saved)
|
Tag event The tag value when the event occurred. Only numeric type tags are saved.
|
Value (only character type is saved)
|
In the case of Tag event, the tag value when the event occurred. Only string type tags are saved.
|
Value Quality
|
For Tag event, the quality of the tag value when the event occurred. Normally this is "GOOD". If communication with PLC is not possible, this will be "BAD". If communication has never been established yet, this will be "UNCERTAIN". When saving to a database (ODBC), if saving to a numeric DB field, it will be saved as a number (0-BAD 1-GOOD 2-UNCERTAIN).
|
category
|
The message, set on the Event Attributes tab of the event's properties.
|
Condition Name
|
The condition name, which is set on the event properties "Tag event" tab.
|
Subcondition Name
|
Sub-condition name, set on the event properties "Tag event" tab.
|
Importance
|
Severity, set in the Event Properties "Event Attributes" tab.
|
|