Customize the Extended Common Dialogs
To customize the extended common dialog, use the client configuration file "rc.xml" provided as a sample. This client configuration file contains the form that is the basis for the extended common dialog, and you can freely customize the layout, etc. by copying the form of the desired extended common dialog from this configuration file to the client configuration file you are developing.
|
The extended common dialog is also used by standard functions such as the screen library. When customizing the extended common dialog, care must be taken to avoid problems when calling from other standard functions. If you want to unify the system-wide common dialog with customized content, use the form name of the custom dialog imported from "rc.xml" in the customization procedure below without changing it, and the customization will be reflected in calls from all other places (for example, use the imported "_sysYesNoMsg" without changing the name, and call "_sysYesNoMsg" with OpenDialog). On the other hand, if you do not want the customizations to be reflected in all dialog invocations, you can customize the imported extended common dialog by changing the form name to another name and then specifying that form name when calling OpenDialog wherever necessary to display the customized common dialog individually (for example, change "_sysYesNoMsg" to "Ctm_sysYesNoMsg" and call "Ctm_sysYesNoMsg" with OpenDialog from the place where you want to call the customized dialog). |

|
The extended common dialog can be configured in detail using the open parameters specified when it is called. Depending on the customization requirements, it may be possible to meet the requirements by simply setting the open parameters without customizing the extended common dialog form, so be sure to check the open parameter specifications in advance. For details on the open parameters of each extended common dialog, see "Extended Common Dialog Reference". |

Download the sample
A sample of the extended common dialog can be downloaded from the link below.
The above contains the following files:
sample_dialog_ext_customize.xml
|
This is an example of customizing the extended common dialog. This is a client configuration file that was actually created using the procedure described in "Example of customizing the extended common dialog" below.
|
The original form of the Common Dialogue can also be downloaded from the link below.
The above contains the following files:
rc.xml
|
This is the original form of the Common Dialogue. |
Example of customizing the extended common dialog
The general steps for customizing the extended common dialog are as follows:
1)Open the client configuration file to be developed in Panel Editor.
2)In addition to the above, start another Panel Editor, open "rc.xml" and copy the form of the extended common dialog you want to customize.
3)Paste the Extended Common Dialog form copied in step 2 above into the client setting file to be developed that is open in Panel Editor in step 1 above.
4)Customize the extended common dialog that you copied and imported.
As an example, we will change the notation of each button in the message box (Yes/No button) as follows.
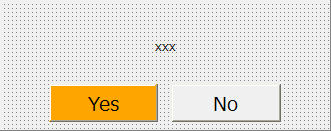
- Increase the size of each button and the font size.
・Change the display color of the Yes button.
■ Customization example
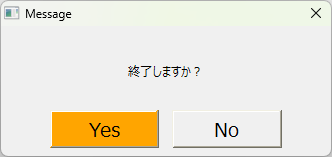
Below is an example of the customization procedure:
1.Start Panel Editor and open the client configuration file to be developed.
Currently, this client configuration file only has "Form01".
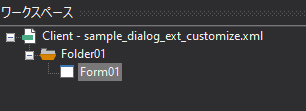
2.Start another Panel Editor and open "rc.xml"
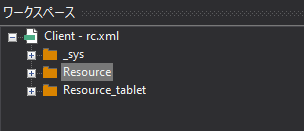
3.Open the _sys folder, right-click the "_sysYesNoMsg" form and copy it.
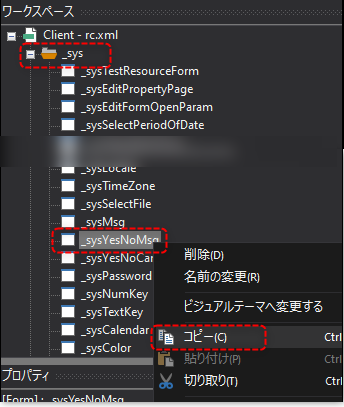
4.Display the Panel Browser of the browser that has the client configuration file you want to develop open, right-click on the folder where you want to paste the form, and paste it.
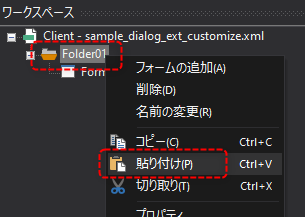
The form has been copied.
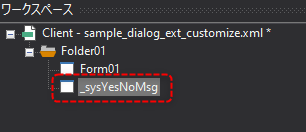
5.Customize the layout of the imported _sysYesNoMsg form
In this example, the layout is changed as follows:
Before the layout change:
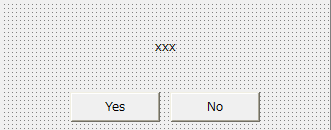
After layout change:
6.Operation check
The sample Form01 form Button control implements a process to call the exit confirmation dialog using _sysYesNoMsg. Try running it in Panel Browser and pressing the button.
Verify that your customized dialog appears.
|
The extended common dialog "_sysYesNoMsg" customized in the above way will be reflected when the dialog is called from all locations, including standard functions such as screen libraries. If you do not want the customization to affect dialog calls from other locations, you can display the customized common dialog individually by changing the form name of the imported common dialog to another name (for example, "Ctm_sysYesNoMsg") and specifying that form name when calling from OpenDialog. |