overview
FA-Client connects to FA-Server via Panel-Interface. When using FA-Client, first configure Panel-Interface from FA-Server. Next, configure the server-side actions, events, and other processes that will be connected from the client application. You can also download a sample application for FA-Client from the "Client Configuration Guide" page. This sample also includes definitions such as user information required for logging in from FA-Client, and can be imported and used as is.
Below we will explain the server side settings for connecting FA-Client.
|
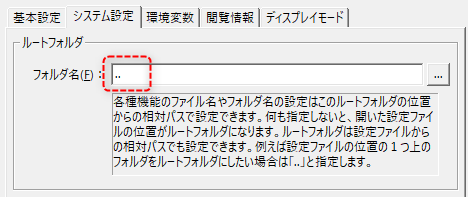
The setup procedures introduced on this page are written based on the FA-Client sample application downloaded from the "Client Setup Guide" page. The root folder of the FA-Server system settings for this sample is set to "." as shown below. This means that the folder one level above the folder in which the server settings file is stored becomes the root folder for the FA-Server application. For details, see "System Settings" in the FA-Server application settings.
(system settings root folder)
|
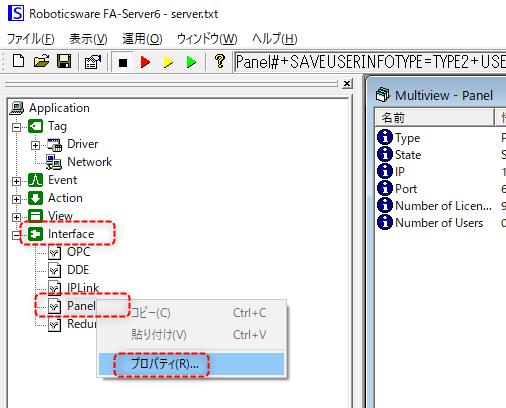
How to display the Panel-Interface settings screen
Panel-Interface settings are made from the FA-Server settings screen.
|
To open the Panel-Interface settings screen, right-click on “Panel” under “Interface” in the FA-Server tree and select “Properties”.
|
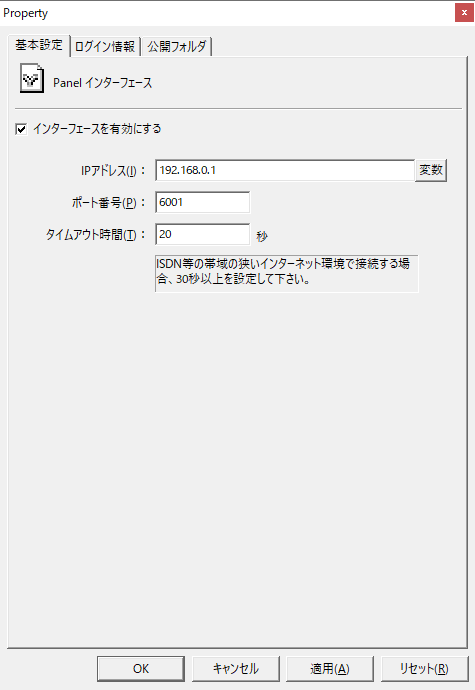
Panel-Interface/Basic settings
In the basic settings of Panel-Interface, you set the IP address, port number, etc. for communication connection from FA-Client.
|
Open the "Basic Settings" tab from the settings screen and perform the following settings.
•Check "Enable interface". •Set the server IP address for connection from FA-Client (the above is an example). •Change the port number of Panel-Interface if necessary. •Set the timeout period as necessary.
|
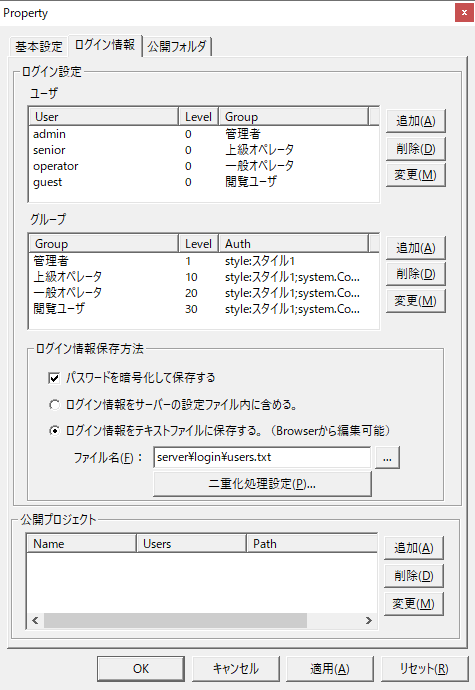
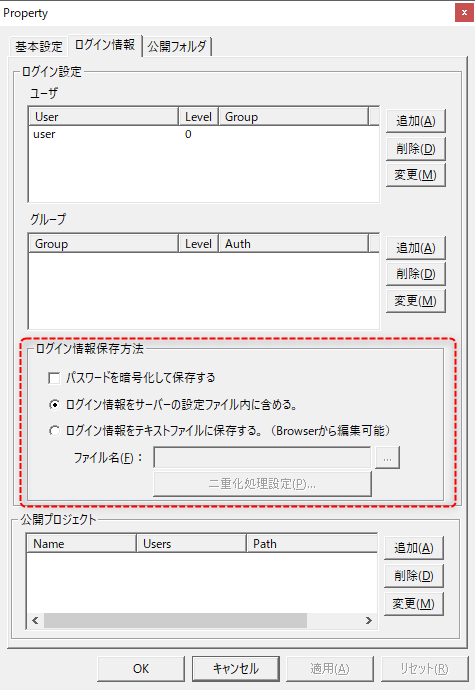
Panel-Interface/Login settings
In the Panel-Interface login settings, you can set user and group information for logging in.
|
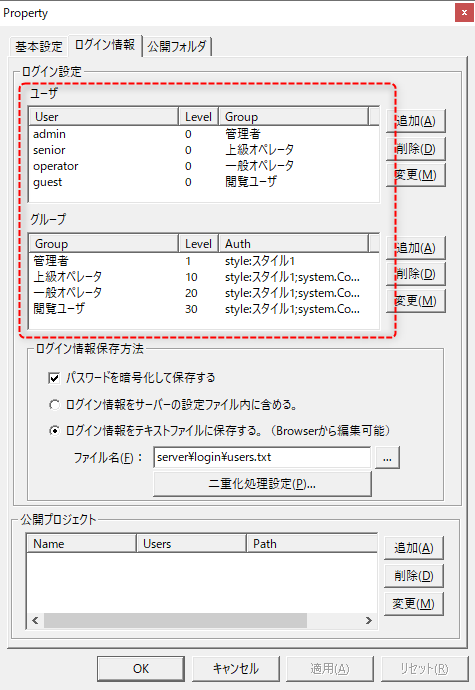
The login settings for FA-Server require the registration of user and group information required to log in from FA-Client. These definitions can be registered one by one from the settings screen shown on the left, but the easiest method of configuration is to copy and import the user and group information definition files from the server settings included in the FA-Client sample.
The FA-Client sample application comes with the information required for login pre-registered, including the following user and group information:
|
Steps for importing user information from a sample
Below are the steps to import user information from the sample.
1.Open the configuration file (server.txt) of the server you are currently building in FA-Server.
As an example, we will assume that the project being built has the following folder structure (same folder structure as the sample application).
C:\Project1
\server
server.txt...Server configuration file
\server_data
\config...Pen setting files, etc. (for public folders)
: : :...Others, logging and aggregated data, etc.
2.Open the settings screen of FA-Server's Panel-Interface and open the "Login Info" tab.
|
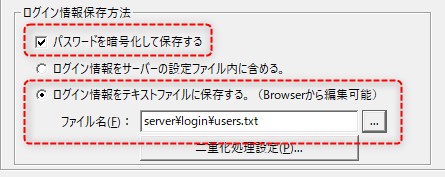
The image on the left shows that nothing has been set yet.
Of the settings on the left, please set "How to save login information" as follows.
•Check "Save passwords encrypted."
•Select "Save login information to a text file" and specify the following as the file name.
server\login\users.txt
|
3.Once you have configured the above, click OK to save and close the settings.
|
|

4.Please overwrite and save the current FA-Server settings and close FA-Server for now.
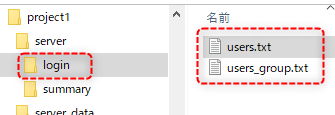
After closing FA-Server, open the above project folder (Project1) using Explorer or similar.
Please confirm that the “login” folder has been created directly under the “server” folder and that the following two text files are saved in it.
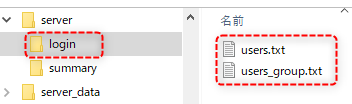
5.Next, open the sample application folder (sample01) using Explorer or similar.
Copy the following two text files in the "login" folder directly under the sample "server" folder, and paste them into the "login" folder of the project you are currently working on (Project1).Please overwrite.
6.After overwriting the file, open the server settings file you are currently working on (Project1 side) in FA-Server.
Open the Login Information tab in the Panel-Interface settings screen and verify that the sample user and group information has been imported correctly.
|
|
Panel-Interface/Public folder settings
In the Panel-Interface public folder configuration you define a public folder.
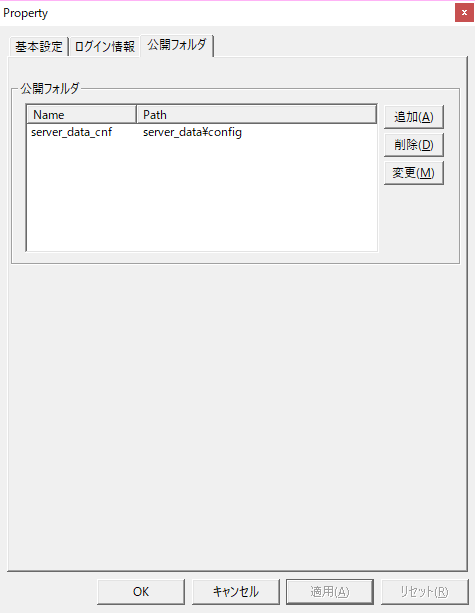
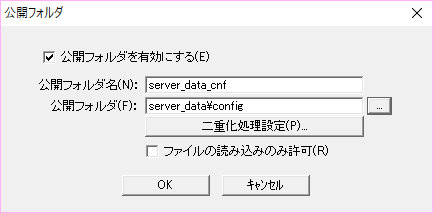
When connecting to FA-Client, you must register the public folder (server_data_cnf) required by FA-Client.The public folder is used to commonly store setting information configured on the client side. For example, the pen settings for trend graphs on a FA-Client are stored in a public folder. When operating with multiple FA-Clients, the pen settings configured on one FA-Client can also be displayed from the other FA-Clients.
|
From the Panel-Interface settings screen, open the Public Folders tab and click the “Add” button.
Then the following dialog will be displayed:
Make the following settings in the dialog and close it with the OK button.
•Enable public folder: Check •Public Folder Name: server_data_cnf •Public folder: server_data\config •Allow file reading only: Uncheck
|
Defining summary actions for the daily report screen
The FA-Client report screen connects to a summary action to display report data.
The following conditions are required for setting up a summary action:
Setting contents |
Commentary |
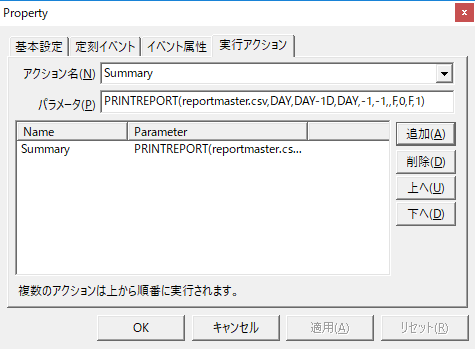
Action Name |
The default action name for the summary action connected from FA-Client is "Summary". If you want to change the name of the action to connect to, you must change the client configuration file.
For information on how to change the client configuration file, see "Client Settings".
|
Summary Section
|
When connecting to Daily/Monthly/Yearly Report from the report function, the summary name must be "DAY", "MONTH" or "YEAR".
Therefore, please set the aggregation log section of the Summary Master as follows:
[RAW::DAY] ...Definition of daily report...
[DAY::MONTH] ...Definition of monthly report...
[MONTH::YEAR] ...Definition of Annual Report...
|
In addition, the daily report has the functions of "automatic printing" and "automatic CSV output." To use these functions, the following Scheduled event must be registered.
What happens |
Scheduled event name |
Default setting date and time |
Parameters of the Run Event action |
Automatic daily report printing |
PRINTREPORT_DAY |
Everyday at 00:05 |
PRINTREPORT(reportmaster.csv,DAY,DAY-1D,DAY,-1,-1,,F,0,F,1) |
Automatic monthly report printing |
PRINTREPORT_MONTH |
00:06 on the first day of every month |
PRINTREPORT(reportmaster.csv,MONTH,MONTH-1MO,MONTH,-1,-1,,F,0,F,1) |
Automatic printing of annual reports |
PRINTREPORT_YEAR |
Every year at 00:07 on January 1st |
PRINTREPORT(reportmaster.csv,YEAR,YEAR-1Y,YEAR,-1,-1,,F,0,F,1) |
Daily report CSV automatic output |
CREATECSV_DAY |
Everyday at 00:10 |
CREATESUBREPORT(reportmaster.csv,csv_header2,CSV\DAY\DAYSUB_[GROUPID2]_[PAGEID2]_%Y%m%d.csv,DAY,DAY-1D,DAY,-1,-1,0,F,2) |
Monthly report CSV automatic output |
CREATECSV_MONTH |
1st of every month at 00:11 |
CREATESUBREPORT(reportmaster.csv,csv_header2,CSV\MONTH\MONTHSUB_[GROUPID]_[PAGEID]_%Y%m%d.csv,MONTH,MONTH-1MO,MONTH,-1,-1,0,F,2) |
Automatic output of annual report CSV |
CREATECSV_YEAR |
Every year at 00:12 on January 1st |
CREATESUBREPORT(reportmaster.csv,csv_header2,CSV\YEAR\YEARSUB_[GROUPID]_[PAGEID]_%Y%m%d.csv,YEAR,YEAR-1Y,YEAR,-1,-1,0,F,2) |
In the client connection sample, the above Scheduled event is already registered. If you want to add actions or events to your own server configuration file later, register the event by referring to the above and the sample, specify "Summary" as the event execution action, and specify the above "Event execution action parameters".
(Execution Actions tab of Scheduled event)
Defining Actions for Trend Graph Screen
The trend graph screen of FA-Client can be connected to "Logger Action", "Summary Action", and "Historical data server Action" to display trend graphs.
There is no problem with registering multiple of these actions at the same time.
When you select a pen from the trend graph screen, all fields defined in each action are listed. You can freely select the fields you want to add to the pen.
For the relationship between trend graphs and each action, please refer to "Relationship between trend graphs and server functions".