About Alarm Master
The definition of alarm conditions for Alarm server must be in a configuration file called the "alarm master".
The alarm master is a text file in CSV format, and can be freely edited with a text editor such as Notepad, Excel, etc. Alarm server actions load the alarm master when executed and monitor the alarms.
The following explains how to set the alarm master reference for an Alarm server action and the alarm master format.
Alarm Master tab settings
Alarm serverIn the "Alarm Master" tab of the action setting screen, you can set basic conditions such as the alarm master reference destination.
The setting items on the Alarm Master tab are as follows.
(Alarm Master tab)
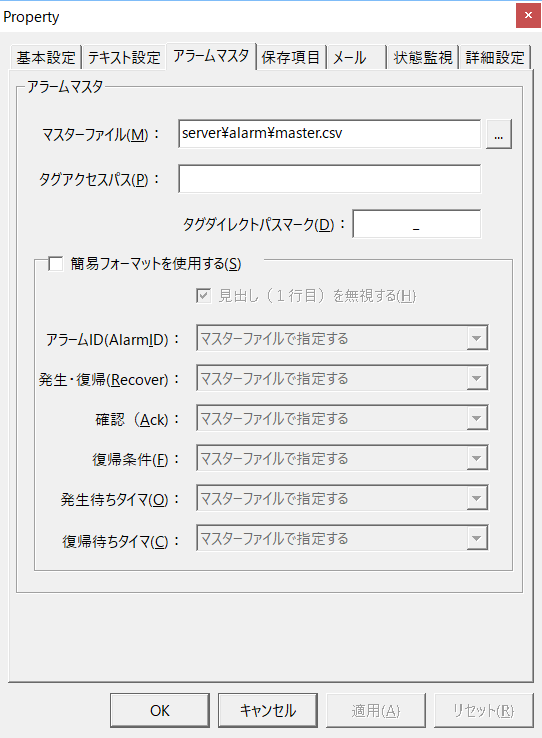
•Master File
Specifies the path name of the alarm master.
•Tag Access Path
If you specify a
tag access path, you can omit the initial string of all tag names used in the alarm master. For example, if the access path is "U01.F01.", the occurrence condition "(U01.F01.M0000 || U01.F01.M0001) && U01.F01.M0002" becomes "(M0000 || M0001) && M0002" by omitting the initial "U01.F01.".
•Tag Direct Path Mark
When you specify a tag access path, the access path string is always added to the beginning of the tag name. If you do not want to add the access path string to a specific tag, add the tag direct path mark to the beginning of the tag name.
Example: _U01!Alive
Also, if the access path is "U01.F01.", you can use this option if you want to include U02 onwards in the alarm conditions.
•Use the simple format
There are two types of master file formats: normal format and simple format. If you want to use the simple format, check "Use simple format." For more information on the simple format, see the tips below.
|
The simple format is an old specification function that remains in order to maintain compatibility with older versions. In versions prior to Ver4.0Rev5, only the simple format could be defined, but in Rev6 and later, functions such as alarm mail and tag comment fields have been expanded, and it is now possible to define two formats: the normal format (new format) and the simple format (old format). Unless there is a special reason, there is no need to use the simple format.
Disadvantages of the simple format: - Alarm email cannot be defined - Unable to define tag comment field
|

|
For more information about tag access paths and direct path marks, see "About using tag access paths". |
|
If you set a tag access path in Alarm server, you cannot include system property tags (such as U01!Alive) in the alarm conditions as is. If you want to include a system property tag in an alarm after setting a tag access path, you can do so by adding a direct path mark at the beginning. The default direct path mark is "_" (underscore). Example) '_U01!Alive' == FALSE For information on system property tags such as "U01!Alive", see "PLC Alarm monitoring for communication errors". |
Alarm master format (normal format)
The alarm master must be created as a text file in CSV format.
The standard format specifications are as follows:
First row |
This is the title line. You can freely write the column headings of the alarm master, separated by commas.
|
Second row |
Specify the type of each field to be defined in the alarm master. Specify which field is defined in which column, separated by commas.
For example, write it as follows:
[ALARMID],[RECOVER],[ACK],[ONCONDITION],[CM0],[CM1],[CM2]
Here, the format enclosed in square brackets, such as [ALARMID] or [ACK], represents a field. In the above example, the first column is interpreted as the alarm ID, the second column as whether the alarm occurred and was restored, the third column as whether the alarm was acknowledged, the fourth column as the occurrence condition, and so on.
|
From the third line |
Define each alarm. Define the information for each alarm in the order of the fields specified on the second line, separated by commas.
|
example)
Alarm ID, Occurrence recovery, Confirmation, Occurrence condition, Comment 0, Comment 1, Comment 2 |
←Title line |
[ALARMID],[RECOVER],[ACK],[ONCONDITION],[CM0],[CM1],[CM2] |
<- Field name |
0,n,n,U01.F01.M0000,M0 is abnormal. ,Line1,1 |
←Alarm definition |
1,n,n,U01.F01.M0001,M1 is abnormal. ,Line1,1 |
|
2,n,y,U01.F01.M0002,M2 is abnormal. ,Line1,2 |
When specifying a field name, specify a predefined string enclosed in square brackets ([]). The field names that can be used in Alarm Master are as follows:
Field Name |
Commentary |
||||||||||||
[ALARMID] |
The alarm ID is an index (characters) assigned to each alarm. The alarm ID is a number (characters) to identify an alarm, and is used in various situations. Since it is a number (characters) that is uniquely assigned to each alarm, it can be used like an error code. Furthermore, if you assign characters such as a tag name to the alarm ID instead of a number, you can define it in the alarm master without worrying about duplication when you want to insert or add an alarm later. Also, if this field is omitted, a consecutive number starting from 0 will automatically be assigned internally as the ID. However, please note that if a new alarm is inserted in the middle of an alarm master after the operation of Alarm server, the alarm IDs after the inserted alarm may shift, and consistency with past alarm data may not be maintained. If you want to add a new alarm with automatic ID assignment in effect, be sure to add it to the end of the alarm master.
|
||||||||||||
[RECOVER] |
Define whether or not an alarm occurs and is restored with lowercase "y" or "n". If you set this to "y" (yes), separate alarm events will occur when an alarm occurs and when it is restored. If you want to perform alarm monitoring, specify "y". If this field is omitted, all fields will be set to "y". On the other hand, if you specify "n" (none), a record will be generated only when an event occurs and will be ignored when the event is restored. Specify "n" when registering events such as operation history.
|
||||||||||||
[ACK] |
Define whether or not to "acknowledge" with "y" or "n". If you select "acknowledge", you can acknowledge the alarm from the screen. If you omit this field, all fields will be "y". Alarms that are set to "no acknowledgement" will automatically return without acknowledgement (when an alarm returns, it will automatically be removed from the alarm summary).
|
||||||||||||
[ONCONDITION] |
This is the condition for the alarm to occur. This field is required. For example, if you want to generate an alarm when TAG01 turns ON, enter "TAG01". You can also enter an expression as the condition for the alarm to occur.
For example, you can write the condition as an expression like "TAG01 * 2 > 10 || TAG02".
In addition, you can include a communication error with the PLC in the alarm conditions. For information on how to define it, see "PLC Alarm monitoring for communication errors".
|
||||||||||||
[OFFCONDITION] |
Optionally, write the alarm recovery condition. The alarm will be recovered when the specified condition becomes FALSE. If omitted, the alarm will be considered to be recovered when the occurrence condition becomes FALSE.
For example, if the occurrence condition is TAG01 > 10 and the return condition is TAG01 > 5, an alarm will occur when the value becomes 10 or greater, and the alarm will not return to normal until the value becomes 5 or less.
|
||||||||||||
[ONTIMER] |
This is the timer until an alarm occurs (seconds). If the alarm remains ON for the specified time, the alarm will occur. If the occurrence condition is cleared within the waiting time, the alarm will not occur. If you do not need a particular occurrence waiting timer, you can omit this field.
|
||||||||||||
[OFFTIMER] |
This is the timer until the alarm is restored (seconds). If the alarm remains OFF for the specified time, the alarm is restored. If the restoration condition is cleared within the waiting time, the alarm will not be generated. If you do not need a restoration wait timer, you can omit this field.
|
||||||||||||
[OUTPUTTAG0:xxx] ~ [OUTPUTTAGn:xxx] |
Set this if you want to link the alarm state to a tag. Specify the field name you want to output in the xxx part. You can also write an arithmetic expression. For information on field names, see "About Field Names". For information on the calculation expression syntax, see "Calculation Expression Syntax".
In addition, the status of multiple alarms can be output to separate tags by setting OUTPUTTAG0:xxx, OUTPUTTAG1:xxx, OUTPUTTAG2:xxx.
Example) [OUTPUTTAG0:[CM0]] Example) [OUTPUTTAG0:[STATE]] Example) [OUTPUTTAG0:[CONDID2]] Example) [OUTPUTTAG0:[ACK]] Example) [OUTPUTTAG0:[RECOVER]] Example) [OUTPUTTAG0:[STATE] + ":" + [CONDID2]]
(Note 1) By using something like [OUTPUTTAG0:CM0], you can write a comment about when the event occurred in the tag. For example, if multiple occurrence conditions are set for the same AlarmId, such as HIHI/HI/LO/LOLO, you can enter the alarm level value in the CM0 column and link the alarm state to a tag. However, in this case, there is one thing to note. When an alarm is reset, there is no value to take as a comment, so the value of the state from the previous time it was generated is retained. If you want to set it to 0 when it is reset, write it as follows.
[OUTPUTTAG0:{[RECOVER]}{0},{default}{[CM0]}]
*If you want to output the alarm level value to a tag like in the example above, [OUTPUTTAG0:[STATE]] can also be used instead.
(Note 2) The output tag can also be linked to a PLC tag, but because alarm processing can be slow when a large number of alarms occur, you should usually create a memory tag and define it as the output tag.
|
||||||||||||
[MAIL] |
If you want to send an alarm email, set this field.
There are various timings for alarms, such as occurrence, recovery, confirmation, and change. The timing at which you want to send an email is set in the [MAIL] field. In the [MAIL] field, set a combination of the following keywords for each alarm.
If you want multiple occurrences, list the keywords separated by spaces. For example, if you want to send an email when an alarm occurs and is recovered, you would enter "new recover". Conversely, if you do not want to send an email for an alarm, do not write anything. Note that if you specify "#" at the beginning of the string defined in this field, it will behave the same as if no specification was made.
For details, please refer to "Sending alarm emails".
|
||||||||||||
[CM0] ~ [CMn] |
This is a text comment. You can set as many comments as you need. There is no limit to the number that can be set. This is mainly used for alarm messages, etc. You can define multiple comments by defining [CM0], [CM1], [CM2], etc.
|
||||||||||||
[CM0:TAG] ~ [CMn:TAG] |
Tag comments can include any tag value as a comment when an alarm occurs. You can set as many tag comments as you want. You cannot specify a number that overlaps with a text comment. When using tag comments, in addition to defining them in the alarm master, you must add the tag comment column to the saved items from the Alarm server action "Saved items" tab. For details, see "Include tag values in alarm messages" in this manual.
|
|
[ONCONDITION] is a required setting for the alarm master. Other fields do not need to be written in the alarm master if they are not required. If they are not written, the default settings will be used. For example, if there is no [ALARMID] field, an ID will be automatically assigned starting from 0. |
|
The order of the fields is up to you. For example, you don't have to write [ALARMID] at the left end. You can write the [RECOVER] column first. |
|
When using "," in text such as comments, enclose it in double quotation marks (*If you are using Excel, using "," will automatically enclose it in double quotation marks when saved).
example) 0,n,n,U01.F01.M0000,"M0 is abnormal., Importance [High]",Line1,1
|
Below is an example of an alarm master file created in the standard format.
Alarm ID, |
Conditions for occurrence: |
Comments 0, |
Comment 1, |
Comment 2 |
[ALARMID], |
[ONCONDITION], |
[CM0], |
[CM1], |
[CM2] |
1, |
M0, |
Pump abnormality. |
Group1, |
1 |
2, |
D0 > 10, |
High temperature abnormality. |
Group1, |
2 |
3, |
M1, |
Motor abnormality. |
Group2, |
1 |
4, |
M2 && M3, |
Water level abnormal. |
Group2, |
1 |
5, |
D1> 80, |
It has exceeded HIHI. |
Group3, |
2 |
5, |
D1 > 60, |
Exceeded HI. |
Group3, |
2 |
5, |
D0 < 20, |
It has exceeded LOLO. |
Group3, |
2 |
5, |
D0 < 40, |
LO has been exceeded. |
Group3, |
2 |
For alarm ID:1, M0 is set as the occurrence condition. When M0 turns ON, this alarm occurs.
For alarm ID:4, M2 && M3 is set as the occurrence condition. This means that the alarm will only occur when both M2 and M3 are ON. You can also write more complex conditions such as "M2 || M3" or "(M2 || M3) && M4".
In alarm ID:5, four conditions are defined for one alarm (you can also define multiple lines like this). An alarm will occur if any of the four conditions are met. With this alarm setting, if another alarm condition is detected between the first alarm occurrence and recovery, an alarm record with the alarm type "change" will be created. For example, when D1 changes from 58 to 62, the alarm type will be "occurrence". If D1 subsequently exceeds 80 without the alarm being recovered, an alarm record with the alarm type "change" will be created. Due to this action, the message "Exceeded HI" will be updated to "Exceeded HIHI" in the summary screen. In the alarm history, a record with the alarm type "change" (change) will be added, as well as "new" (occurrence), "recover" (recovery), and "ack" (acknowledgement).
|
If multiple conditions are defined on multiple lines for the same alarm ID, the following behavior will occur:
•The conditions are evaluated in order starting from the first line. •For the field name items below, the values defined in each line will be used, but for other field name items, the settings in the first line will take precedence. [ONCONDITION] / [OFFCONDITION] / [CM0] ~ [CMn] / [CM0:TAG] ~ [CMn:TAG]
|
|
The operators and functions that can be used are based on "Operation Expression Syntax". |
|
Alarms defined as "occurrence and no recovery" or "no acknowledgement" are not displayed on the alarm summary screen. Such alarms are called "events". |
|
For event type alarms ("No recovery from occurrence", "No confirmation"), if the device alarm condition is already ON when Panel Server is switched from offline to online, an alarm will be generated immediately after it is switched online. Similarly, if Panel Server is switched from online to offline to online again while the device alarm condition remains ON, an alarm will be generated again. This is normal behavior because event type alarms do not have recovery information. If you want to prevent an alarm from being generated every time Panel Server is switched online, define the alarm with recovery from occurrence. In this case, you can create a screen equivalent to the event display by setting the Panel Server side as an alarm with recovery from occurrence and hiding the alarm information that notifies of recovery on the Panel Browser side alarm screen. |

Alarm master format (simple format)
If you want to use the simple format of the alarm master, check "Use simple format".
|
The simple format is an old specification function that is left in order to maintain compatibility with older versions. Unless you have a special reason, you do not need to use the simple format. |
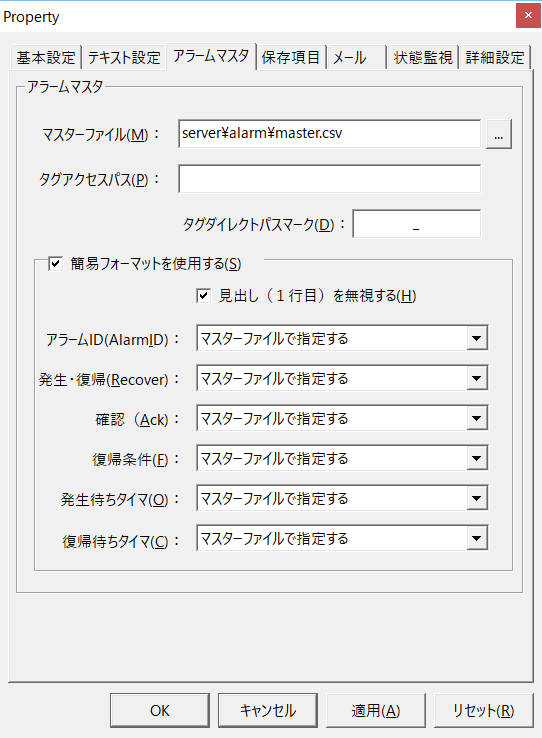
The format is determined by each combo box (alarm ID, occurrence/recovery, etc.). In the alarm master, write the following order, separated by commas, according to the combo box selection. Fields that are not required are not written. Write as many columns of comments as you like in the alarm master.
field |
Commentary |
Alarm ID |
Required if you select "Specify in master file." |
Occurrence and recovery |
Required if you select "Specify in master file." |
confirmation |
Required if you select "Specify in master file." |
Occurrence waiting timer |
Required if you select "Specify in master file." |
Recovery wait timer |
Required if you select "Specify in master file." |
Conditions |
Mandatory. |
Return Condition |
Required if you select "Specify in master file." |
Comments 0 |
Free. |
Comment 1 |
Free. |
Comments 2 |
Free. |
… |
… |
Example 1)
If you select "Specify in master file" for all and need two comments, the alarm master format is as follows:
"Alarm ID, occurrence/recovery, confirmation, occurrence wait timer, recovery wait timer, occurrence condition, recovery condition, comment 0, comment 1"
Example 2)
If you select "Specify in master file" for only "Alarm ID" and need one comment, the alarm master format will be as follows.
"Alarm ID, occurrence condition, comment 0"
Ignore the heading (first line)
The alarm master can include a header on the first line. If you want to include a header in the master, enable this check.
▪Alarm ID
An alarm ID is an index number (letters) assigned to each alarm. An alarm ID is a number (letters) to identify an alarm and is used in various situations. Because it is a number (letters) that is uniquely assigned to each alarm, it can be used like an error code.
If you select "Specify in master file", you can assign any number (letter) as the alarm ID. This number (letter) does not need to be assigned from 0, and does not need to be consecutive. However, you cannot specify duplicate numbers (letters). After operation of Alarm server begins, you can edit, add, and insert alarms, but you cannot change the ID. If you assign characters such as tag names to the alarm ID instead of assigning numbers, it is convenient because you can define them in the alarm master without worrying about whether they are duplicated when you want to insert or add alarms later.
If you select "Allocate automatically", IDs will be automatically assigned and you will not need to specify IDs in the master file. However, if you insert a new alarm in the middle of the alarm master after the operation of Alarm server, the alarm IDs after the inserted alarm may shift, and consistency with past alarm data may not be maintained. If you want to add a new alarm with automatic ID assignment, be sure to add it to the end of the alarm master.
▪Occurrence and recovery
If you select "Specify in master file", you can specify in the master file whether occurrence and recovery are necessary for each alarm. In the master file, specify "y" if occurrence and recovery are necessary, or "n" if they are not necessary.
If you select "Alarms with occurrence and recovery", all alarms will be considered as alarms with occurrence and recovery, and there will be no need to specify them in the master file.
If you select "Alarms with no occurrence or recovery", all alarms will be considered as alarms with no occurrence or recovery, and there will be no need to specify them in the master file.
▪confirmation
If you select "Specify in master file", you can specify in the master file whether confirmation is required for each alarm. In the master file, specify "y" if confirmation is required, or "n" if confirmation is not required.
If you select "Mark as acknowledged alarms", all alarms will be considered acknowledged. There is no need to specify this in the master file. Similarly, if you select "Mark as unacknowledged alarms", all alarms will be considered unacknowledged. Again, there is no need to specify this in the master file.
▪Return Condition
You can specify any alarm recovery condition. The alarm will be restored when the condition specified here becomes FALSE. For example, if the occurrence condition is TAG01 > 10 and the recovery condition is TAG01 > 5, the alarm will occur when the value becomes 10 or more, and the alarm will not be restored until it becomes 5 or less.
If you select "Specify in master file", you can specify the return condition for each alarm in the master file. If you select "Do not specify return condition", the opposite condition of the occurrence condition will be considered as return, and in this case there is no need to specify it in the master file.
▪Occurrence waiting timer
If you specify a wait timer, the alarm will only occur if the condition persists for the wait time. If the condition is removed within the wait time, the alarm will not occur.
If you select "Specify in master file", you can specify the occurrence waiting timer for each alarm in the master file. The time unit is seconds.
If you select "Do not specify an occurrence waiting timer", this setting is considered to have been omitted, in which case there is no need to specify it in the master file.
▪Recovery wait timer
If you specify a recovery wait timer, an alarm will occur only if the recovery condition continues for the wait time. If the recovery condition is released within the wait time, no alarm will occur. If you select "Specify in master file", you can specify a recovery wait timer for each alarm in the master file. The time is specified in seconds. If you select "Do not specify a recovery wait timer", there is no need to specify it in the master file.
Below is an example of creating an alarm master in the simple format. All alarms have "occurrence/recovery" and "acknowledgement" columns, and there are columns for "message," "group," and "importance" as comments.
Alarm server settings:
Simple format |
check |
Heading |
Yes |
Alarm ID |
Select "Specify in master file". |
Occurrence and recovery |
Select "Alarm with occurrence and recovery." |
confirmation |
Select "Alarm with confirmation." |
Return Condition |
Select "Do not specify a return condition." |
Occurrence waiting timer |
Select "Do not specify an occurrence waiting timer." |
Recovery wait timer |
Select "Do not specify a recovery wait timer." |
Example of an alarm master file:
Alarm ID, |
Conditions for occurrence: |
Comments 0, |
Comment 1, |
Comment 2 |
1, |
M0, |
Pump abnormality. |
Group1, |
1 |
2, |
D0 > 10, |
High temperature abnormality. |
Group1, |
2 |
3, |
M1, |
Motor abnormality. |
Group2, |
1 |
4, |
M2 && M3, |
Water level abnormal. |
Group2, |
1 |
5, |
D1> 80, |
It has exceeded HIHI. |
Group3, |
2 |
5, |
D1 > 60, |
Exceeded HI. |
Group3, |
2 |
5, |
D0 < 20, |
It has exceeded LOLO. |
Group3, |
2 |
5, |
D0 < 40, |
LO has been exceeded. |
Group3, |
2 |
M0 is set as the occurrence condition for alarm ID 1. When M0 turns ON, this alarm occurs.
For alarm ID 4, M2 && M3 is set as the trigger condition. This means that the alarm will only be triggered when both M2 and M3 are ON. You can also write more complex conditions such as "M2 || M3" or "(M2 || M3) && M4". The operators and functions that can be used are based on "Calculation Expression Syntax".
Alarm ID 5 defines four conditions for one alarm (you can also define multiple lines like this). Any of the four conditions will cause an alarm to occur. With this alarm setting, if another alarm condition is detected between the initial alarm occurrence and recovery, an alarm record with the alarm type "change" will be created. For example, when D1 changes from 58 to 62, the alarm type will be "occurrence". If D1 subsequently exceeds 80 without the alarm being recovered, an alarm record with the alarm type "change" will be created. This action will cause the message "Exceeded HI" to be updated to "Exceeded HIHI" in the summary screen. In the alarm history, a record with the alarm type "change" will be added, as well as "new" (occurrence), "recover" (recovery), and "ack" (acknowledgement).