Split display settings screen
Layout setting screen
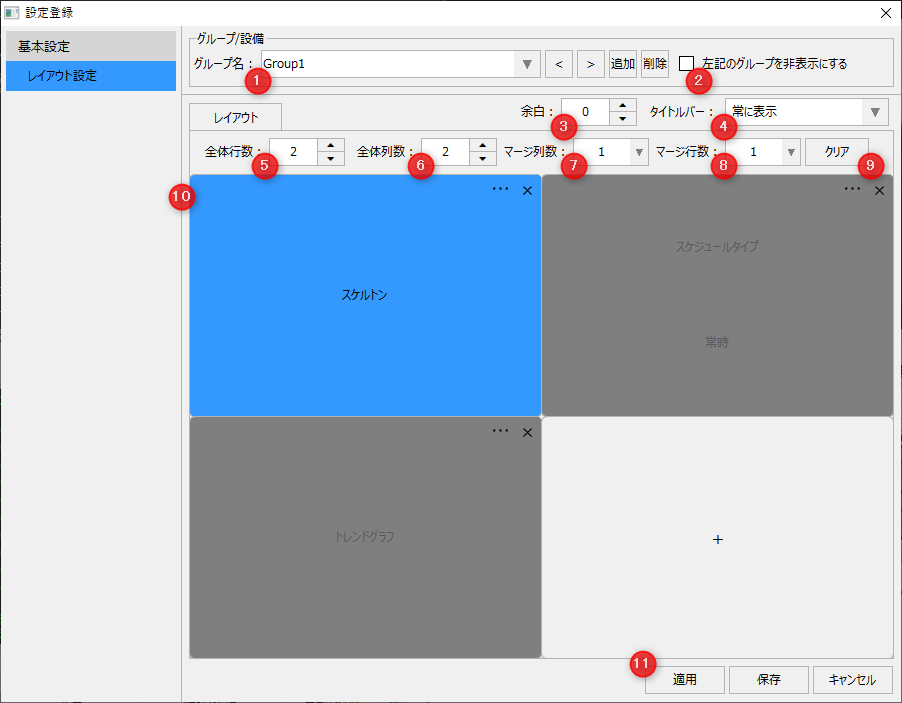
# |
name |
explanation |
||||||||
|---|---|---|---|---|---|---|---|---|---|---|
1 |
Group Name
|
Select the target group. You can change the name by directly editing it. Click the Add button to add a new group, or click the Delete button to delete the selected group. |
||||||||
2 |
Hide the group on the left |
If you check this box, you can hide the group from the group selection combo box on the split screen. Use this when you want to hide a group temporarily. |
||||||||
3 |
margin
|
You can set the margins of the split screen display frame in pixels. |
||||||||
4 |
Title Bar
|
This is the common setting for the title bar of each display frame in the selected group. You can choose from the following:
|
||||||||
5 |
Total number of lines
|
Specify the number of lines to display for the group. The default setting allows you to specify up to 10 lines.
|
||||||||
6 |
Total number of columns
|
Specify the number of columns to split the group into. The default setting allows you to specify up to 10 columns. |
||||||||
7 |
Merge Column Count
|
Specifies the number of columns to merge down, starting from the currently selected frame.
|
||||||||
8 |
Merge Row Count
|
Specifies the number of rows to the right of the currently selected frame.
|
||||||||
9 |
Clear button
|
Initializes the settings of each display frame. |
||||||||
10 |
Split display area
|
Set the layout of the split display area. Clicking a display frame that has nothing assigned to it will display the Display List dialog, where you can select a screen or camera from the list. You can also specify the display position of the equipment by dragging and dropping. If you drop it on a location where equipment is already set, the display position will be swapped with the original selection only if the display frames are the same size. Clicking the display frame selection button "..." will pop up the "Display List Dialog" and allow you to change the display settings from the screen. Clicking the Delete button (x) of a display frame will remove the display target assigned to that display frame. |
||||||||
11 |
Application/ keep/ |
|
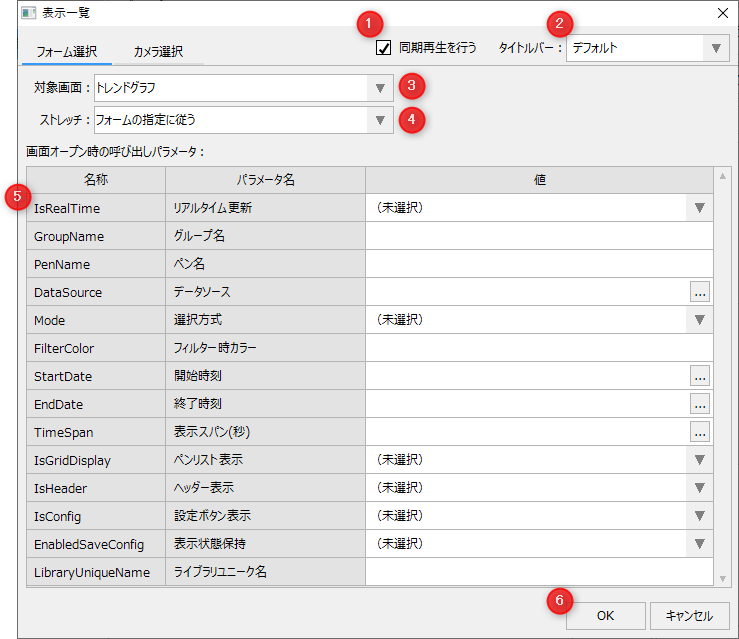
Select the screen or camera to display in the split screen frame. You can switch between "Form Selection" and "Camera Selection" using the tabs at the top of the screen.
(Display List/Form Selection)
# |
name |
explanation |
||||||||||||
|---|---|---|---|---|---|---|---|---|---|---|---|---|---|---|
1 |
Synchronized Playback
|
Set whether or not the screen assigned to the display frame is subject to synchronous playback. For example, in a function that displays history by specifying a date and time, such as a trend graph screen, the same date and time will be displayed during synchronous playback in a split display. Note that this setting will be ignored for screens that are not related to synchronous playback, such as graphic screens.
|
||||||||||||
2 |
Title Bar
|
This is the title bar setting for the currently selected display frame. You can choose from the following:
|
||||||||||||
3 |
Target screen
|
Select the screen to be displayed in the display frame from the combo box. The combo box displays a list of screens that can be added to the menu.
|
||||||||||||
4 |
stretch
|
This is the stretching setting when displaying in the display frame. You can choose from the following:
|
||||||||||||
5 |
Call parameters when the screen is opened |
You can specify parameters for screens that have open parameters, such as screen libraries. For information on open parameters, see "About open parameters in the screen library".
|
||||||||||||
6 |
OK/ |
|

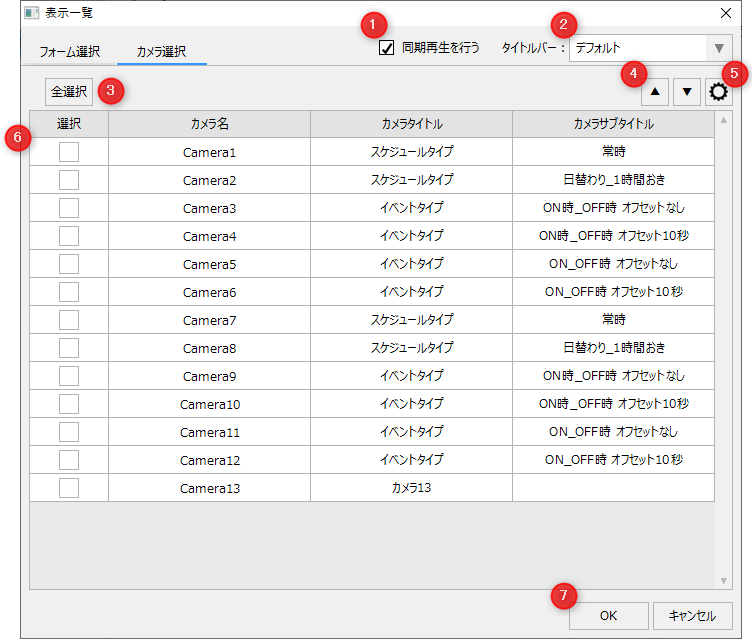
(Display list/Camera selection)
# |
name |
explanation |
||||||||||
|---|---|---|---|---|---|---|---|---|---|---|---|---|
1 |
Synchronized Playback |
Set whether or not to target the camera assigned to the display frame for synchronous playback. When synchronous playback is enabled, the video of the same date and time will be targeted for synchronous playback on the split display screen.
|
||||||||||
2 |
Title Bar
|
This is the title bar setting for the currently selected window. You can choose from the following:
|
||||||||||
3 |
FullSelect
|
Clicking this button will select the check marks for all cameras in the camera list at once. |
||||||||||
4 |
Up and down buttons
|
Edit the display order of cameras in the list. Move the camera in the currently focused row up or down one row. |
||||||||||
5 |
Settings button
|
Click this button to call up the camera registration. For details on how to register a camera, please refer to "Camera Registration" in the Surveillance System Construction Guide.
|
||||||||||
6 |
Camera List
|
The cameras registered in the above camera registration will be displayed in a list. If you check the "Select" column and click the OK button, the camera will be assigned to the corresponding display frame in the split display. If you check multiple rows and click the OK button, the cameras will be assigned to multiple display frames in a batch, starting from the currently selected display frame and moving downwards to the right. |
||||||||||
7 |
OK/ |
|